

- Introduction
- How To Build
- Creating
- Setting Data
- Virtual Data Mode
- Virtual Bookmarks
- Custom Colors
- Templates
- Methods
Expand
- ClearData
- Create
- CreateDialogCtrl
- Delete
- DestroyWindow
- ExecuteCmd
- GetActualWidth
- GetBookmarks
- GetCacheSize
- GetCapacity
- GetCaretPos
- GetCharsExtraSpace
- GetCodepage
- GetColors
- GetData
- GetDataSize
- GetDateInfo
- GetDlgItemHandle
- GetFont
- GetGroupSize
- GetMenuHandle
- GetOffset
- GetPagesCount
- GetPagePos
- GetPageSize
- GetScrollRatio
- GetSelection
- GetTemplates
- GetUnprintableChar
- GetWndHandle
- GoToOffset
- HasInfoBar
- HasSelection
- HitTest
- IsCmdAvail
- IsCreated
- IsDataSet
- IsHexCharsUpper
- IsMutable
- IsOffsetAsHex
- IsOffsetVisible
- IsVirtual
- ModifyData
- PreTranslateMsg
- Redraw
- SetCapacity
- SetCaretPos
- SetCharsExtraSpace
- SetCodepage
- SetColors
- SetConfig
- SetData
- SetDateInfo
- SetDlgProperties
- SetFont
- SetGroupSize
- SetHexCharsCase
- SetMutable
- SetOffsetMode
- SetPageSize
- SetRedraw
- SetScrollRatio
- SetSelection
- SetUnprintableChar
- SetVirtualBkm
- SetWindowPos
- ShowInfoBar
- Structures
- Interfaces
- Enums
- Notification Messages
Expand
- HEXCTRL_MSG_BKMCLICK
- HEXCTRL_MSG_CONTEXTMENU
- HEXCTRL_MSG_DESTROY
- HEXCTRL_MSG_DLGBKMMGR
- HEXCTRL_MSG_DLGCODEPAGE
- HEXCTRL_MSG_DLGDATAINTERP
- HEXCTRL_MSG_DLGGOTO
- HEXCTRL_MSG_DLGMODIFY
- HEXCTRL_MSG_DLGSEARCH
- HEXCTRL_MSG_DLGTEMPLMGR
- HEXCTRL_MSG_MENUCLICK
- HEXCTRL_MSG_SETCAPACITY
- HEXCTRL_MSG_SETCARET
- HEXCTRL_MSG_SETCODEPAGE
- HEXCTRL_MSG_SETDATA
- HEXCTRL_MSG_SETFONT
- HEXCTRL_MSG_SETGROUPSIZE
- HEXCTRL_MSG_SETSELECTION
- Licensing
HexCtrl is the fully-featured Hex Control written in pure Win32 API.
- View and edit data up to 16EB (exabyte)
- Two working modes: Memory and Virtual Data Mode
- Fully-featured Bookmarks Manager
- Fully-featured Search and Replace
- Fully-featured Data Interpreter
- Grouping data with arbitrary group size
- Changeable codepage for the text area
- Many options to Copy/Paste to/from clipboard
- Modify data with Filling and many predefined Operations options
- Undo/Redo
- Ability to visually divide data into pages
- Print whole document/pages range/selection
- Customizable colors for data with Custom Colors
- Powerful system of Templates
- Assignable keyboard shortcuts via external config file
- Customizable look and appearance, font, colors
- High-DPI compliant
- Utilizes AVX/AVX2 instruction set for best performance
- Supports compiling for the ARM64 architecture
- Written with the /std:c++20 standard conformance

git clone https://github.com/jovibor/HexCtrl.git
To build HexCtrl from the sources:
- Add all files from the
HexCtrlfolder into your project - Make sure to disable Precompiled Header usage for all
*.ixxfiles in the project - Add
#include "HexCtrl.h" - Declare HexCtrl object:
auto myHex { HEXCTRL::CreateHexCtrl() }; - Create control instance
Note
You can skip adding rapidjson-amalgam.h into your project, to avoid polluting project’s global namespace.
To build and use HexCtrl as a DLL:
- Build HexCtrl{x86/x64/ARM64}.dll and HexCtrl{x86/x64/ARM64}.lib with the HexCtrl DLL.vcxproj project
- Include
HexCtrl.hinto your project - Add
/DHEXCTRL_DYNAMIC_LIBcompiler option, or alternatively#defineit before includingHexCtrl.h:#define HEXCTRL_DYNAMIC_LIB #include "HexCtrl.h"
- Declare
IHexCtrlPtrobject:auto myHex { HEXCTRL::CreateHexCtrl() }; - Create control instance
First you need to create HexCtrl object:
auto myHex { HEXCTRL::CreateHexCtrl() };Then call the Create method, which takes the HEXCREATE struct with the all necessary information for the HexCtrl creation. The HEXCREATE::dwStyle and dwExStyle are window and extended window styles respectively, set these styles according to your needs. For all available options see the HEXCREATE struct description.
To use HexCtrl in a Dialog you can create it with the Classic Approach: call Create method and provide all the necessary information.
But there is another option:
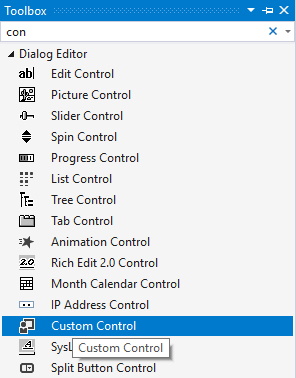
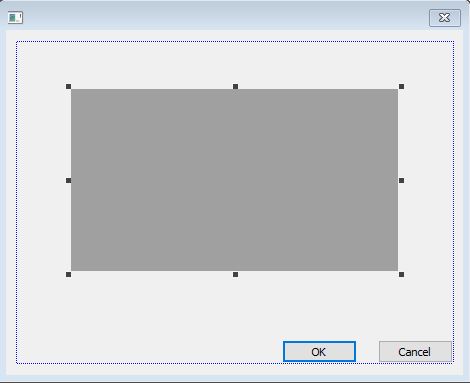
- Put the Custom Control from the Toolbox in Visual Studio dialog designer onto your dialog template.


- In the Properties of this control in the Class field within the Misc section write: HexCtrl_MainWnd.
- Declare
IHexCtrlPtrmember variable within your dialog class:HEXCTRL::IHexCtrlPtr m_myHex { CreateHexCtrl() }; - Call the
CreateDialogCtrlmethod from dialog’sOnInitDialogmethod.BOOL CMyDialog::OnInitDialog() { CDialogEx::OnInitDialog(); m_myHex->CreateDialogCtrl(IDC_MY_HEX, m_hWnd); }


[[nodiscard]] IHexCtrlPtr CreateHexCtrl();This is the main factory function for creating HexCtrl object. The IHexCtrlPtr class is a IHexCtrl interface pointer wrapped into a standard std::unique_ptr with custom deleter, so you don’t need to worry about its destruction.
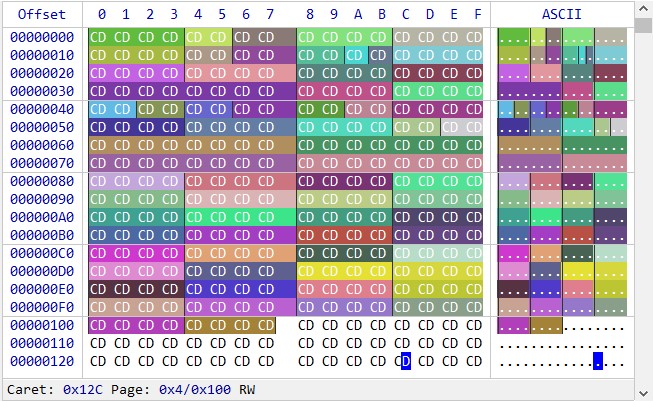
To set a data for the HexCtrl the SetData method is used. The code below shows how to construct HexCtrl object and display first 0x1FF bytes of the current app’s memory:
IHexCtrlPtr myHex { CreateHexCtrl() };

HEXCREATE hcs;
hcs.hWndParent = m_hWnd;
hcs.rect = {0, 0, 600, 400}; //Window rect.
myHex->Create(hcs);

HEXDATA hds;
hds.spnData = { reinterpret_cast<std::byte*>(GetModuleHandle(nullptr)), 0x1FF };
myHex->SetData(hds);
The next example shows how to display std::string‘s text as hex data:
std::string str = "My string";
HEXDATA hds;
hds.spnData = { reinterpret_cast<std::byte*>(str.data()), str.size() };
myHex->SetData(hds);Besides the standard mode, when the HexCtrl just holds a pointer to a data in a memory, it can also work in the Virtual mode. This mode can be useful in cases where you need to display a very large amount of a data that can’t fit in the memory all at once.
If HEXDATA::pHexVirtData pointer is set, then the whole data routine will be done through it. This pointer is of IHexVirtData class type, which is a pure abstract base class.
You have to derive your own class from it and implement all its public methods.
Then provide a pointer to the created object of this derived class through the HEXDATA::pHexVirtData member, prior to call the SetData method.
HexCtrl has innate functional to work with any amount of bookmarked regions. These regions can be assigned with individual background and text colors and description.
But if you have big and complicated data logic and want to handle all these bookmarks yourself, you can do it with the help of the Virtual Bookmarks mode. In this mode all bookmark’s burden is handled by yourself, by implementing the IHexBookmarks interface and providing pointer to this implementation to the HexCtrl by calling the SetVirtualBkm method.
If you’d like to colorize data regions with your own custom colors, use the IHexVirtColors interface.
To use it set the HEXDATA::pHexVirtColors member to a valid instance of your own class that implements this interface, prior to calling the SetData method.
The OnHexGetColor method of this interface takes HEXCOLORINFO struct as an argument. The HEXCOLORINFO::ullOffset member indicates the offset for which the color is requested. This method should return true if it sets custom colors for the given offset or false for default colors.

HexCtrl‘s templates is a powerful system of a data structures’ description with a simple .json file. These files can be loaded through the HexControl‘s internal template manager, or through the API.
{
    "$schema": "https://raw.githubusercontent.com/jovibor/HexCtrl/master/docs/HexCtrl.Templates.Schema.json",
    "TemplateName": "SampleTemplate",
    "Data": {
        "endianness": "little",
        "clrBk": "#999999",
        "clrText": "#FFFFFF",
        "Fields": [
            {
                "name": "MyCustomDataSingle",
                "type": "MyCustomType"
            },
            {
                "name": "CustomComplexData",
                "type": "MyCustomComplexType"
            },
            {
                "name": "ArrayOfDWORDs",
                "type": "DWORD",
                "array": 10
            },
            {
                "name": "MyCustomDataArray",
                "type": "MyCustomType",
                "array": 4
            }
        ]
    },
    "CustomTypes": [
        {
            "TypeName": "MyCustomType",
            "Fields": [
                {
                    "name": "myCustomTypeField1",
                    "type": "DWORD"
                },
                {
                    "name": "myCustomTypeField2",
                    "type": "DWORD"
                }
            ]
        },
        {
            "TypeName": "MyCustomComplexType",
            "Fields": [
                {
                    "name": "MyCustomTypeData1",
                    "type": "MyCustomType"
                },
                {
                    "name": "MyCustomTypeData2",
                    "type": "MyCustomType"
                }
            ]
        }
    ]
}
Every such file contains the following properties:
- TemplateName [mandatory, string] – the name of the template
- Data [mandatory, object] – main object that contains all template field’s information
- CustomTypes [optional, array] – array of a user defined types, that can be then referenced in the type property of the Fields
CustomTypes objects are the same as Fields objects, the only difference is the TypeName property which Fields objects don’t have.
Every Data or CustomType object contains Fields property with actual struct members.
Fields [array] – is an array of objects where every object represents a struct data member. Any such object can have its own Fields sub-objects, which will represent nested structs.
The Fields‘s properties include:
- name – [mandatory, string] – name of the field
- description – [optional, string] – field description
- type – [optional, string] – field type, such as:
bool,char,unsigned char,byte,short,unsigned short,WORD,long,unsigned long,int,unsigned int,DWORD,long long,unsigned long long,QWORD,float,double,time32_t,time64_t,FILETIME,SYSTEMTIME,GUID, or any custom type defined in the CustomTypes section - size – [optional, int] – size of the field in bytes, if the type field is not provided
- array – [optional, int] – size of the array, if the given field is an array of fields
- endianness – [optional, string] – field endianness, “little” or “big”. By default all fields are little-endian.
- clrBk – [optional, string] – field background color
- clrText – [optional, string] – field text color
The endianness, clrBk and clrText properties that locate at the same level as the Fields property, would mean the default properties for all the Fields objects of that level and below the line, unless they explicitly redefined in the field itself.
For the available templates check the Templates directory.
The HexCtrl has plenty of methods that you can use to manage its behavior.
void ClearData();Clears data from the HexCtrl view, not touching data itself.
bool Create(const HEXCREATE& hcs);Main initialization method. Takes the HEXCREATE struct as argument. Returns true if created successfully, false otherwise.
bool CreateDialogCtrl(UINT uCtrlID, HWND hwndDlg);Creates HexCtrl from a Custom Control dialog’s template. Takes control id, and dialog’s window handle as arguments. See Creating section for more info.
void Delete();Deletes the HexCtrl object. You only use this method if you want, for some reason, to manually delete the HexCtrl object, otherwise IHexCtrlPtr will invoke this method automatically.
Important
You usually don’t need to call this method unless you use the HexCtrl through a raw pointer. If you use HexCtrl in the standard way, through the IHexCtrlPtr pointer obtained by the CreateHexCtrl function, this method will be called automatically.
void DestroyWindow();Destroys the HexCtrl main window.
void ExecuteCmd(EHexCmd eCmd)const;Executes one of the predefined commands of the EHexCmd enum. All these commands are basically replicating HexCtrl‘s inner menu.
[[nodiscard]] auto GetActualWidth()const->int;Returns the width of the HexCtrl bounding rectangle, i.e. the width of the drawn working area.
[[nodiscard]] auto GetBookmarks()->IHexBookmarks*;Returns pointer to the IHexBookmarks interface, which responds for the bookmarks machinery.
[[nodiscard]] auto GetCacheSize()const->DWORD;Returns current cache size set in HEXDATA.
[[nodiscard]] auto GetCapacity()const->DWORD;Returns current capacity.
[[nodiscard]] auto GetCaretPos()const->ULONGLNG;Retrieves current caret position offset.
[[nodiscard]] auto GetCharsExtraSpace()const->DWORD;Get extra space between chars, in pixels. This extra space can be set with the SetCharsExtraSpace method.
[[nodiscard]] auto GetColors()const->const HEXCOLORS&;Returns reference to the current HEXCOLORS struct.
[[nodiscard]] auto GetData(HEXSPAN hss)const->std::byte*;Returns a pointer to the data offset no matter what mode the control works in.
Note
In the Virtual mode returned data size can not exceed current cache size, and therefore may be less than the size acquired. In the default mode returned pointer is just an offset from the data pointer set in the SetData method.
[[nodiscard]] auto GetDataSize()const->ULONGLONG;Returns currently set data size.
[[nodiscard]] auto GetDateInfo()const->std::tuple<DWORD, wchar_t>;Returns tuple of the current date format-ordering specifier, and date separator.
[[nodiscard]] auto GetDlgItemHandle(EHexDlgItem eItem)const->HWND;Returns HWND of a dialog’s internal child control.
[[nodiscard]] auto GetCodepage()const->int;Returns code page that is currently in use.
[[nodiscard]] auto GetFont(bool fMain)const->LOGFONTW;Returns current main font if fMain is true, and infobar font if fMain is false.
[[nodiscard]] auto GetGroupSize()const->DWORD;Returns current data grouping size.
[[nodiscard]] auto GetMenuHandle()const->HMENU;Returns the HMENU handle of the HexCtrl context menu. You can use this handle to customize menu for your needs.
HexCtrl‘s internal menu uses IDs starting from 0x8001. So if you wish to add your own new menu, assign menu ID starting from 0x9000 to not interfere.
When a user clicks custom menu, control sends WM_NOTIFY message to its parent window with LPARAM pointing to HEXMENUINFO with its hdr.code member set to HEXCTRL_MSG_MENUCLICK, and wMenuID field containing ID of the menu clicked.
[[nodiscard]] auto GetOffset(ULONGLONG ullOffset, bool fGetVirt)const->ULONGLONG;Converts offset from virtual to flat, and vice versa.
[[nodiscard]] auto GetPagesCount()const->ULONGLONG;Returns current count of pages set by the SetPageSize method.
[[nodiscard]] auto GetPagePos()const->ULONGLONG;Returns a page number that the cursor stays at.
[[nodiscard]] auto GetPageSize()const->DWORD;Returns current page size set by the SetPageSize method.
[[nodiscard]] auto GetScrollRatio()const->std::tuple<float, bool>;Returns tuple of the current scroll ratio and fLines flag set by the SetScrollRatio method.
[[nodiscard]] auto GetSelection()const->std::vector<HEXSPAN>;Returns std::vector with the offsets and sizes of the current selection.
[[nodiscard]] auto GetTemplates()->IHexTemplates*;Returns pointer to the internal IHexTemplates interface that is responsible for templates machinery.
[[nodiscard]] auto GetUnprintableChar()const->wchar_t;Returns replacement char for unprintable characters.
[[nodiscard]] auto GetWndHandle(EHexWnd eWnd, bool fCreate = true)const->HWND;Returns HWND for HexCtrl‘s main window or one of its internal dialogs. If fCreate flag is true, the dialog window will be created first before returning, if it was not already.
void GoToOffset(ULONGLONG ullOffset, int iPosAt = 0);Go to the given offset. The second argument iPosAt can take three values:
-1– offset will appear at the top line-
0– offset will appear in the center -
1– offset will appear at the bottom line
[[nodiscard]] bool HasInfoBar()const;Shows whether bottom info bar currently visible or not.
[[nodiscard]] bool HasSelection()const;Returns true if HexCtrl has any area selected.
[[nodiscard]] auto HitTest(POINT pt, bool fScreen = true)const->std::optional<HEXHITTEST>;Hit testing of given point in a screen fScreen = true, or client fScreen = false coordinates. In case of success returns HEXHITTEST structure.
[[nodiscard]] bool IsCmdAvail(EHexCmd eCmd)const;Returns true if the given command can be executed at the moment, false otherwise.
[[nodiscard]] bool IsCreated()const;Shows whether HexCtrl is created or not.
[[nodiscard]] bool IsDataSet()const;Shows whether a data was set to HexCtrl or not
[[nodiscard]] bool IsHexCharsUpper()const;Shows if hex chars printed in UPPER or lower case.
[[nodiscard]] bool IsMutable()const;Shows whether HexCtrl is currently in edit mode or not.
[[nodiscard]] bool IsOffsetAsHex()const;Is “Offset” currently represented (shown) as Hex or as Decimal. It can be changed by double clicking at offset area.
[[nodiscard]] auto IsOffsetVisible(ULONGLONG ullOffset)const->HEXVISION;Checks for offset visibility and returns HEXVISION as a result.
[[nodiscard]] bool IsVirtual()const;Returns true if HexCtrl currently works in Virtual Data Mode.
void ModifyData(const HEXMODIFY& hms);Modify data currently set in HexCtrl, see the HEXMODIFY struct for details.
[[nodiscard]] bool PreTranslateMsg(MSG* pMsg);The HexCtrl has many internal dialog windows. In order for dialog keyboard navigation to work correctly, this method must be hooked into your app’s main message loop before TranslateMessage and DispatchMessage, or into MFC’s PreTranslateMessage virtual function.
while (GetMessageW(&msg, nullptr, 0, 0)) {
    if (!TranslateAcceleratorW(msg.hwnd, hAccelTable, &msg)) {
        if (!m_pHexCtrl->PreTranslateMsg(&msg)) { //Process further only if it returns false.
            TranslateMessage(&msg);
            DispatchMessageW(&msg);
        }
    }
}
If this method returns true it means that no further message processing should be made, HexCtrl has done all processing by itself.
void Redraw();Redraws main window.
void SetCapacity(DWORD dwCapacity);Sets HexCtrl‘s current capacity.
void SetCaretPos(ULONGLONG ullOffset, bool fHighLow = true, bool fRedraw = true);Sets the caret to the given offset. The fHighLow flag shows which part of the hex chunk, low or high, a caret must be set to.
void SetCharsExtraSpace(DWORD dwSpace);Sets extra space to add between chars, in pixels.
void SetCodepage(int iCodePage);Sets the code page for the HexCtrl‘s text area. Takes code page identifier as an argument, or -1 for default ASCII-only characters.
Note
Code page identifier must represent Single-byte Character Set. Multi-byte character sets are not currently supported.
void SetColors(const HEXCOLORS& clr);Sets all the colors for the control. Takes HEXCOLORS as the argument.
bool SetConfig(std::wstring_view wsvPath);Sets the path to a JSON config file with keybindings to use in HexCtrl, or empty path (L"") for default. This file is using EHexCmd enum values as keys and strings array as values:
{
    "CMD_DLG_SEARCH": [ "ctrl+f", "ctrl+h" ],
    "CMD_SEARCH_NEXT": [ "f3" ],
    "CMD_SEARCH_PREV": [ "shift+f3" ]
}
For default values see the IDR_HEXCTRL_JSON_KEYBIND.json file from the project sources.
void SetData(const HEXDATA& hds, bool fAdjust = false)Main method to set data for HexCtrl. It takes HEXDATA struct as an argument.
The fAdjust flag when set to true allows adjusting already set data. For example to switch between virtual and normal data modes.
void SetDateInfo(DWORD dwFormat, wchar_t wchSepar);Sets date format-ordering specifier, along with date separator.
void SetDlgProperties(EHexWnd eWnd, std::uint64_t u64Flags);Sets various properties to the HexCtrl‘s internal dialogs, in form of flags. Flags can be combined together with the OR (|) operation.
Available flags:
HEXCTRL_FLAG_DLG_NOESC //Prevent dialog from closing on Esc key.void SetFont(const LOGFONTW& lf, bool fMain);Sets new main font for the HexCtrl if fMain is true, or infobar font when fMain is false. This font has to be monospaced.
void SetGroupSize(DWORD dwSize);Sets current data grouping size in bytes.
void SetHexCharsCase(bool fUpper);Sets printed hex chars to an UPPER or lower case.
void SetMutable(bool fMutable);Enables or disables mutable mode. In the mutable mode all the data can be modified.
void SetOffsetMode(bool fHex);Sets offset area being shown as Hex (fHex=true) or as Decimal (fHex=false).
void SetPageSize(DWORD dwSize, std::wstring_view wsvName = L"Page");Sets the size of the page to draw the divider line between. This size should be multiple to the current capacity size to take effect. The second argument sets the name to be displayed in the bottom info area of the HexCtrl (“Page”, “Sector”, etc…).
To remove the divider just set dwSize to 0.
void SetRedraw(bool fRedraw);Should the main HexCtrl window be redrawn or not. E.g. should the WM_PAINT message be handled or not.
void SetScrollRatio(float flRatio, bool fLines);Sets the scroll amount for one scroll-page. Page is the one mouse-wheel tick or page-down key. When fLines is true the flRatio is the amount of text lines to scroll. When it’s false flRatio is a ratio of visible screen height to scroll.
void SetSelection(const std::vector<HEXSPAN>& vecSel, bool fRedraw = true, bool fHighlight = false);Sets current selection or highlight in the selection, if fHighlight is true.
void SetUnprintableChar(wchar_t wch);Sets replacement char for unprintable characters.
void SetVirtualBkm(IHexBookmarks* pVirtBkm);Sets a pointer for the Virtual Bookmarks mode, or disables this mode if nullptr is set.
void SetWindowPos(HWND hWndAfter, int iX, int iY, int iWidth, int iHeight, UINT uFlags);Sets HexCtrl window position. This method replicates behavior of the SetWindowPos Windows function.
void ShowInfoBar(bool fShow);Show/hide bottom Info bar.
Below are listed all HexCtrl‘s structures.
Main bookmarks structure, used with the IHexBookmarks interface.
struct HEXBKM {
    VecSpan      vecSpan;     //Vector of offsets and sizes.
    std::wstring wstrDesc;    //Bookmark description.
    ULONGLONG    ullID { };   //Bookmark ID, assigned internally by framework.
    ULONGLONG    ullData { }; //User defined custom data.
    HEXCOLOR     stClr;       //Bookmark bk/text color.
};
using PHEXBKM = HEXBKM*;
The member vecSpan is of a std::vector<HEXSPAN> type because a bookmark may have few non adjacent areas. For instance, when selection is made as a block, with Alt pressed.
Bookmark information struct.
struct HEXBKMINFO {
    NMHDR   hdr { };  //Standard Windows header.
    PHEXBKM pBkm { }; //Bookmark pointer.
};
using PHEXBKMINFO = HEXBKMINFO*;Background and Text color struct.
struct HEXCOLOR {
    COLORREF clrBk { };   //Bk color.
    COLORREF clrText { }; //Text color.
    auto operator<=>(const HEXCOLOR&)const = default;
};
using PHEXCOLOR = HEXCOLOR*;Struct for hex chunks’ color information.
struct HEXCOLORINFO {
    NMHDR     hdr { };       //Standard Windows header.
    ULONGLONG ullOffset { }; //Offset for the color.
    HEXCOLOR  stClr;         //Colors of the given offset.
};This structure contains all colors for fonts, background, and all other visual stuff. All these colors have their default values, so you don’t have to set them all during HexCtrl creation, if you don’t want to.
struct HEXCOLORS {
    COLORREF clrFontHex { ::GetSysColor(COLOR_WINDOWTEXT) };       //Hex-chunks font color.
    COLORREF clrFontText { ::GetSysColor(COLOR_WINDOWTEXT) };      //Text font color.
    COLORREF clrFontSel { ::GetSysColor(COLOR_HIGHLIGHTTEXT) };    //Selected hex/text font color.
    COLORREF clrFontBkm { ::GetSysColor(COLOR_WINDOWTEXT) };       //Bookmarks font color.
    COLORREF clrFontDataInterp { ::GetSysColor(COLOR_HIGHLIGHTTEXT) }; //Data Interpreter text/hex font color.
    COLORREF clrFontCaption { RGB(0, 0, 180) };                    //Caption font color
    COLORREF clrFontInfoParam { ::GetSysColor(COLOR_WINDOWTEXT) }; //Font color of the Info bar parameters.
    COLORREF clrFontInfoData { RGB(0, 0, 180) };                   //Font color of the Info bar data.
    COLORREF clrFontCaret { ::GetSysColor(COLOR_HIGHLIGHTTEXT) };  //Caret font color.
    COLORREF clrBk { ::GetSysColor(COLOR_WINDOW) };                //Background color.
    COLORREF clrBkSel { ::GetSysColor(COLOR_HIGHLIGHT) };          //Background color of the selected Hex/Text.
    COLORREF clrBkBkm { RGB(240, 240, 0) };                        //Bookmarks background color.
    COLORREF clrBkDataInterp { RGB(147, 58, 22) };                 //Data Interpreter Bk color.
    COLORREF clrBkInfoBar { ::GetSysColor(COLOR_3DFACE) };         //Background color of the bottom Info bar.
    COLORREF clrBkCaret { RGB(0, 0, 255) };                        //Caret background color.
    COLORREF clrBkCaretSel { RGB(0, 0, 200) };                     //Caret background color in selection.
    COLORREF clrLinesMain { ::GetSysColor(COLOR_SCROLLBAR) };      //Main window and pages lines color.
    COLORREF clrLinesTempl { ::GetSysColor(COLOR_WINDOWTEXT) };    //Templates data confining lines color.
    COLORREF clrScrollBar { ::GetSysColor(COLOR_3DFACE) };         //Scrollbar color.
    COLORREF clrScrollThumb { ::GetSysColor(COLOR_SCROLLBAR) };    //Scrollbar thumb color.
    COLORREF clrScrollArrow { ::GetSysColor(COLOR_GRAYTEXT) };     //Scrollbar arrow color.
};
using PCHEXCOLORS = const HEXCOLORS*;The main initialization struct used for the HexCtrl creation.
struct HEXCREATE {
    HINSTANCE       hInstRes { };           //Hinstance of the HexCtrl resources, nullptr for current module.
    HWND            hWndParent { };         //Parent window handle.
    PCHEXCOLORS     pColors { };            //HexCtrl colors, nullptr for default.
    const LOGFONTW* pLogFont { };           //Monospaced font for HexCtrl, nullptr for default.
    RECT            rect { };               //Initial window rect.
    UINT            uID { };                //Control ID if it's a child window.
    DWORD           dwStyle { };            //Window styles.
    DWORD           dwExStyle { };          //Extended window styles.
    DWORD           dwCapacity { 16UL };    //Initial capacity size.
    DWORD           dwGroupSize { 1UL };    //Initial data grouping size.
    float           flScrollRatio { 1.0F }; //Either a screen-ratio or lines amount to scroll with Page-scroll (mouse-wheel).
    bool            fScrollLines { false }; //Treat flScrollRatio as screen-ratio (false) or as amount of lines (true).
    bool            fInfoBar { true };      //Show bottom Info bar or not.
    bool            fOffsetHex { true };    //Show offset digits as Hex or Decimal.
    bool            fCustom { false };      //If it's a custom control in a dialog.
};HINSTANCE hInstRes
The hInstRes member allows you to provide an alternative HINSTANCE of a module where all HexCtrl resources (dialogs, menu, etc…) reside. By default HexCtrl uses its current module, whether it’s a .exe or .dll.
DWORD dwStyle
Standard window style for the main HexCtrl window.
DWORD dwExStyle
Standard extended window style for the main HexCtrl window.
The main struct to set a data to display in the HexCtrl.
struct HEXDATA {
    SpanByte        spnData;                    //Data span to display.
    IHexVirtData*   pHexVirtData { };           //Pointer for VirtualData mode.
    IHexVirtColors* pHexVirtColors { };         //Pointer for Custom Colors class.
    ULONGLONG       ullMaxVirtOffset { };       //Maximum virtual offset.
    DWORD           dwCacheSize { 0x800000UL }; //Data cache size for VirtualData mode.
    bool            fMutable { false };         //Is data mutable or read-only.
    bool            fHighLatency { false };     //Do not redraw until scroll thumb is released.
};ULONGLONG ullMaxVirtOffset
Used to set maximum virtual data offset in virtual data mode. This is needed for the offset digits amount calculation.
Struct for a data information used in IHexVirtData.
struct HEXDATAINFO {
    NMHDR    hdr { };   //Standard Windows header.
    HEXSPAN  stHexSpan; //Offset and size of the data.
    SpanByte spnData;   //Data span.
};Structure is used in HitTest method.
struct HEXHITTEST {
    ULONGLONG ullOffset { };     //Offset.
    bool      fIsText { false }; //Is cursor at Text or Hex area.
    bool      fIsHigh { false }; //Is it High or Low part of the byte.
};This struct is used to represent data modification parameters.
When eModifyMode is set to MODIFY_ONCE, bytes from pData just replace corresponding data bytes as is.
If eModifyMode is equal to MODIFY_REPEAT then block by block replacement takes place few times.
For example, if:
SUM(vecSpan.ullSize) == 9spnData.size() == 3eModifyModeis set toMODIFY_REPEAT- bytes in memory at
vecSpan.ullOffsetare010203040506070809 - bytes pointed to by
spnData.data()are030405
then, after modification, bytes at vecSpan.ullOffset will become 030405030405030405.
If eModifyMode is equal to the MODIFY_OPERATION then the eOperMode shows what kind of operation must be performed on the data.
struct HEXMODIFY {
    EHexModifyMode eModifyMode { };      //Modify mode.
    EHexOperMode   eOperMode { };        //Operation mode, used if eModifyMode == MODIFY_OPERATION.
    EHexDataType   eDataType { };        //Data type of the underlying data, used if eModifyMode == MODIFY_OPERATION.
    SpanCByte      spnData;              //Span of the data to modify with.
    VecSpan        vecSpan;              //Vector of data offsets and sizes to modify.
    bool           fBigEndian { false }; //Treat data as the big endian, used if eModifyMode == MODIFY_OPERATION.
};Menu information struct.
struct HEXMENUINFO {
    NMHDR hdr { };        //Standard Windows header.
    POINT pt { };         //Mouse position when clicked.
    WORD  wMenuID { };    //Menu identifier.
    bool  fShow { true }; //Whether to show menu or not, in case of HEXCTRL_MSG_CONTEXTMENU.
};
using PHEXMENUINFO = HEXMENUINFO*;This struct is used mostly in selection and bookmarking routines. It holds offset and size of the data region.
struct HEXSPAN {
    ULONGLONG ullOffset { };
    ULONGLONG ullSize { };
};
using VecSpan = std::vector<HEXSPAN>;This struct is returned from IsOffsetVisible method. Two members i8Vert and i8Horz represent vertical and horizontal visibility respectively. These members can be in three different states:
-1— offset is higher, or at the left, of the visible area.-
1— offset is lower, or at the right. -
0— offset is visible.
struct HEXVISION {
    std::int8_t i8Vert { }; //Vertical offset.
    std::int8_t i8Horz { }; //Horizontal offset.
    operator bool()const { return i8Vert == 0 && i8Horz == 0; }; //For test simplicity: if(IsOffsetVisible()).
};The IHexBookmarks interface responds for the HexCtrl‘s bookmarks machinery. To obtain pointer to this interface use the GetBookmarks method.
class IHexBookmarks {
public:
    virtual auto AddBkm(const HEXBKM& hbs, bool fRedraw = true) -> ULONGLONG = 0; //Add new bookmark, returns the new bookmark's ID.
    [[nodiscard]] virtual auto GetByID(ULONGLONG ullID) -> PHEXBKM = 0;           //Get bookmark by ID.
    [[nodiscard]] virtual auto GetByIndex(ULONGLONG ullIndex) -> PHEXBKM = 0;     //Get bookmark by index.
    [[nodiscard]] virtual auto GetCount() -> ULONGLONG = 0;                       //Get bookmarks count.
    [[nodiscard]] virtual auto HitTest(ULONGLONG ullOffset) -> PHEXBKM = 0;       //HitTest for given offset.
    virtual void RemoveAll() = 0;                                                 //Remove all bookmarks.
    virtual void RemoveByID(ULONGLONG ullID) = 0;                                 //Remove by a given ID.
};ULONGLONG AddBkm(const HEXBKM& hbs, bool fRedraw = false)Adds new bookmark to the control, returns created bookmark’s ID.
Example:
HEXBKM hbs;
hbs.vecSpan.emplace_back(0x1, 10);
hbs.clrBk = RGB(0, 255, 0);
hbs.clrText = RGB(255, 255, 255);
hbs.wstrDesc = L"My bookmark, with green bk and white text.";
myHex->GetBookmarks()->Add(hbs);GetByID(ULONGLONG ullID)->HEXBKM*;Get bookmark by ID.
auto GetByIndex(ULONGLONG ullIndex)->HEXBKM*;Get bookmark by index.
ULONGLONG GetCount();Get bookmarks’ count.
auto HitTest(ULONGLONG ullOffset)->HEXBKM*;Test given offset and retrieves a pointer to HEXBKM if offset contains a bookmark.
void RemoveAll();Removes all bookmarks.
void RemoveByID(ULONGLONG ullID);Removes bookmark with the given ID.
class IHexTemplates {
public:
    virtual auto AddTemplate(const HEXTEMPLATE& hts) -> int = 0; //Adds existing template.
    virtual auto ApplyTemplate(ULONGLONG ullOffset, int iTemplateID) -> int = 0; //Applies template to offset, returns AppliedID.
    virtual void DisapplyAll() = 0;
    virtual void DisapplyByID(int iAppliedID) = 0;
    virtual void DisapplyByOffset(ULONGLONG ullOffset) = 0;
    virtual auto LoadTemplate(const wchar_t* pFilePath) -> int = 0; //Returns TemplateID on success, null otherwise.
    virtual void ShowTooltips(bool fShow) = 0;
    virtual void UnloadAll() = 0;                     //Unload all templates.
    virtual void UnloadTemplate(int iTemplateID) = 0; //Unload/remove loaded template from memory.
    [[nodiscard]] static HEXCTRLAPI auto __cdecl LoadFromFile(const wchar_t* pFilePath)->std::unique_ptr<HEXTEMPLATE>;
};[[nodiscard]] static auto LoadFromFile(const wchar_t* pFilePath)->std::unique_ptr<HEXTEMPLATE>;This static method can be used to upfront load a template from a file. The loaded template can then be added to multiple HexCtrl instances, through the IHexTemplates::AddTemplate method. This approach allows to avoid loading the same template from the disk multiple times if multiple HexCtrls would load it through the IHexTemplates::LoadTemplate, each individually.
class IHexVirtColors {
public:
    virtual bool OnHexGetColor(HEXCOLORINFO&) = 0; //Should return true if colors are set.
};class IHexVirtData {
public:
virtual void OnHexGetData(HEXDATAINFO&) = 0; //Data to get.
virtual void OnHexGetOffset(HEXDATAINFO& hdi, bool fGetVirt) = 0; //Offset<->VirtOffset conversion.
virtual void OnHexSetData(const HEXDATAINFO&) = 0; //Data to set, if mutable.
};Internally HexCtrl operates with flat data offsets. If you set data of 1MB size, HexCtrl will have working offsets in the [0-1'048'575] range. However, from the user perspective the real data offsets may differ. For instance, in processes memory model very high virtual memory addresses can be used (e.g. 0x7FF96BA622C0). The process data can be mapped by operating system to literally any virtual address. The OnHexGetOffset method serves exactly for the Flat<->Virtual offset converting purpose.
Enum of commands that can be executed within HexCtrl.
enum class EHexCmd : std::uint8_t {
CMD_SEARCH_DLG = 0x01, CMD_SEARCH_NEXT, CMD_SEARCH_PREV,
CMD_NAV_GOTO_DLG, CMD_NAV_REPFWD, CMD_NAV_REPBKW, CMD_NAV_DATABEG, CMD_NAV_DATAEND,
CMD_NAV_PAGEBEG, CMD_NAV_PAGEEND, CMD_NAV_LINEBEG, CMD_NAV_LINEEND, CMD_GROUPDATA_BYTE,
CMD_GROUPDATA_WORD, CMD_GROUPDATA_DWORD, CMD_GROUPDATA_QWORD, CMD_GROUPDATA_INC, CMD_GROUPDATA_DEC,
CMD_BKM_ADD, CMD_BKM_REMOVE, CMD_BKM_NEXT, CMD_BKM_PREV, CMD_BKM_REMOVEALL, CMD_BKM_DLG_MGR,
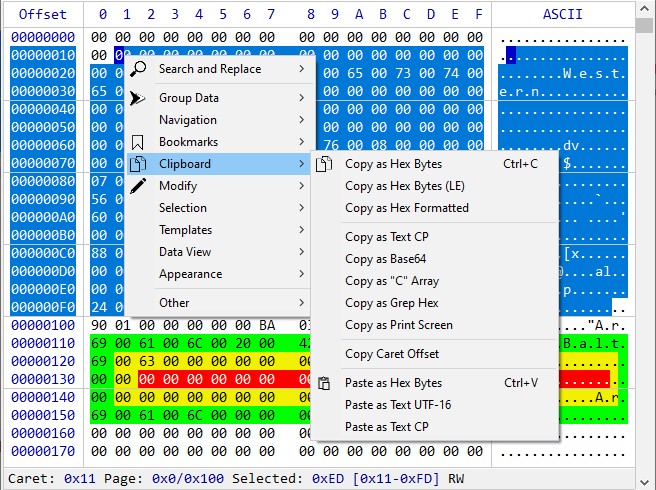
CMD_CLPBRD_COPY_HEX, CMD_CLPBRD_COPY_HEXLE, CMD_CLPBRD_COPY_HEXFMT, CMD_CLPBRD_COPY_TEXTCP,
CMD_CLPBRD_COPY_BASE64, CMD_CLPBRD_COPY_CARR, CMD_CLPBRD_COPY_GREPHEX, CMD_CLPBRD_COPY_PRNTSCRN,
CMD_CLPBRD_COPY_OFFSET, CMD_CLPBRD_PASTE_HEX, CMD_CLPBRD_PASTE_TEXTUTF16, CMD_CLPBRD_PASTE_TEXTCP,
CMD_MODIFY_OPERS_DLG, CMD_MODIFY_FILLZEROS, CMD_MODIFY_FILLDATA_DLG, CMD_MODIFY_UNDO, CMD_MODIFY_REDO,
CMD_SEL_MARKSTARTEND, CMD_SEL_ALL, CMD_SEL_ADDLEFT, CMD_SEL_ADDRIGHT, CMD_SEL_ADDUP,
CMD_SEL_ADDDOWN, CMD_DATAINTERP_DLG, CMD_CODEPAGE_DLG, CMD_APPEAR_FONT_DLG, CMD_APPEAR_FONTINC,
CMD_APPEAR_FONTDEC, CMD_APPEAR_CAPACINC, CMD_APPEAR_CAPACDEC, CMD_PRINT_DLG, CMD_ABOUT_DLG,
CMD_CARET_LEFT, CMD_CARET_RIGHT, CMD_CARET_UP, CMD_CARET_DOWN,
CMD_SCROLL_PAGEUP, CMD_SCROLL_PAGEDOWN,
CMD_TEMPL_APPLYCURR, CMD_TEMPL_DISAPPLY, CMD_TEMPL_DISAPPALL, CMD_TEMPL_DLG_MGR
};Enum of the data type used in the HEXMODIFY struct with the EHexModifyMode::MODIFY_OPERATION mode.
enum class EHexDataType : std::uint8_t {
    DATA_INT8, DATA_UINT8, DATA_INT16, DATA_UINT16, DATA_INT32,
    DATA_UINT32, DATA_INT64, DATA_UINT64, DATA_FLOAT, DATA_DOUBLE
};Enum of the data modification modes, used in HEXMODIFY.
enum class EHexModifyMode : std::uint8_t {
    MODIFY_ONCE, MODIFY_REPEAT, MODIFY_OPERATION, MODIFY_RAND_MT19937, MODIFY_RAND_FAST
};Enum of the data operation modes, used in HEXMODIFY when HEXMODIFY::enModifyMode is set to MODIFY_OPERATION.
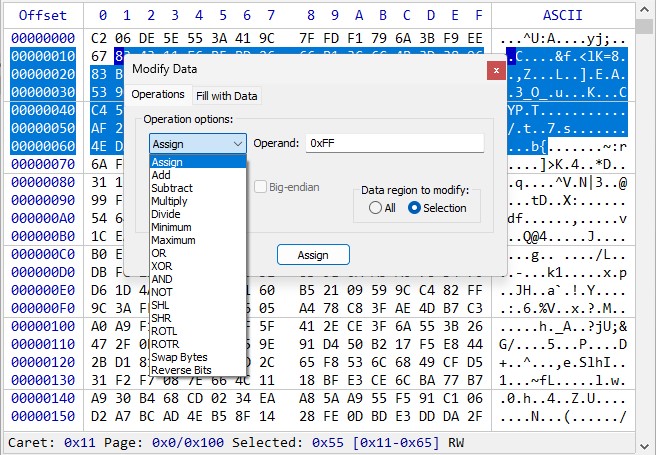
enum class EHexOperMode : std::uint8_t {
    OPER_ASSIGN, OPER_ADD, OPER_SUB, OPER_MUL, OPER_DIV, OPER_CEIL, OPER_FLOOR, OPER_OR,
    OPER_XOR, OPER_AND, OPER_NOT, OPER_SHL, OPER_SHR, OPER_ROTL, OPER_ROTR, OPER_SWAP,
    OPER_BITREV
};Enum of all HexCtrl‘s internal windows, used in the GetWndHandle method.
enum class EHexWnd : std::uint8_t {
    WND_MAIN, DLG_BKMMGR, DLG_DATAINTERP, DLG_MODIFY,
    DLG_SEARCH, DLG_ENCODING, DLG_GOTO, DLG_TEMPLMGR
};During its work the HexCtrl sends notification messages to its parent window through WM_NOTIFY mechanism.
The LPARAM of the WM_NOTIFY message contains a pointer to the NMHDR standard Windows struct. Depending on the notification message LPARAM can then be casted to a pointer to another struct, see the messages description for details.
Sent if a bookmark is clicked, LPARAM contains a pointer to the HEXBKMINFO struct.
Sent when a context menu is about to be displayed, LPARAM contains a pointer to the HEXMENUINFO struct. You can disable menu showing-up by setting the PHEXMENUINFO->fShow flag to false in response to this message.
Sent to indicate that the HexCtrl‘s window is about to be destroyed, LPARAM contains a pointer to the NMHDR struct.
Sent to indicate that the Bookmark Manager dialog is about to be displayed, LPARAM contains a pointer to the NMHDR struct.
Sent to indicate that the Codepage dialog is about to be displayed, LPARAM contains a pointer to the NMHDR struct.
Sent to indicate that the Data interpreter dialog is about to be displayed, LPARAM contains a pointer to the NMHDR struct.
Sent to indicate that the Go to dialog is about to be displayed, LPARAM contains a pointer to the NMHDR struct.
Sent to indicate that the Modify Data dialog is about to be displayed, LPARAM contains a pointer to the NMHDR struct.
Sent to indicate that the Search dialog is about to be displayed, LPARAM contains a pointer to the NMHDR struct.
Sent to indicate that the Template Manager dialog is about to be displayed, LPARAM contains a pointer to the NMHDR struct.
Sent when a user-defined custom menu has been clicked, LPARAM contains a pointer to the HEXMENUINFO struct.
Sent when the capacity has changed, LPARAM contains a pointer to the NMHDR struct.
Sent when the caret position has changed, LPARAM contains a pointer to the NMHDR struct.
Sent when the codepage of the text area has changed, LPARAM contains a pointer to the NMHDR struct.
Sent to indicate that the data has changed, LPARAM contains a pointer to the NMHDR struct.
Sent when font has changed, LPARAM contains a pointer to the NMHDR struct.
Sent when the data grouping size has changed, LPARAM contains a pointer to the NMHDR struct.
Sent when a selection has been made, LPARAM contains a pointer to the NMHDR struct.
This software is available under “The HexCtrl License”, it is free for any NON-COMMERCIAL use.
See the LICENSE file.
 https://github.com/jovibor/HexCtrl