This data is updated weekly, with filled postings removed. Last updated: 08/22/2025
All jobs are sourced from algojobs.io. For more recent postings, see: NestJS Jobs

https://github.com/algojobs/NestJS-Jobs
This data is updated weekly, with filled postings removed. Last updated: 08/22/2025
All jobs are sourced from algojobs.io. For more recent postings, see: NestJS Jobs
https://github.com/algojobs/NestJS-Jobs


![]()

![]()


The Blue Brain Project concluded in December 2024, so development has ceased under the BlueBrain GitHub organization. Future development will take place at: https://github.com/openbraininstitute/morphology-workflows
This project contains several workflows for processing morphologies:


In a nutshell, the user provides a list of morphologies in a .csv file, with their names and
paths and a luigi.cfg configuration file. Each workflow is run independently and creates an
output folder, with one subfolder per task. In each, there will be a report.csv and a data
folder containing the output files of the task if any. In the report.csv file, columns contain
paths to these files, additional information, error messages if the task failed on that
morphologies, as well as a flag is_valid, used in subsequent tasks to filter valid morphologies.
At the end of each workflow, another report.csv file is created, with the main output columns of
each tasks, and a report.pdf containing a human readable summary of the result of the workflow.
Usually, the user should run the Curate workflow, then the Annotate workflow and finally the
Repair workflow.
The complete documentation can be found here:
This should be installed using pip:
pip install morphology-workflowsUsually, user should create a new project folder using this workflow. It will create the files required to run the other workflows. For example, the command:
morphology-workflows Initialize --source-database NeuroMorphowill create the inputs to download the morphologies from the NeuroMorpho database and the run the other workflows on these morphologies.
If the user wants to provide arbitrary morphologies to the Curate / Annotate / Repair workflows, the following command can be used:
morphology-workflows Initialize --input-dir <path-to-the-morphologies>in order to create the dataset required by these workflows.
Once the Initialize workflows is complete, the user can update the outputs according to its needs (see the next sections for details about each workflow).
This workflow helps fetching morphologies from online databases. This workflow only needs a configuration file, which depends on the source from which the morphologies are fetched.
The possible sources are:
For each of them, the configuration file should be a JSON file containing a list of objects like the following examples:
NeuroMorpho:
[
    {
        "species": "mouse",
        "brain_region": "neocortex",
        "cell_type": "interneuron",
        "nb_morphologies": 10
    }
]
MouseLight:
[
    {
        "brain_region": "neocortex",
        "nb_morphologies": 10,
        "seed": 0
    }
]
Allen:
[
    {
        "species": "Mus musculus",
        "brain_region": "VISli",
        "cell_type": "pyramidal",
        "nb_morphologies": 10,
        "seed": 0
    }
]
In these examples, the seed attribute is optional and is only used to sample which morphologies
are fetched among those which pass the filter.
Each JSON object in the list will give a set of morphologies to fetch, depending on the given
filters.
Note that all attributes are optional, so it’s possible to pass an empty object to fetch all the
morphologies from the database, though it is not recommended.
The Annotate and Repair workflows should usually be run after the Curate workflow since their inputs should be the outputs of the Curate workflow. But it is still possible to run them on arbitrary inputs (though the morphologies must be valid, as the ones processed by the Curate workflow).
The inputs should consist in:
a directory containing the input morphologies.
a CSV file with the following columns:
morph_path: the path to the morphology file.morph_name: the name of the morphology.mtype: the morphology-type of the morphology (this column is optional).Any other column is kept into the results but not used in the workflows.
Note that the column names should not contain spaces between commas and names.
a luigi.cfg file containing the configuration for all the tasks of the workflow.
an optional logging.conf file containing the logging configuration. If you prefer default logging
behavior, remove this file and comment line in logging_conf_file = logging.conf in luigi.cfg.
The examples folder contains
examples for the luigi.cfg and logging.conf files.
These inputs can be created using the Fetch workflow that downloads morphologies from online databases and create the dataset in the correct format.
These workflows are based on the luigi library but can be run via the command line interface.
For example, you can run the Curate workflow with the following command:
morphology-workflows CurateNOTE: This command must be executed from a directory containing a
luigi.cfgfile. An example of such file is given in theexamplesdirectory.
By default, a local scheduler is used but it is also possible to use a Luigi’s master scheduler
using the -m / --master-scheduler trigger:
morphology-workflows -m CurateOnce the Curate workflow has run, the Annotate and Repair workflows can be run directly, they will just take the results of the Curate workflow as input:
morphology-workflows Annotate
morphology-workflows Repair
Note that it is also possible to run the 3 workflows directly because each workflow depends on each other:
morphology-workflows RepairMore details can be found in the command line interface section of the documentation or by running the commands:
morphology-workflows --help
morphology-workflows <workflow> --helpEach workflow will create several new directories, one for each sub-step. These new directories can
be nested into a global result directory for each workflow, using the result_path parameter.
These directories contain intermediate data so it is possible to understand why a morphology
could not be validated at a given step.
The invalid morphologies should be manually fixed before being processed again by the workflows.
The main workflows (Curate, Annotate and Repair) will also create a final CSV file which contains most of the relevant data of the workflow (main sub-step results and final morphology paths). Finally, the Repair workflow can generate morphology releases that contain the final morphologies that could be validated and automatically fixed by the workflow. Usually these morphologies are the most relevant ones for later use.
The morphologies marked as invalid may be fixed manually before rerunning the workflow on them.
The examples folder contains
a simple example that will fetch and process a set of morphologies.
A dataset.csv file is provided which is taken as input for the workflows. A luigi.cfg file
is also provided to give a default configuration for the workflows.
This example can simply be run using the following command:
./run_curation.shThis script will create a new directory out_curated which will contain the report and all the
results.
When you use this software, we kindly ask you to cite the following DOI:
The development of this software was supported by funding to the Blue Brain Project, a research center of the École polytechnique fédérale de Lausanne (EPFL), from the Swiss government’s ETH Board of the Swiss Federal Institutes of Technology.
For license and authors, see LICENSE.txt and AUTHORS.md respectively.
Copyright © 2021-2022 Blue Brain Project/EPFL
https://github.com/BlueBrain/morphology-workflowsUnicontent is a Python library to extract metadata from different types of sources and for different types of objects. The
goal is to normalize metadata and to provide an easy-to-use extractor. Given an identifier (URL, DOI, ISBN), unicontent can retrieve
structured data about the corresponding object.
Here is the basic usage if you want to extract metadata with any kind of identifier. unicontent will detect the type of identifier and use the right extractor. Use get_metadata function if you just want metadata.
from unicontent.extractors import get_metadata
data = get_metadata(identifier="http://example.com", format='n3')
See below if you want to use the extractor for a specific kind of identifier (URL, DOI or ISBN).
The class URLContentExtractor is used to extract data from an URL. Several formats are available : RDF formats will return a rdflib graph (n3, turtle, xml). ‘dict’ and ‘json’ format will return a dictionary and a JSON file according to the mapping defined. A default mapping is provided.
url = 'http://www.lemonde.fr/big-browser/article/2017/02/13/comment-les-americains-s-informent-oublient-et-reagissent-sur-les-reseaux-sociaux_5079137_4832693.html'
url_extractor = URLContentExtractor(identifier=url, format='dict', schema_names=['opengraph', 'dublincore', 'htmltags']) # 'dict' is the default format
metadata_dict = url_extractor.get_data()
The order of the schema_names parameters defines how the extractor will fetch metadata as explained before. Always use htmltags to get at least the <title> tag in the webpage.
The module uses the DOI system Proxy Server to extract metadata from DOI codes. The extractor name is DOIContentExtractor.
doi = '10.10.1038/nphys1170'
doi_extractor = DOIContentExtractor(identifier=doi, format='dict')
metadata_dict = doi_extractor.get_data()
To retrieve metadata from books, the library uses GoogleBooks and OpenLibrary (in this order). The extractor class is called ISBNContentExtractor.
If GoogleBooks does not find the volume corresponding to the ISBN code, a request is sent to OpenLibrary to fetch the data.
https://github.com/hboisgibault/unicontent
A customizable scientific software pipeline written in python3 for detecting, categorizing, and viewing single pulse candidates that may be Fast Radio Burst (FRB) sources in Radio Astronomy data.
You can run the pipeline either by issuing ./pipeline.py or with python pipeline.py. Either method requires including the configuration file as a positional argument and running from the Pipeline directory (or including the path to it). Here’s a simple example:
$ ./pipeline.py Templates/hello_world.cfg
If no configuration file is included, then the default.cfg template will be used. To get help, use -h.
A method is essentially a task for the pipeline to perform. Each method consists of a single python file that is named to reflect what it does, followed by _method.py, and is stored in the Methods directory. For example, the “Hello World!” method file is named hello_world_method.py.
In order to run a method, it must be specified in the cofiguration file you choose when you run the pipeline. Simple methods are self-contained, but larger or more complex methods use supporting modules. There are several existing methods to choose from, some of which call functions from underlying modules.
A configuration file (.cfg) is all that is needed to run the pipeline with existing methods. This file specifies which methods you would like to perform and all of the necessary or desired parameters, inputs, directory locations, etc. for those methods. A method is specified by name as a section key without the _method part of the name. For example, to run the “Hello World!” method, your configuration file must include [hello_world].
Configuration files are parsed by the pipeline to add values to a dictionary (called hotpotato), which is passed around to each method that is called. Each of the key-value pairs defined in a section for a method become values for values used within the method. The file format support comments following the ; or # characters. When the configuration file is read by the pipeline, these comments and any trailing spaces (on the left or right side) will be removed before key-value pairs are stored in a dictionary.
Method files are typically short python 3 files that take in a dictionary from the pipeline and return a dictionary to the pipeline when completed. In-between, they perform any necessary setup of variables, parameters, etc. to be able to run the module file, and then call the module file. If any dictionary values are changed during the execution of the module, and you want the pipeline to use these changes going forward, you will need to return the values to the dictionary before passing it back.
pipeline.py, parser, and other components for setting up and running the pipeline.
A python 3 python 2 re-write (needs to be written for python 3) of the modulation index functionality from the PALFA2 pipeline as modified by Laura Spitler.
https://github.com/federatedcloud/FRB_pipeline


Replace unicode emojis in a text. Supports Unicode 10 standard.
$ pip install emoji-unicode
emoji_unicode.replace(
    u'Time to ⛽',
    lambda e: u'<img src="https://github.com/nitely/{filename}.svg" alt="{raw}">'.format(filename=e.code_points, raw=e.unicode)
)
# Time to <img src="https://github.com/nitely/26fd.svg" alt="⛽">
Note: the Emoji.code_points are normalized.
This function removes optional characters that may appear depending on
the input source (Android, iOS, etc). For example the emoji variation \\uFE0F
may (or may not) appear in between a emoji and a skin tone modifier,
making the code points to be different. It should be used
to rename the image files.
emoji_unicode.normalize(u'1F468-200D-2764-FE0F-200D-1F468')
# 1f468-2764-1f468PATTERN = re.compile(emoji_unicode.RE_PATTERN_TEMPLATE)
def match_handler(m):
e = emoji_unicode.Emoji(unicode=m.group('emoji'))
return u'<img src="https://github.com/nitely/{filename}.svg" alt="{raw}">'.format(
filename=e.code_points,
raw=e.unicode
)
re.sub(PATTERN, match_handler, u'Time to ⛽')
# Time to <img src="https://github.com/nitely/26fd.svg" alt="⛽">If your current emoji package supports unicode 8, which means it supports skin tones and sequences, then normalizing the file names should be enough. But to handle unsupported emojis, for example future sequences, they should be displayed as multiple glyphs.
Instead of displaying the woman-kissing-man glyph you may
display woman, heart, kiss, man glyphs.
Here is a example of how this could be handled:
EMOJI_FILES = set(['1f469', '2764', '1f48b', '1f468'])  # A set containing the emoji file names


def _render(unicode, code_points):
    return u'<img src="https://github.com/nitely/{filename}.svg" alt="{alt}">'.format(filename=code_points, alt=unicode)


def render(e):
    """
    Return the rendered html for the passed Emoji.
    Return the html as multiple glyphs when the
    emoji is a sequence not found within the files.
    Return the raw unicode when one or more glyphs
    are missing.
    """
    if e.code_points in EMOJI_FILES:
        return _render(e.unicode, e.code_points)

    if any(c not in EMOJI_FILES for u, c in e.as_map()):
        return e.unicode

    return u''.join(_render(u, c) for u, c in e.as_map())


# This assumes `woman-kissing-man.svg` is missing
emoji_unicode.replace(
    u'\U0001f469\u200d\u2764\ufe0f\u200d\U0001f48b\u200d\U0001f468',
    render
)
# <img src="https://github.com/nitely/1f469.svg" alt="\U0001f469"><img src="2764.svg" alt="\u2764"> ...The ./emoji_unicode/pattern.py file is generated
by parsing the ./emoji_unicode/emoji-data.txt file,
then putting the output in a in-memory copy of
./emoji_unicode/pattern_template.py, and lastly
writing the result into pattern.py.
To generate the pattern.py file, run:
make gen
make test
This will run some silly benchmarks.
make bench
Here is the output on my machine:
emoji.replace()
text len: 10000
0.01640868396498263

re.sub() (raw match)
text len: 10000
0.005225047003477812

Text with no emojis
emoji.replace()
text len: 10000
0.0014624089817516506
Thanks to iamcal/emoji-data for maintaining an incredible source of emojis that allowed me to make a robust test suite.
MIT
https://github.com/nitely/emoji-unicodeImportant to note: this currently is only released for windows, attempting to follow these steps on other operating systems will not work
This package’s purpose is to enable the automation of creating weekly scoresheets and runsheets for NSBL (North Shore Basketball League). It will achieve this through creating a web crawler to grab the weekly info for each year’s games, creating a new Excel file (based off the scoresheet/runsheet template) and populating its information.
To use the latest release of this package you should follow these steps:
Extract NSBL Games (its type is Application), right click on this file and choose Create Shortcut, this will create a shortcut file to the applicationNow that you have created a shortcut file, this is how to use the application:
Open), this will open up a command prompt window which you will interact with the script through.y otherwise type n or just press enter.month date-sunday-games.To report any bugs or suggest any improvements, you can either create a new Github issue (which will notify me and will document it so I can act on it), or if you have my details send me a msg/email etc and I will work on fixing it.
Depending on requirements of future development on the script, these are some features that I would like to add:
This package includes the following:
The external python (pip) libraries that are used to create this are:
nsbl-create-spreadsheets)pyinstaller '.\Extract NSBL Games.spec' which will run the pyinstaller with the necessary settings for it to workExtract NSBL Games which will contain the application data and executable
https://github.com/north-shore-basketball-league/nsbl-create-spreadsheets


An Ansible Role to install and configure Docker on Linux.
Docker and Docker Containers are widely used. Setting up a docker service is very common and useful.
This role is setting up docker and configuring it from official repositories.
Used Modules:
Install from Github
git clone https://github.com/while-true-do/ansible-role-srv_docker.git while_true_do.srv_docker
Install from Ansible Galaxy
ansible-galaxy install while_true_do.srv_docker
---
# defaults file for while_true_do.srv_docker

## Package Management
wtd_srv_docker_package: "docker"
# State can be present|latest|absent
wtd_srv_docker_package_state: "present"

# Define the source of docker:
# Source can be dist|ce
# dist = repository of your distribution
# ce = official community docker repository
wtd_srv_docker_package_source: "dist"
# Only used for source = ce|ee
# *_enabled can be 0|1
wtd_srv_docker_package_edge_enabled: 0
wtd_srv_docker_package_test_enabled: 0

# Docker Compose Packages
# State can be present|latest|absent|unmanaged
wtd_srv_docker_compose_package_state: "unmanaged"
# Source can be binary
wtd_srv_docker_compose_package_source: "binary"
# Only used, when source = binary
wtd_srv_docker_compose_package_version: "1.24.1"
wtd_srv_docker_compose_package_path: "/usr/local/bin/docker-compose"

## Service Management
wtd_srv_docker_service: "docker"
# State can be started|stopped
wtd_srv_docker_service_state: "started"
wtd_srv_docker_service_enabled: true

## User and Group Management
wtd_srv_docker_group: "docker"
# State can be present|absent
wtd_srv_docker_group_state: "present"
# A list of user names.
wtd_srv_docker_group_users: []
Running Ansible Roles can be done in a playbook.
---
- hosts: all
  roles:
    - role: while_true_do.srv_docker
Add users to the docker group.
- hosts: all
  roles:
    - role: while_true_do.srv_docker
      wtd_srv_docker_group_users:
        - user1
        - user2
      wtd_srv_docker_service_enabled: "no"
Use the docker-ce version and install docker-compose.
- hosts: all
  roles:
    - role: while_true_do.srv_docker
      wtd_srv_docker_compose_package_state: "present"
      wtd_srv_docker_package_source: "ce"
Most of the “generic” tests are located in the Test Library.
Ansible specific testing is done with Molecule.
Infrastructure testing is done with testinfra.
Automated testing is done with Travis CI.
Thank you so much for considering to contribute. We are very happy, when somebody is joining the hard work. Please fell free to open Bugs, Feature Requests or Pull Requests after reading the Contribution Guideline.
See who has contributed already in the kudos.txt.
This work is licensed under a BSD-3-Clause License.
https://github.com/while-true-do/ansible-role-srv_docker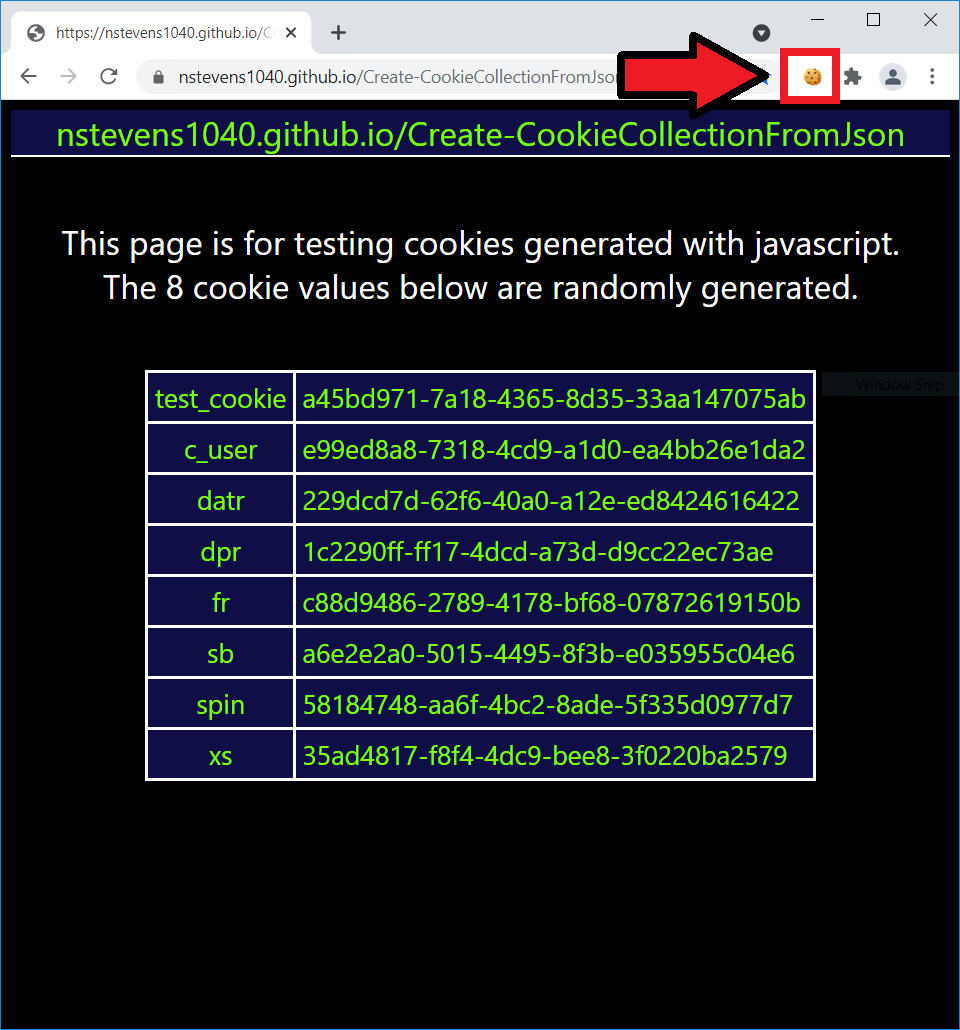
(Tested and working on both Windows PowerShell 5.1 as well as PowerShell Core 7.1.3.)
I’m leaving this at the top of the page for convenience.
The command below will make Create-CookieCollectionFromJson available in your current PowerShell session.
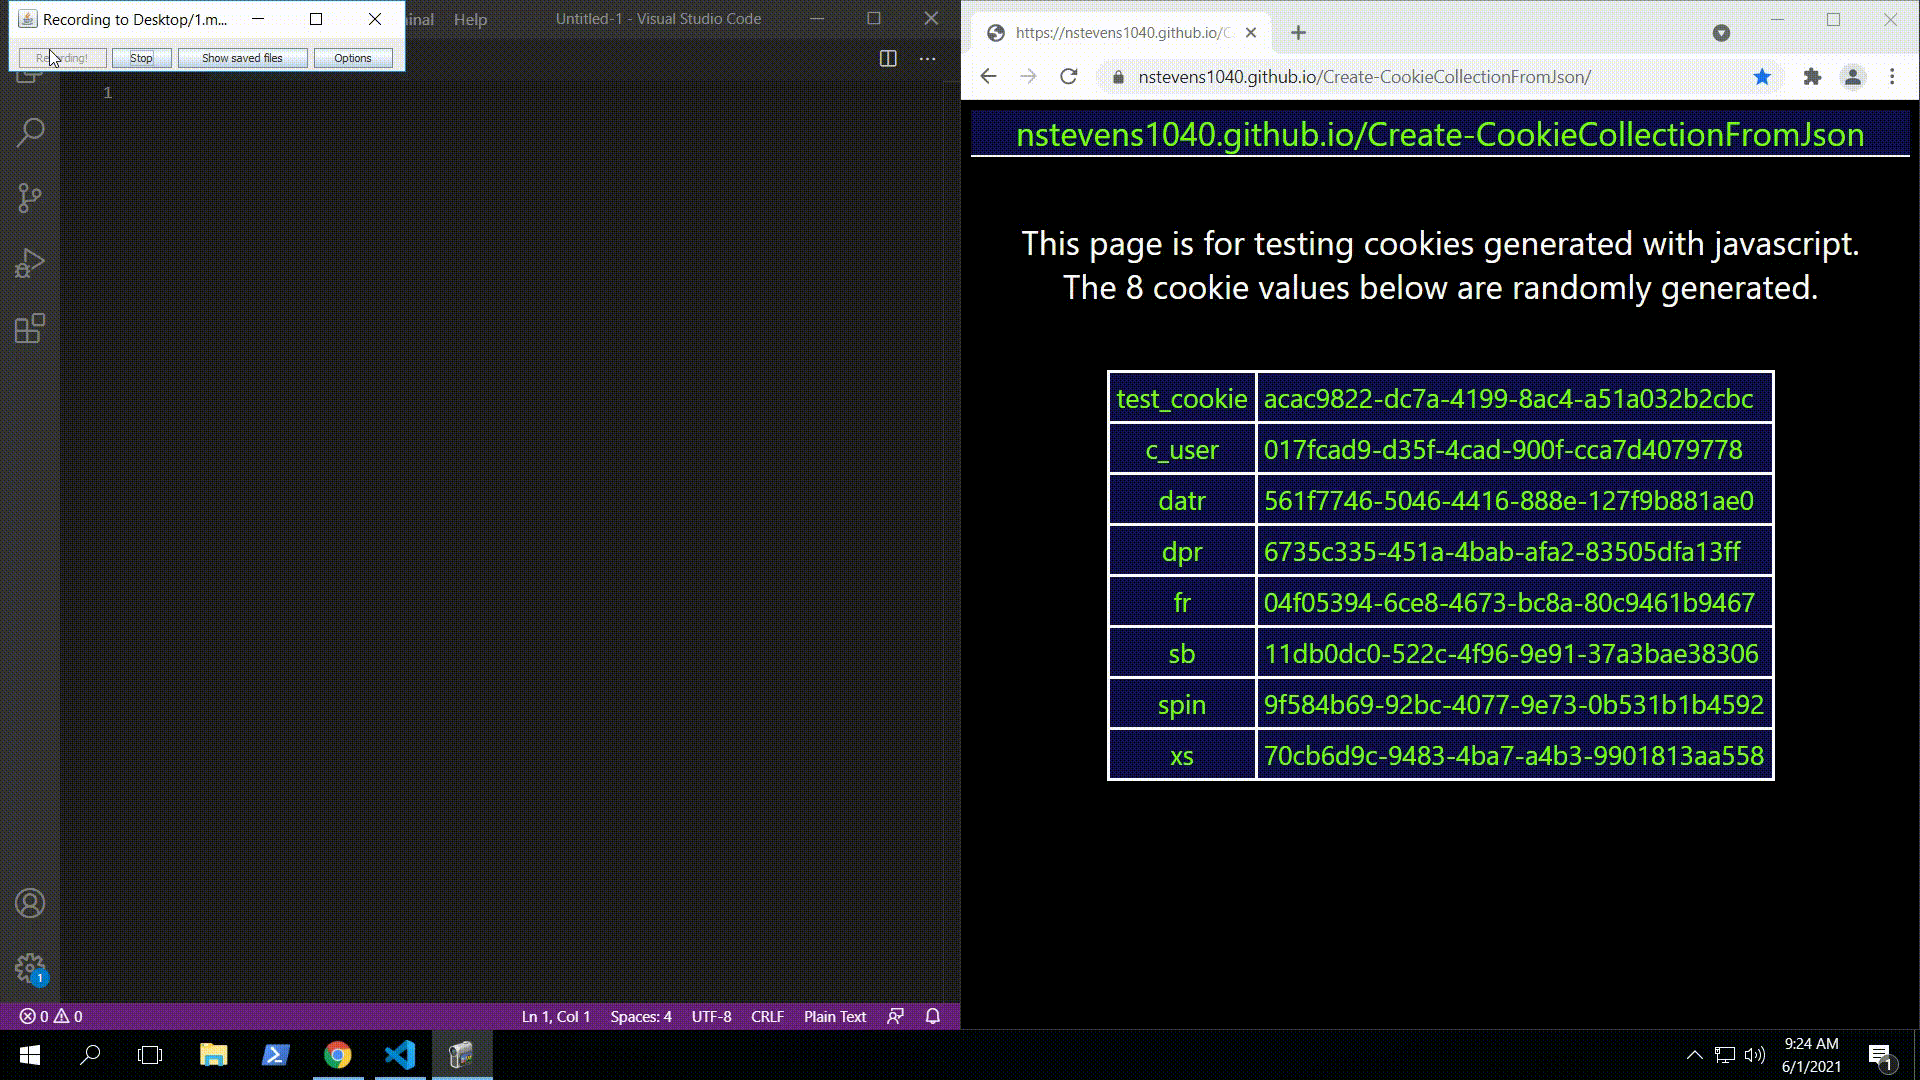
iex (irm "https://raw.githubusercontent.com/nstevens1040/Create-CookieCollectionFromJson/main/Create-CookieCollectionFromJson.ps1")It is a PowerShell script that creates a System.Net.CookieCollection object using the json exported from the EditThisCookie browser extension.
Together with my other library Execute.HttpRequest, this script will alow you to make authenticated HTTP requests in Windows PowerShell via cookies.
Although Execute.HttpRequest is fully functional in Windows PowerShell it does not work in PowerShell Core (yet).
A word of caution; please be smart while using your cookies. They are used to authenticate you.
Install the EditThisCookie browser extension (currently available for Chrome and Opera).
Once it’s installed, you can identify the extension by it’s cookie icon.

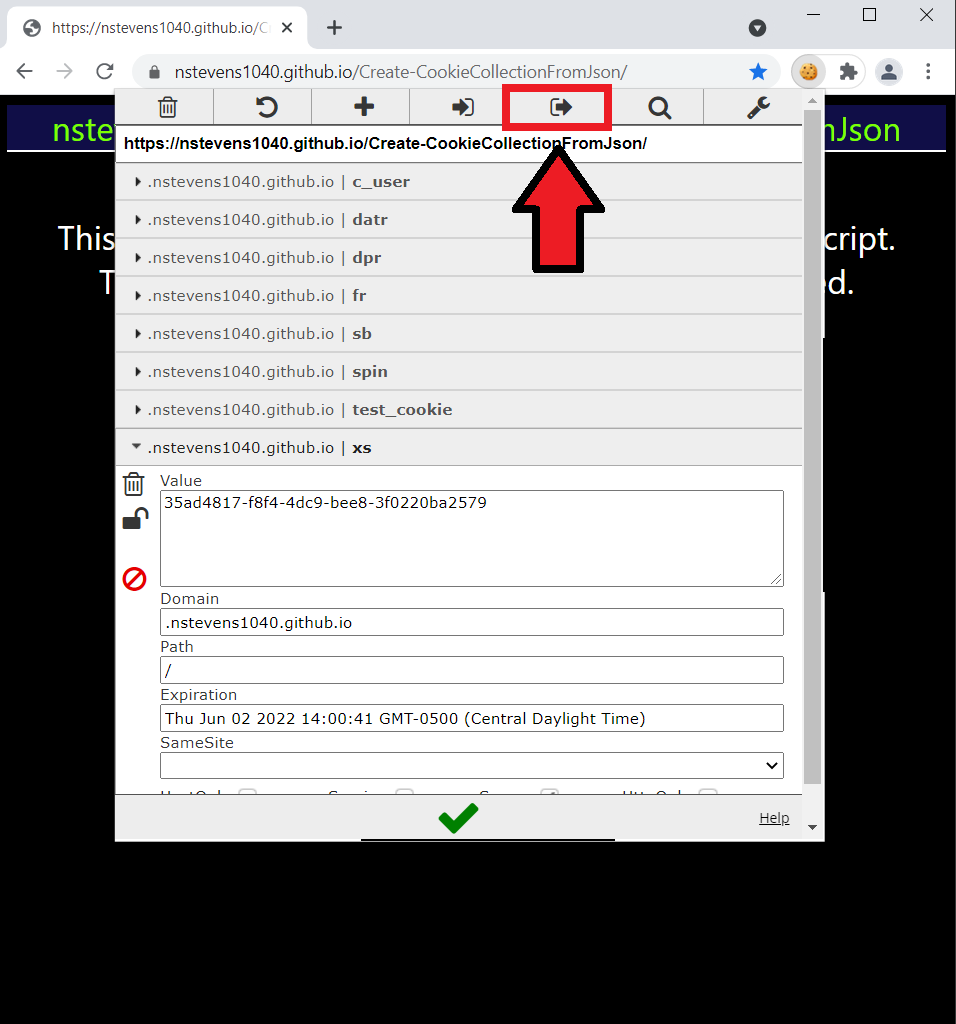
Click once on the cookie icon, then find the export button.

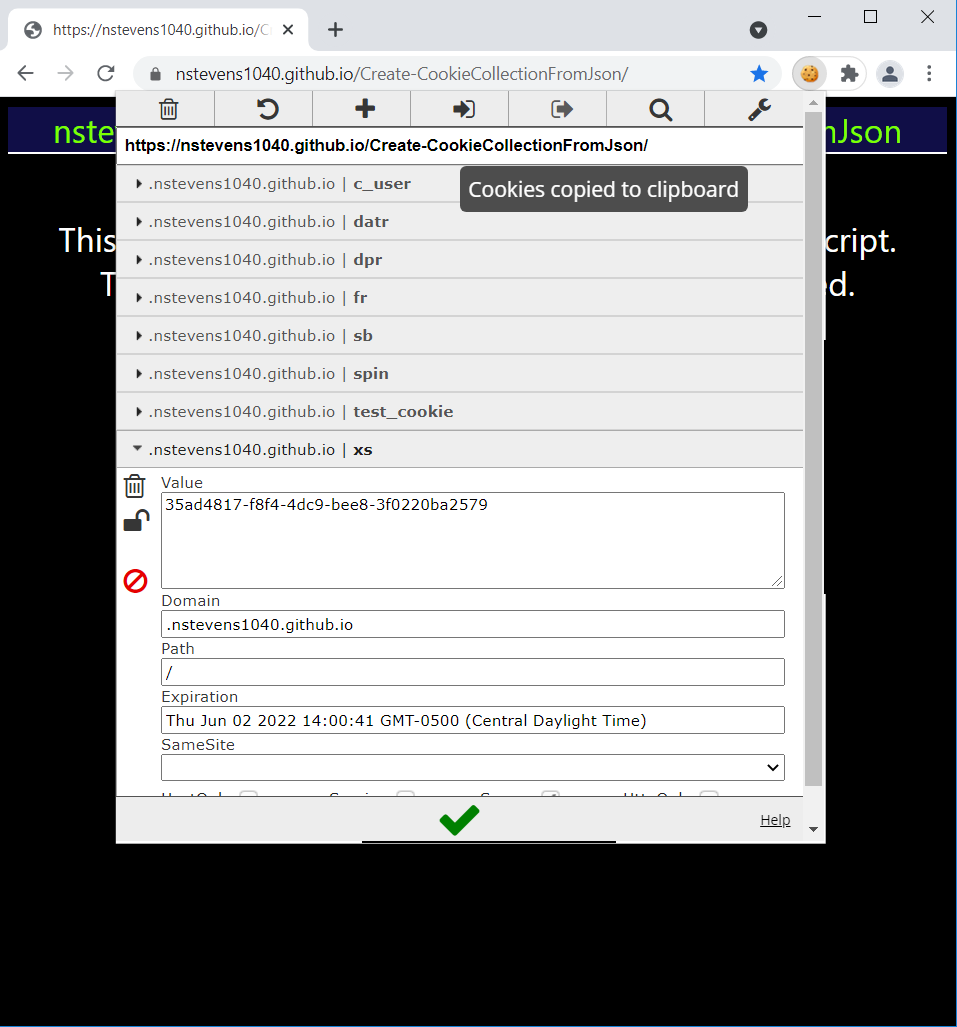
Click once on the export icon. The extension will let say Cookies copied to the clipboard in a small pop-up box.

Open your favorite text editor and paste your cookies. Save the file with a .json file extension.

Now that you have your cookies in a json file, go ahead and launch PowerShell.
1. To make the script available in your current PowerShell session, run the code below.
iex (irm "https://raw.githubusercontent.com/nstevens1040/Create-CookieCollectionFromJson/main/Create-CookieCollectionFromJson.ps1")2. The script takes a string argument via the -JsonFilePath parameter.
Create-CookieCollectionFromJson -JsonFilePath "$($ENV:USERPROFILE)\Desktop\cookies.json"The script will notify you of it’s success and let you know how to access the cookies.
It creates a custom c# class with a property named (your cookie domain)_cookies.

In the example above, after I create my CookieCollection object the script tells me that it’s accessible via [Nstevens1040.Cookies]::nstevens1040_cookies.
To view my CookieCollection’s properties, I run
[Nstevens1040.Cookies]::nstevens1040_cookies | select name,value,expires,secure,path,domain | ft -AutoSize3. To use the CookieCollection in an HTTP request I load my other library, Execute.HttpRequest, into Windows PowerShell with the command below.
(Step 3 onward works only in Windows PowerShell and not PowerShell Core)
[System.Net.ServicePointManager]::SecurityProtocol = [System.Net.SecurityProtocolType]::Tls12
iex (irm "https://github.com/nstevens1040/Execute.HttpRequest/releases/download/v1.1.8/Quick-Start.ps1")
4. Send my HTTP request
$r = [Execute.HttpRequest]::Send(
    "https://nstevens1040.github.io/Create-CookieCollectionFromJson",
    [System.Net.Http.HttpMethod]::Get,
    $null,
    [Nstevens1040.Cookies]::nstevens1040_cookies
)
To view the CookieCollection returned from the HTTP request
$r.CookieCollection | select name,value,expires,secure,path,domain | ft -AutoSizeLaunch PowerShell.
(Tested in both Windows PowerShell and PowerShell Core)
1. To make the script available in your current PowerShell session, run the code below.
iex (irm "https://raw.githubusercontent.com/nstevens1040/Create-CookieCollectionFromJson/main/Create-CookieCollectionFromJson.ps1")2. The script takes a string argument via the -JsonFilePath parameter and if you want the script to return the C# source use the -ReturnCSharp switch.
Create-CookieCollectionFromJson -JsonFilePath "$($ENV:USERPROFILE)\Desktop\cookies.json" -ReturnCSharpThis will return the raw CSharp source code that you can use. Example output below
namespace Nstevens1040
{
    using System.Net;
    using System;
    public class Cookies
    {
        public static CookieCollection nstevens1040_cookies = new CookieCollection(){
            new Cookie(){
                Domain = ".nstevens1040.github.io",
                Expires = DateTime.Parse(@"1970-01-01").AddSeconds(1654093426),
                HttpOnly = false,
                Name = "c_user",
                Path = "https://github.com/",
                Secure = true,
                Value = "017fcad9-d35f-4cad-900f-cca7d4079778"
            },
            new Cookie(){
                Domain = ".nstevens1040.github.io",
                Expires = DateTime.Parse(@"1970-01-01").AddSeconds(1654093426),
                HttpOnly = false,
                Name = "datr",
                Path = "https://github.com/",
                Secure = true,
                Value = "561f7746-5046-4416-888e-127f9b881ae0"
            },
            new Cookie(){
                Domain = ".nstevens1040.github.io",
                Expires = DateTime.Parse(@"1970-01-01").AddSeconds(1654093426),
                HttpOnly = false,
                Name = "dpr",
                Path = "https://github.com/",
                Secure = true,
                Value = "6735c335-451a-4bab-afa2-83505dfa13ff"
            },
            new Cookie(){
                Domain = ".nstevens1040.github.io",
                Expires = DateTime.Parse(@"1970-01-01").AddSeconds(1654093426),
                HttpOnly = false,
                Name = "fr",
                Path = "https://github.com/",
                Secure = true,
                Value = "04f05394-6ce8-4673-bc8a-80c9461b9467"
            },
            new Cookie(){
                Domain = ".nstevens1040.github.io",
                Expires = DateTime.Parse(@"1970-01-01").AddSeconds(1654093426),
                HttpOnly = false,
                Name = "sb",
                Path = "https://github.com/",
                Secure = true,
                Value = "11db0dc0-522c-4f96-9e91-37a3bae38306"
            },
            new Cookie(){
                Domain = ".nstevens1040.github.io",
                Expires = DateTime.Parse(@"1970-01-01").AddSeconds(1654093426),
                HttpOnly = false,
                Name = "spin",
                Path = "https://github.com/",
                Secure = true,
                Value = "9f584b69-92bc-4077-9e73-0b531b1b4592"
            },
            new Cookie(){
                Domain = ".nstevens1040.github.io",
                Expires = DateTime.Parse(@"1970-01-01").AddSeconds(1654093426),
                HttpOnly = false,
                Name = "test_cookie",
                Path = "https://github.com/",
                Secure = true,
                Value = "acac9822-dc7a-4199-8ac4-a51a032b2cbc"
            },
            new Cookie(){
                Domain = ".nstevens1040.github.io",
                Expires = DateTime.Parse(@"1970-01-01").AddSeconds(1654093426),
                HttpOnly = false,
                Name = "xs",
                Path = "https://github.com/",
                Secure = true,
                Value = "70cb6d9c-9483-4ba7-a4b3-9901813aa558"
            }
        };
    }
}
https://github.com/nstevens1040/Create-CookieCollectionFromJsonThis project was bootstrapped with Create React App.
In the project directory, you can run:
Runs the app in the development mode.
Open http://localhost:3000 to view it in the browser.
The page will reload if you make edits.
You will also see any lint errors in the console.
Launches the test runner in the interactive watch mode.
See the section about running tests for more information.
Builds the app for production to the build folder.
It correctly bundles React in production mode and optimizes the build for the best performance.
The build is minified and the filenames include the hashes.
Your app is ready to be deployed!
See the section about deployment for more information.
Note: this is a one-way operation. Once you eject, you can’t go back!
If you aren’t satisfied with the build tool and configuration choices, you can eject at any time. This command will remove the single build dependency from your project.
Instead, it will copy all the configuration files and the transitive dependencies (webpack, Babel, ESLint, etc) right into your project so you have full control over them. All of the commands except eject will still work, but they will point to the copied scripts so you can tweak them. At this point you’re on your own.
You don’t have to ever use eject. The curated feature set is suitable for small and middle deployments, and you shouldn’t feel obligated to use this feature. However we understand that this tool wouldn’t be useful if you couldn’t customize it when you are ready for it.
You can learn more in the Create React App documentation.
To learn React, check out the React documentation.
This section has moved here: https://facebook.github.io/create-react-app/docs/code-splitting
This section has moved here: https://facebook.github.io/create-react-app/docs/analyzing-the-bundle-size
This section has moved here: https://facebook.github.io/create-react-app/docs/making-a-progressive-web-app
This section has moved here: https://facebook.github.io/create-react-app/docs/advanced-configuration
This section has moved here: https://facebook.github.io/create-react-app/docs/deployment
This section has moved here: https://facebook.github.io/create-react-app/docs/troubleshooting#npm-run-build-fails-to-minify
https://github.com/dagreatcode/fullstack-shop


