TripPlanner is a comprehensive travel planning application that combines interactive mapping, detailed activity scheduling, and budget management.
I created TripPlanner as both a learning experience and a practical solution for my own travel planning needs. This project allowed me to dive deep into React development, work with external APIs, and implement user authentication while building something I would actually use.
TripPlanner is designed for desktop use only. For the best experience, please access the application on a desktop browser.
TripPlanner in a nutshell:
📍 Interactive map integration with HERE Maps API
📅 Day-by-day activity planning
💰 Budget tracking for each activity
🔄 Real-time updates and synchronization
🔐 Secure user authentication
Key Features
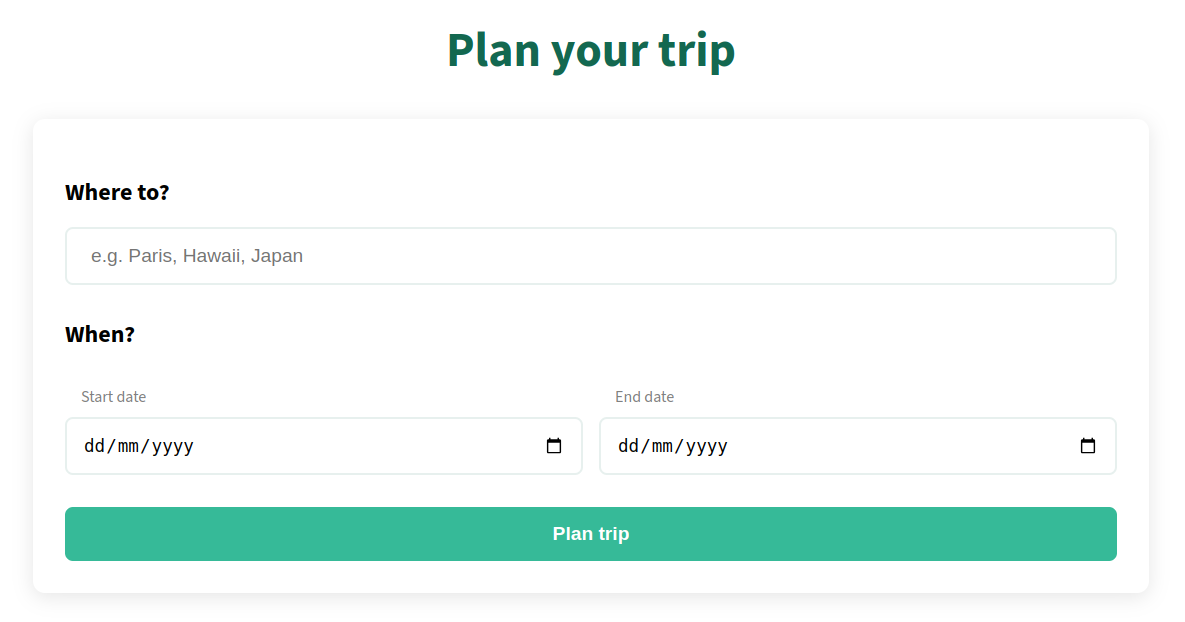
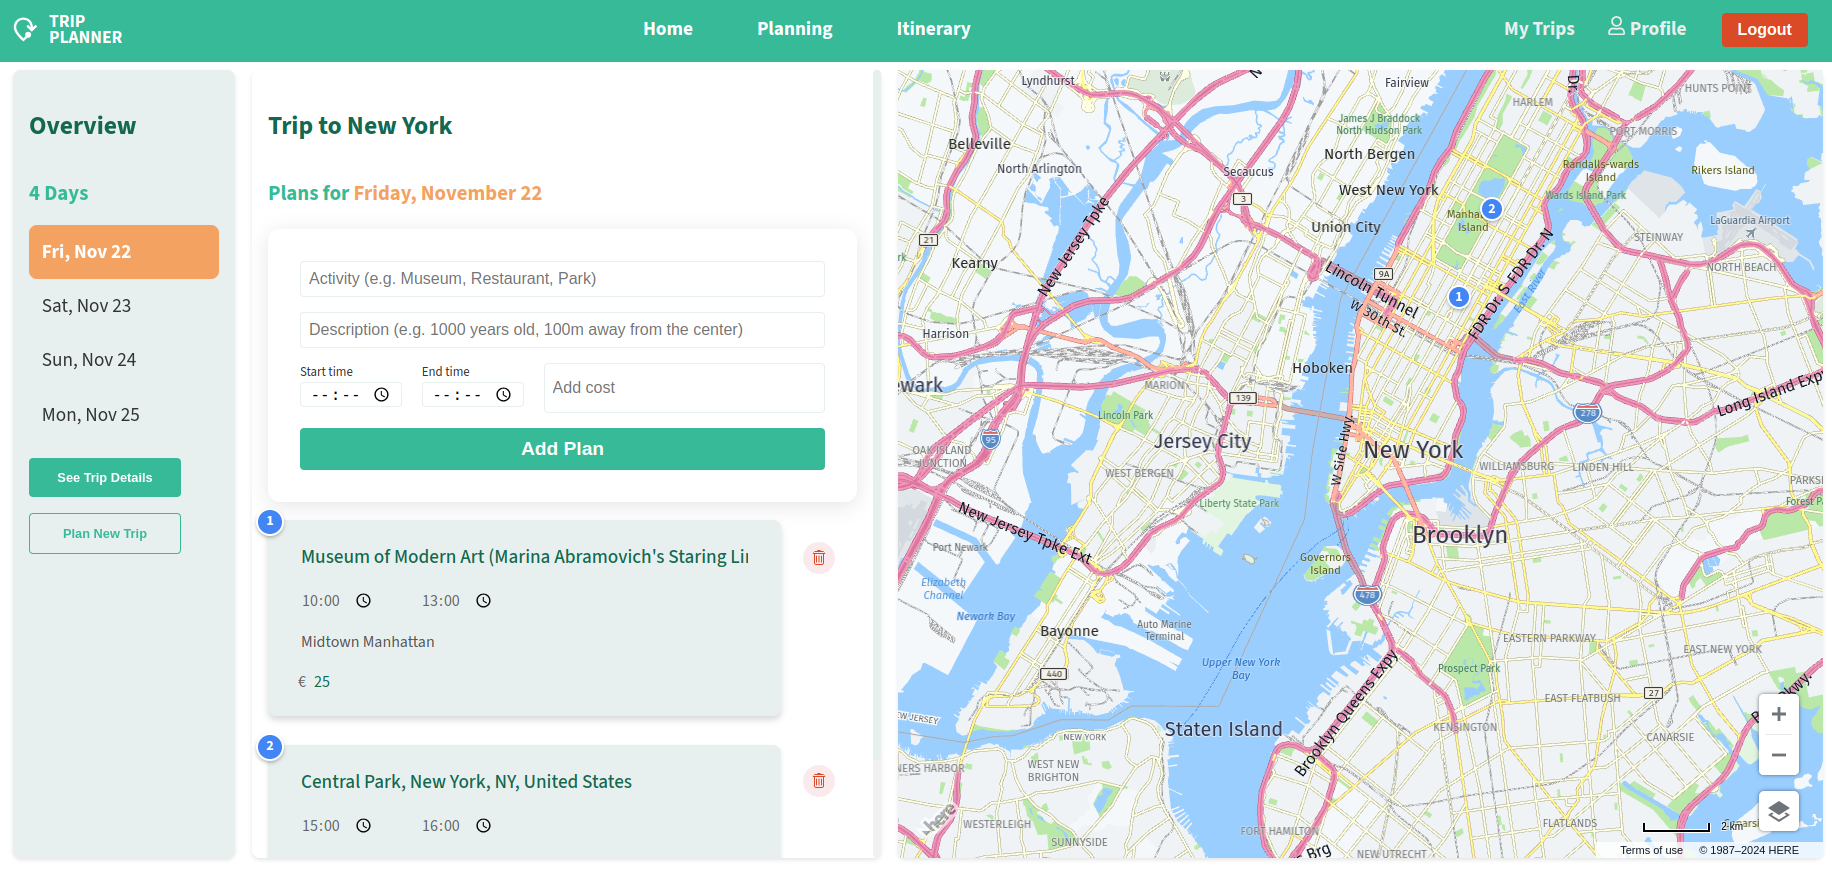
1. Interactive Trip Planning
Destination search with HERE Maps API autocomplete
Interactive map with location markers
Day-by-day itinerary planning
2. Activity Management
Add, edit, and remove activities
Set start and end times
Add activity descriptions
Track costs per activity
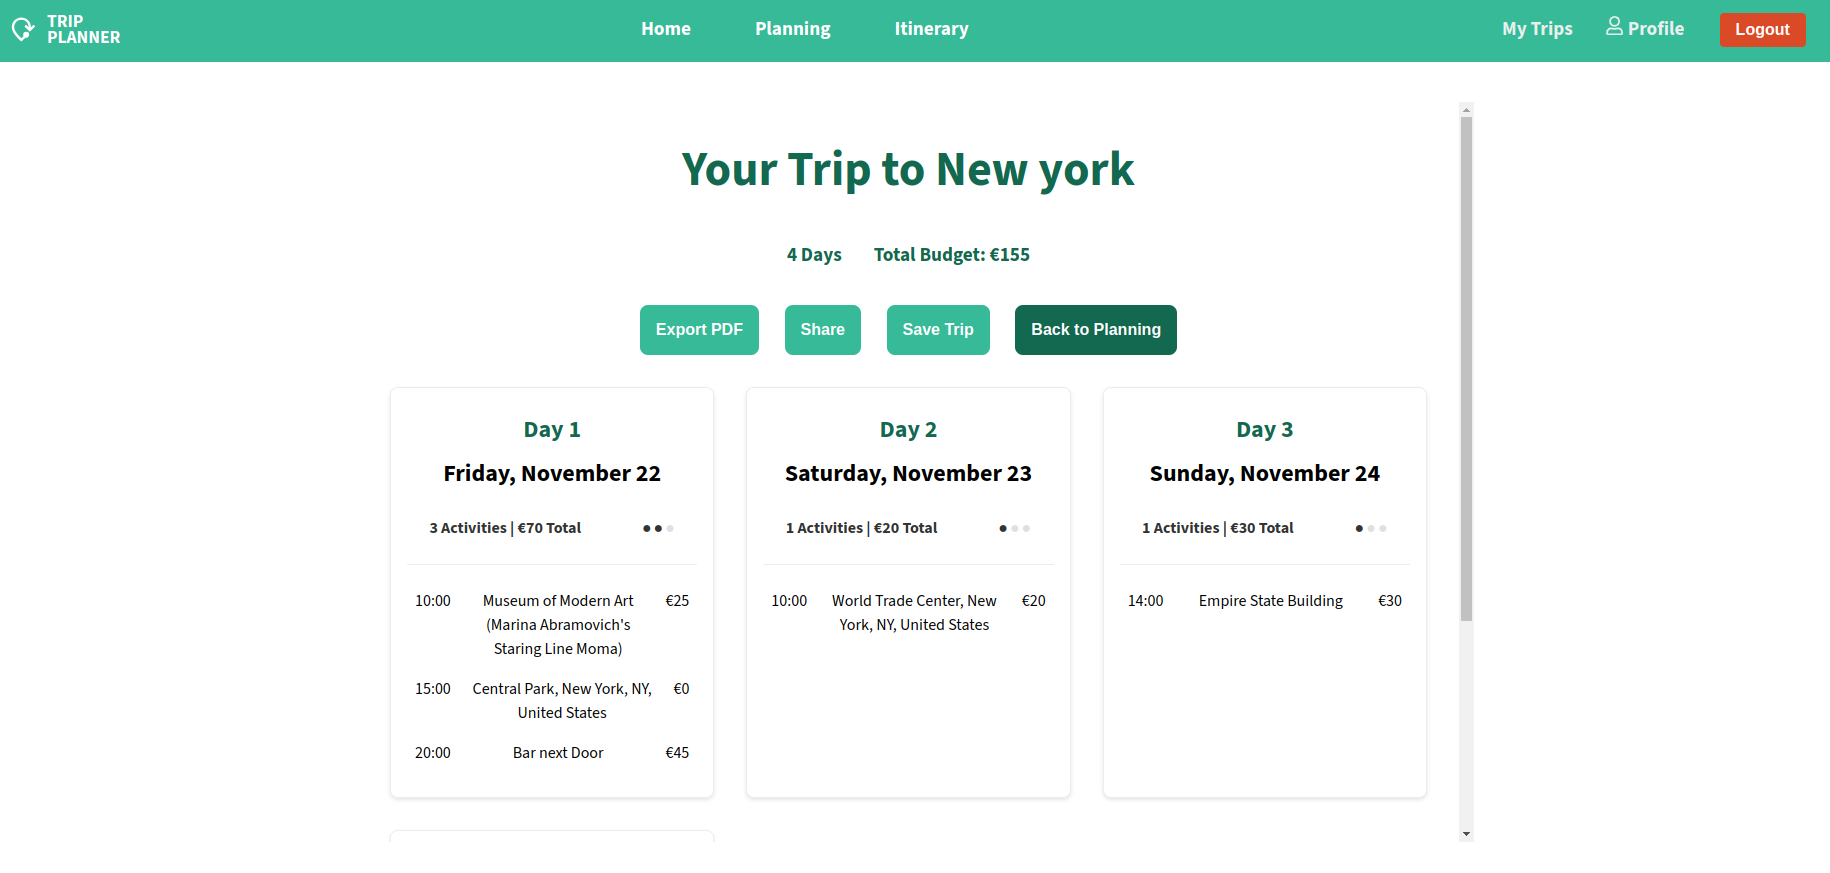
Automatic budget calculation
3. Map Integration
Interactive HERE Maps integration
Location search and suggestions
Visual representation of planned activities
Custom markers for each activity
4. User Management
Secure authentication system using Firebase
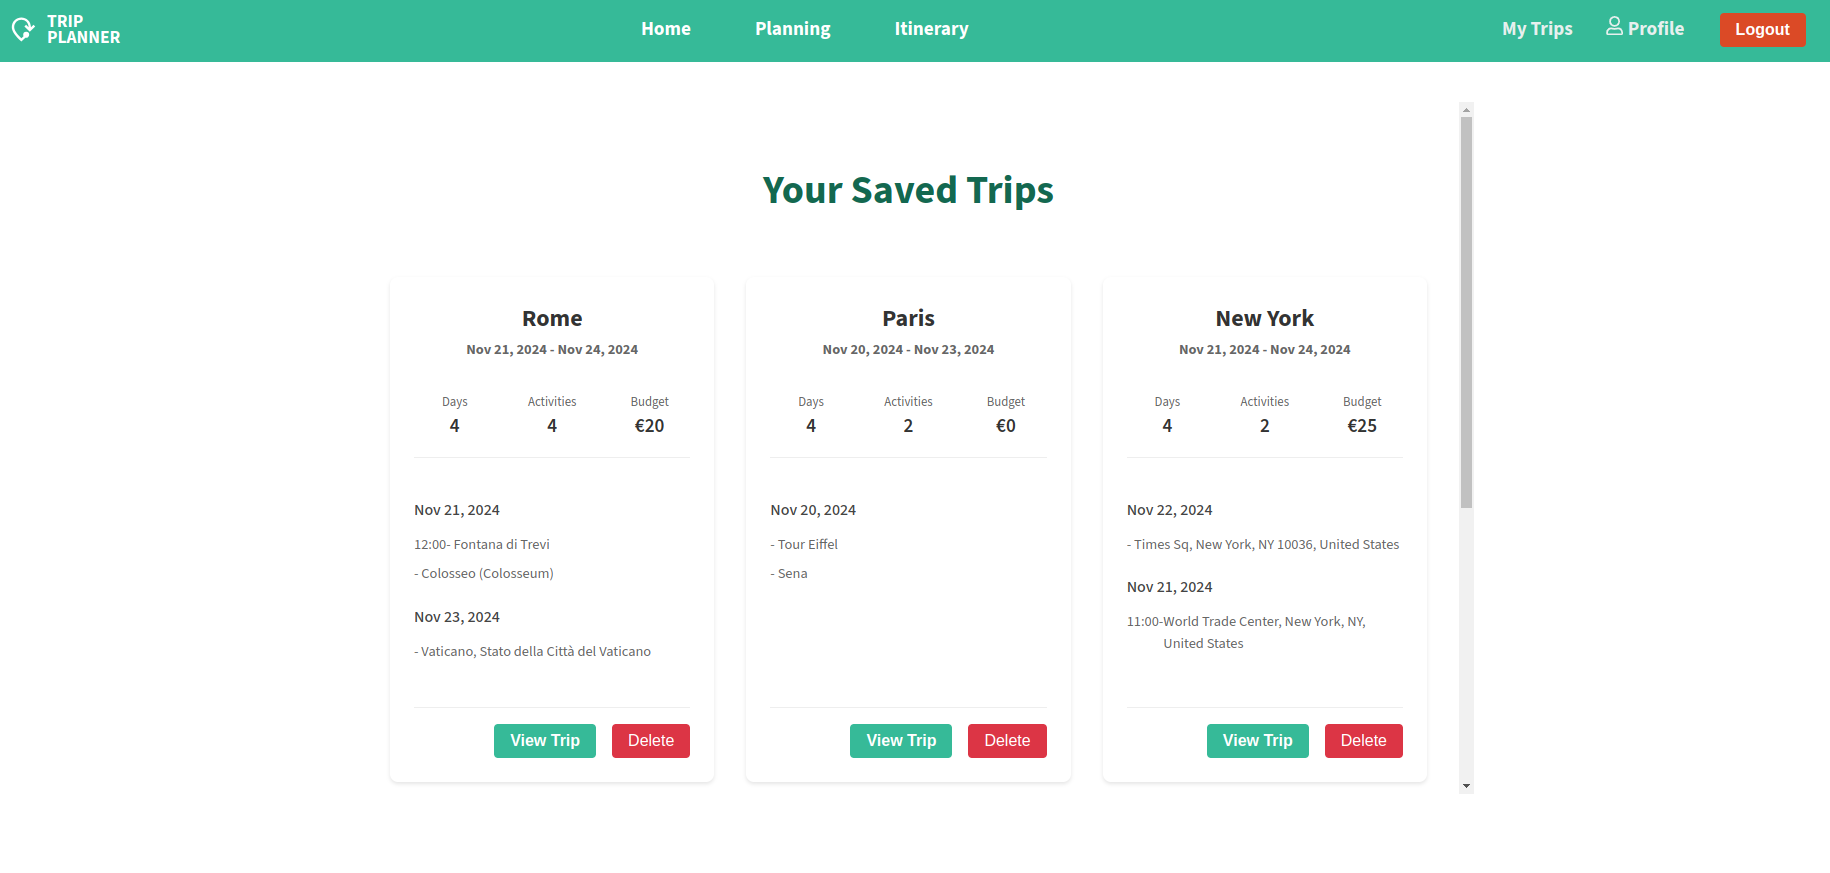
Personal dashboard
Save and manage multiple trips
Simple profile customization
5. Data Export & Sharing
Export itineraries to PDF
Simple sharing of trip content with others
6. State Management
React Context API for global state
Custom reducers for predictable state updates
Real-time synchronization with Firestore
Local storage for guest users
Note: The contact email shown in the footer of my application is not real and is included for demonstration purposes only.
A big thanks to Wanderlog for inspiring the design and functionality of this application. Their outstanding platform provided valuable insights that shaped my approach to building my TripPlanner.
Caution: When you’re using feathers v4 and want to upgrade to feathers v5, please make sure to read the migration guide.
NOTE: This is the version for Feathers v5. For Feathers v4 use feathers-sequelize v6
A Feathers database adapter for Sequelize, an ORM for Node.js. It supports PostgreSQL, MySQL, MariaDB, SQLite and MSSQL and features transaction support, relations, read replication and more.
Very Important: Before using this adapter you have to be familiar with both, the Feathers Basics and general use of Sequelize. For associations and relations see the associations section. This adapter may not cover all use cases but they can still be implemented using Sequelize models directly in a Custom Feathers service.
paginate (optional) – A pagination object containing a default and max page size
multi (optional) – Allow create with arrays and update and remove with idnull to change multiple items. Can be true for all methods or an array of allowed methods (e.g. [ 'remove', 'create' ])
operators (optional) – An array of additional query operators to allow (e..g [ '$regex', '$geoNear' ]). Default is the supported operators
filters (optional) – An object of additional query parameters to allow (e..g { '$post.id$': true }).`
params.sequelize
When making a service method call, params can contain an sequelize property which allows to pass additional Sequelize options. This can e.g. be used to retrieve associations. Normally this wil be set in a before hook:
app.service('messages').hooks({before: {find(context){// Get the Sequelize instance. In the generated application via:constsequelize=context.app.get('sequelizeClient');const{ User }=sequelize.models;context.params.sequelize={include: [User]}returncontext;}}});
Other options that params.sequelize allows you to pass can be found in Sequelize querying docs.
Beware that when setting a top-level where property (usually for querying based on a column on an associated model), the where in params.sequelize will overwrite your query.
This library offers some additional functionality when using sequelize.returning in services that support multi. The multi option allows you to create, patch, and remove multiple records at once. When using sequelize.returning with multi, the sequelize.returning is used to indicate if the method should return any results. This is helpful when updating large numbers of records and you do not need the API (or events) to be bogged down with results.
operatorMap
Sequelize deprecated string based operators a while ago for security reasons. Starting at version 4.0.0 feathers-sequelize converts queries securely, so you can still use string based operators listed below. If you want to support additional Sequelize operators, the operatorMap service option can contain a mapping from query parameter name to Sequelize operator. By default supported are:
// Find all users with name similar to Davapp.service('users').find({query: {name: {$like: 'Dav%'}}});
GET /users?name[$like]=Dav%
Modifying the Model
Sequelize allows you to call methods like Model.scope(), Model.schema(), and others. To use these methods, extend the class to overwrite the getModel method.
By default, all feathers-sequelize operations will return raw data (using raw: true when querying the database). This results in faster execution and allows feathers-sequelize to interoperate with feathers-common hooks and other 3rd party integrations. However, this will bypass some of the “goodness” you get when using Sequelize as an ORM:
custom getters/setters will be bypassed
model-level validations are bypassed
associated data loads a bit differently
…and several other issues that one might not expect
Don’t worry! The solution is easy. Please read the guides about working with model instances. You can also pass { raw: true/false} in params.sequelize to change the behavior per service call.
Working with MSSQL
When using MSSQL as the database, a default sort order always has to be applied, otherwise the adapter will throw an Invalid usage of the option NEXT in the FETCH statement. error. This can be done in your model with:
exportdefaultfunction(options={}){returnasynccontext=>{const{ query ={}}=context.params;// Sort by id field ascending (or any other property you want)// See https://docs.feathersjs.com/api/databases/querying.html#sortconst$sort={id: 1};context.params.query={$sort: {},
...query}returncontext;}}
Primary keys
All tables used by a feathers-sequelize service require a primary key. Although it is common practice for many-to-many tables to not have a primary key, this service will break if the table does not have a primary key. This is because most service methods require an ID and because of how feathers maps services to URLs.
Example
Here is an example of a Feathers server with a messages SQLite Sequelize Model:
importpathfrom'path';import{feathers}from'@feathersjs/feathers';importexpressfrom'@feathersjs/express';importsocketiofrom'@feathersjs/socketio';importSequelizefrom'sequelize';importSequelizeServicefrom'feathers-sequelize';constsequelize=newSequelize('sequelize','','',{dialect: 'sqlite',storage: path.join(__dirname,'db.sqlite'),logging: false});constMessage=sequelize.define('message',{text: {type: Sequelize.STRING,allowNull: false}},{freezeTableName: true});// Create an Express compatible Feathers application instance.constapp=express(feathers());// Turn on JSON parser for REST servicesapp.use(express.json());// Turn on URL-encoded parser for REST servicesapp.use(express.urlencoded({extended: true}));// Enable REST servicesapp.configure(express.rest());// Enable Socket.io servicesapp.configure(socketio());// Create an in-memory Feathers service with a default page size of 2 items// and a maximum size of 4app.use('/messages',newSequelizeService({Model: Message,paginate: {default: 2,max: 4}}));app.use(express.errorHandler());Message.sync({force: true}).then(()=>{// Create a dummy Messageapp.service('messages').create({text: 'Message created on server'}).then(message=>console.log('Created message',message));});// Start the serverconstport=3030;app.listen(port,()=>{console.log(`Feathers server listening on port ${port}`);});
The documentation on Sequelize associations and relations is essential to implementing associations with this adapter and one of the steepest parts of the Sequelize learning curve. If you have never used an ORM, let it do a lot of the heavy lifting for you!
Setting params.sequelize.include
Once you understand how the include option works with Sequelize, you will want to set that option from a before hook in Feathers. Feathers will pass the value of context.params.sequelize as the options parameter for all Sequelize method calls. This is what your hook might look like:
// GET /my-service?name=John&include=1function(context){const{ include, ...query}=context.params.query;if(include){constAssociatedModel=context.app.services.fooservice.Model;context.params.sequelize={include: [{model: AssociatedModel}]};// Update the query to not include `include`context.params.query=query;}returncontext;}
Underneath the hood, feathers will call your models find method sort of like this:
// YourModel is a sequelize modelconstoptions=Object.assign({where: {name: 'John'}},context.params.sequelize);YourModel.findAndCount(options);
To query based on a column in an associated model, you can use Sequelize’s nested column syntax in a query. The nested column syntax is considered a filter by Feathers, and so each such usage has to be whitelisted.
Example:
// Find a user with post.id == 120app.service('users').find({query: {'$post.id$': 120,include: {model: posts}}});
For this case to work, you’ll need to add ‘$post.id$’ to the service options’ ‘filters’ property.
Working with Sequelize Model instances
It is highly recommended to use raw queries, which is the default. However, there are times when you will want to take advantage of Sequelize Instance methods. There are two ways to tell feathers to return Sequelize instances:
import{hydrate}from'feathers-sequelize';exportdefault{after: {// ...find: [hydrate()]// ...},// ...};// Or, if you need to include associated models, you can do the following:constincludeAssociated=()=>(context)=>hydrate({include: [{model: context.app.services.fooservice.Model}]});exportdefault{after: {// ...find: [includeAssociated()]// ...},// ...};
Important: When working with Sequelize Instances, most of the feathers-hooks-common will no longer work. If you need to use a common hook or other 3rd party hooks, you should use the “dehydrate” hook to convert data back to a plain object:
Sequelize by default gives you the ability to add validations at the model level. Using an error handler like the one that comes with Feathers your validation errors will be formatted nicely right out of the box!
Errors
Errors do not contain Sequelize specific information. The original Sequelize error can be retrieved on the server via:
import{ERROR}=from'feathers-sequelize';try{awaitsequelizeService.doSomething();}catch(error){// error is a FeathersError// Safely retrieve the Sequelize errorconstsequelizeError=error[ERROR];}
Testing sequelize queries in isolation
If you wish to use some of the more advanced features of sequelize, you should first test your queries in isolation (without feathers). Once your query is working, you can integrate it into your feathers app.
1. Build a test file
Create a temporary file in your project root like this:
// test.jsimportappfromfrom'./src/app';// run setup to initialize relationsapp.setup();constseqClient=app.get('sequelizeClient');constSomeModel=seqClient.models['some-model'];constlog=console.log.bind(console);SomeModel.findAll({/* * Build your custom query here. We will use this object later. */}).then(log).catch(log);
And then run this file like this:
node test.js
Continue updating the file and running it until you are satisfied with the results.
2. Integrate the query using a “before” hook
Once your have your custom query working to your satisfaction, you will want to integrate it into your feathers app. Take the guts of the findAll operation above and create a “before” hook:
functionbuildCustomQuery(context){context.params.sequelize={/* * This is the same object you passed to "findAll" above. * This object is *shallow merged* onto the underlying query object * generated by feathers-sequelize (it is *not* a deep merge!). * The underlying data will already contain the following: * - "where" condition based on query paramters * - "limit" and "offset" based on pagination settings * - "order" based $sort query parameter * You can override any/all of the underlying data by setting it here. * This gives you full control over the query object passed to sequelize! */};}someService.hooks({before: {find: [buildCustomQuery]}});
Migrations
Migrations with feathers and sequelize are quite simple. This guide will walk you through creating the recommended file structure, but you are free to rearrange things as you see fit. The following assumes you have a migrations folder in the root of your app.
Create the migrations config in migrations/config.js:
constapp=require('../src/app');constenv=process.env.NODE_ENV||'development';constdialect='postgres';// Or your dialect namemodule.exports={[env]: {
dialect,url: app.get(dialect),migrationStorageTableName: '_migrations'}};
Define your models config in migrations/models.js:
constSequelize=require('sequelize');constapp=require('../src/app');constsequelize=app.get('sequelizeClient');constmodels=sequelize.models;// The export object must be a dictionary of model names -> models// It must also include sequelize (instance) and Sequelize (constructor) propertiesmodule.exports=Object.assign({
Sequelize,
sequelize
},models);
Migrations workflow
The migration commands will load your application and it is therefore required that you define the same environment variables as when running your application. For example, many applications will define the database connection string in the startup command:
This will create a new file in the migrations/scripts folder. All migration file names will be prefixed with a sortable data/time string: 20160421135254-meaningful-name.js. This prefix is crucial for making sure your migrations are executed in the proper order.
NOTE: The order of your migrations is determined by the alphabetical order of the migration scripts in the file system. The file names generated by the CLI tools will always ensure that the most recent migration comes last.
Add the up/down scripts:
Open the newly created migration file and write the code to both apply and undo the migration. Please refer to the sequelize migration functions for available operations. Do not be lazy – write the down script too and test! Here is an example of converting a NOT NULL column accept null values:
ProTip: As of this writing, if you use the changeColumn method you must always specify the type, even if the type is not changing.
ProTip: Down scripts are typically easy to create and should be nearly identical to the up script except with inverted logic and inverse method calls.
Keeping your app code in sync with migrations
The application code should always be up to date with the migrations. This allows the app to be freshly installed with everything up-to-date without running the migration scripts. Your migrations should also never break a freshly installed app. This often times requires that you perform any necessary checks before executing a task. For example, if you update a model to include a new field, your migration should first check to make sure that new field does not exist:
The CLI tools will always run your migrations in the correct order and will keep track of which migrations have been applied and which have not. This data is stored in the database under the _migrations table. To ensure you are up to date, simply run the following:
sequelize db:migrate
ProTip: You can add the migrations script to your application startup command to ensure that all migrations have run every time your app is started. Try updating your package.json scripts attribute and run npm start:
To undo the last migration, run the following command:
sequelize db:migrate:undo
Continue running the command to undo each migration one at a time – the migrations will be undone in the proper order.
Note: – You shouldn’t really have to undo a migration unless you are the one developing a new migration and you want to test that it works. Applications rarely have to revert to a previous state, but when they do you will be glad you took the time to write and test your down scripts!
Reverting your app to a previous state
In the unfortunate case where you must revert your app to a previous state, it is important to take your time and plan your method of attack. Every application is different and there is no one-size-fits-all strategy for rewinding an application. However, most applications should be able to follow these steps (order is important):
Stop your application (kill the process)
Find the last stable version of your app
Count the number of migrations which have been added since that version
Undo your migrations one at a time until the db is in the correct state
There are several breaking changes for feathers-sequelize in Feathers v5. This guide will help you to migrate your existing Feathers v4 application to Feathers v5.
Named export
The default export of feathers-sequelize has been removed. You now have to import the SequelizeService class directly:
The old options.operators object is renamed to options.operatorMap:
import{SequelizeService}from'feathers-sequelize';import{Op}from'sequelize';app.use('/messages',newSequelizeService({
Model,// operators is now operatorMap:operatorMap: {$between: Op.between}}));
These functions are used to invoke telephone calls from your Python program.
For example, callText is used to call a specified number and automatically play
your text message using text-to-speech engine.
In order for this class to work, you’ll need to have Voicent Gateway installed
somewhere in your network. This class simply sends HTTP request for telephone
calls to the gateway. Voicent has a free edition for the gateway.
You can download it from http://www.voicent.com.
Bugs are tracked on GitHub Issues.
In case of trouble, please check there if your issue has already been reported.
If you spotted it first, help us smashing it by providing a detailed and welcomed
feedback.
This package implements ServiceDiscovery interface of Olric and uses Consul at background. With this plugin, you don’t need
to maintain a static list of alive peers in the cluster.
Install
Get the code:
go get -u github.com/olric-data/olric-consul-plugin
Usage
Load as compiled plugin
Build
With a properly configured Go environment:
go build -buildmode=plugin -o consul.so
If you want to strip debug symbols from the produced binary, add -ldflags="-s -w" to build command.
If you prefer to deploy Olric in client-server scenario, add a serviceDiscovery block to your olricd.yaml. A sample:
This plugin has very few configuration parameters:
Parameter
Description
provider
Name of the service discovery daemon. It’s Consul. Just informal
path
Absolute path of the compiled plugin
plugin
Pointer to imported plugin
address
Network address of the service discovery daemon
passingOnly
If you set this true, only healthy nodes will be discovered
payload
Service record for Consul
replaceExistingChecks
Missing healthchecks from the request will be deleted from the agent. Using this parameter allows to idempotently register a service and its checks without having to manually deregister checks.
insecureSkipVerify
Controls whether a client verifies the server’s certificate chain and host name. If insecureSkipVerify is true, TLS accepts any certificate presented by the server and any host name in that certificate.
Please note that you cannot set plugin and path simultaneously. Olric chooses path if you set both of them.
Contributions
Please don’t hesitate to fork the project and send a pull request or just e-mail me to ask questions and share ideas.
License
The Apache License, Version 2.0 – see LICENSE for more details.
Library to perform basic transformation on notion database. It is possible to
apply function on a property or combinations of properties in order to edit properties.
⚠ Use at your own risk. If you want to be safe, please apply the functions on copies of the
properties you want to edit (Or at least when testing the proper working of your code).
 Copyright 2022 Thomas Hirtz

 Licensed under the Apache License, Version 2.0 (the "License");
 you may not use this file except in compliance with the License.
 You may obtain a copy of the License at

     http://www.apache.org/licenses/LICENSE-2.0

 Unless required by applicable law or agreed to in writing, software
 distributed under the License is distributed on an "AS IS" BASIS,
 WITHOUT WARRANTIES OR CONDITIONS OF ANY KIND, either express or implied.
 See the License for the specific language governing permissions and
 limitations under the License.
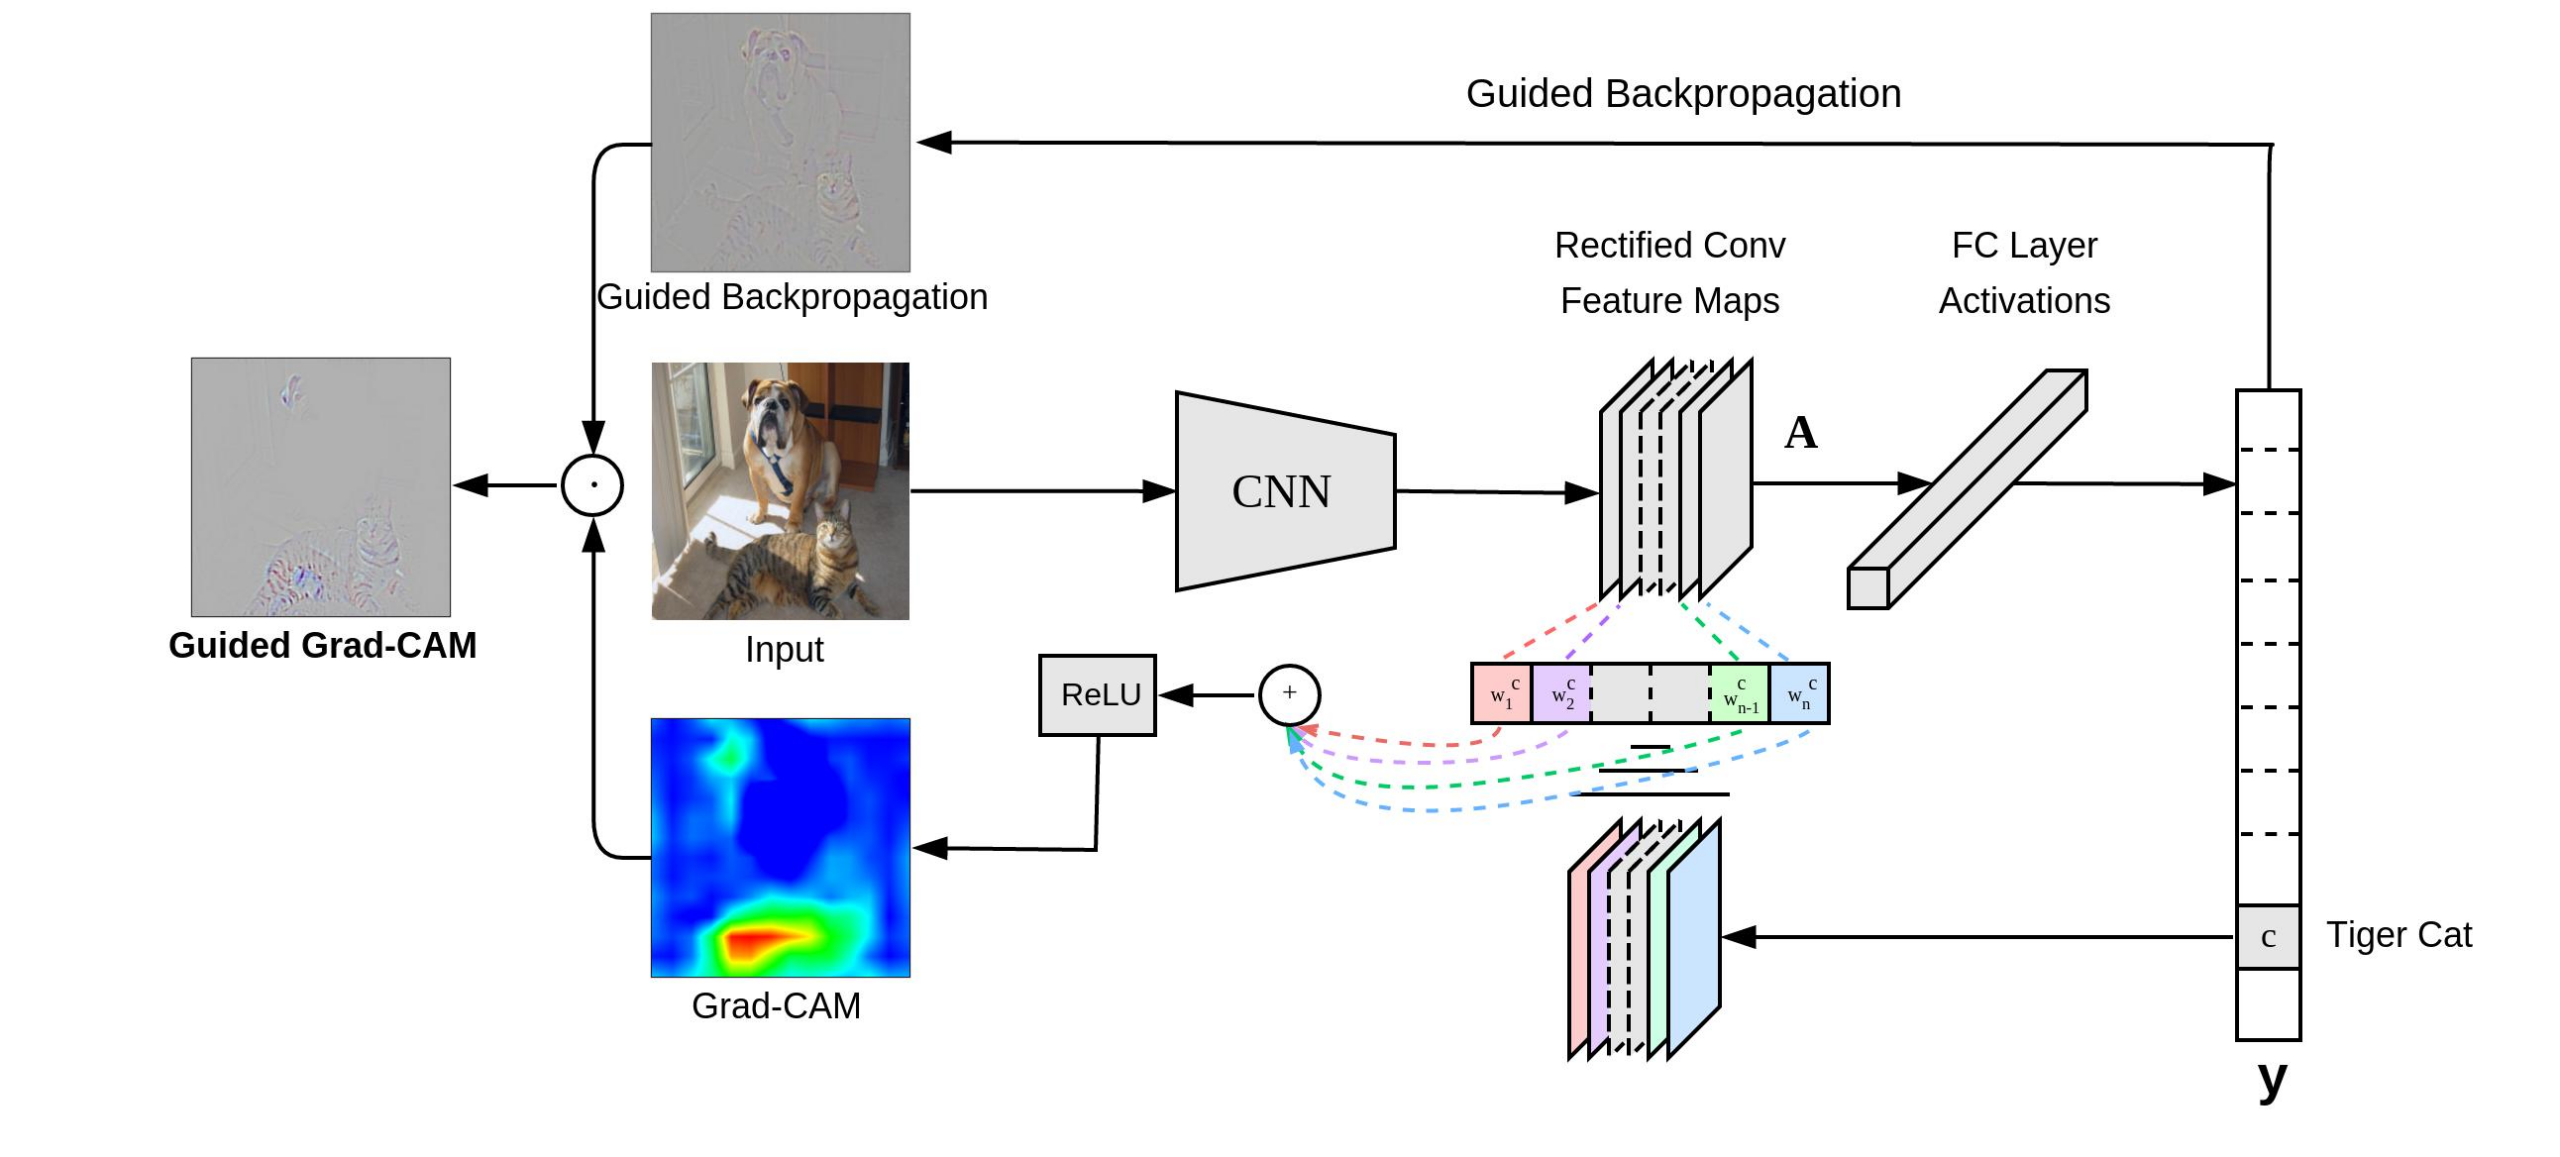
proto_file: Path to the deploy.prototxt file for the CNN Caffe model. Default is models/VGG_ILSVRC_16_layers_deploy.prototxt
model_file: Path to the .caffemodel file for the CNN Caffe model. Default is models/VGG_ILSVRC_16_layers.caffemodel
input_image_path: Path to the input image. Default is images/cat_dog.jpg
input_sz: Input image size. Default is 224 (Change to 227 if using AlexNet)
layer_name: Layer to use for Grad-CAM. Default is relu5_3 (use relu5_4 for VGG-19 and relu5 for AlexNet)
label: Class label to generate grad-CAM for (-1 = use predicted class, 283 = Tiger cat, 243 = Boxer). Default is -1. These correspond to ILSVRC synset IDs
out_path: Path to save images in. Default is output/
gpuid: 0-indexed id of GPU to use. Default is -1 = CPU
backend: Backend to use with loadcaffe. Default is nn
save_as_heatmap: Whether to save heatmap or raw Grad-CAM. 1 = save heatmap, 0 = save raw Grad-CAM. Default is 1
Examples
‘border collie’ (233)
‘tabby cat’ (282)
‘boxer’ (243)
‘tiger cat’ (283)
Visual Question Answering
Clone the VQA (http://arxiv.org/abs/1505.00468) sub-repository (git submodule init && git submodule update), and download and unzip the provided extracted features and pretrained model.
proto_file: Path to the deploy.prototxt file for the CNN Caffe model. Default is models/VGG_ILSVRC_19_layers_deploy.prototxt
model_file: Path to the .caffemodel file for the CNN Caffe model. Default is models/VGG_ILSVRC_19_layers.caffemodel
input_image_path: Path to the input image. Default is images/cat_dog.jpg
input_sz: Input image size. Default is 224 (Change to 227 if using AlexNet)
layer_name: Layer to use for Grad-CAM. Default is relu5_4 (use relu5_3 for VGG-16 and relu5 for AlexNet)
question: Input question. Default is What animal?
answer: Optional answer (For eg. “cat”) to generate Grad-CAM for (” = use predicted answer). Default is ”
out_path: Path to save images in. Default is output/
model_path: Path to VQA model checkpoint. Default is VQA_LSTM_CNN/lstm.t7
gpuid: 0-indexed id of GPU to use. Default is -1 = CPU
backend: Backend to use with loadcaffe. Default is cudnn
save_as_heatmap: Whether to save heatmap or raw Grad-CAM. 1 = save heatmap, 0 = save raw Grad-CAM. Default is 1
Examples
What animal? Dog
What animal? Cat
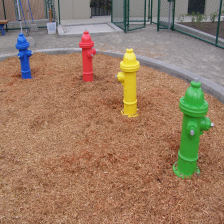
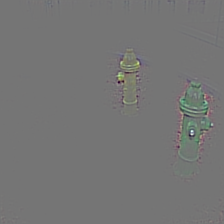
What color is the fire hydrant? Green
What color is the fire hydrant? Yellow
What color is the fire hydrant? Green and Yellow
What color is the fire hydrant? Red and Yellow
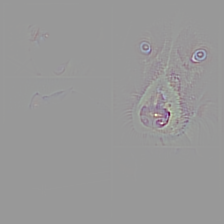
Image Captioning
Clone the neuraltalk2 sub-repository. Running sh models/download_models.sh will download the pretrained model and place it in the neuraltalk2 folder.
Change lines 2-4 of neuraltalk2/misc/LanguageModel.lua to the following:
local utils = require 'neuraltalk2.misc.utils'
local net_utils = require 'neuraltalk2.misc.net_utils'
local LSTM = require 'neuraltalk2.misc.LSTM'
th captioning.lua -input_image_path images/cat_dog.jpg -caption 'a dog and cat posing for a picture' -gpuid 0
th captioning.lua -input_image_path images/cat_dog.jpg -caption '' -gpuid 0
Options
input_image_path: Path to the input image. Default is images/cat_dog.jpg
input_sz: Input image size. Default is 224 (Change to 227 if using AlexNet)
layer: Layer to use for Grad-CAM. Default is 30 (relu5_3 for vgg16)
caption: Optional input caption. No input will use the generated caption as default
out_path: Path to save images in. Default is output/
model_path: Path to captioning model checkpoint. Default is neuraltalk2/model_id1-501-1448236541.t7
gpuid: 0-indexed id of GPU to use. Default is -1 = CPU
backend: Backend to use with loadcaffe. Default is cudnn
save_as_heatmap: Whether to save heatmap or raw Grad-CAM. 1 = save heatmap, 0 = save raw Grad-CAM. Default is 1