Hybrid cloud means the use of both public cloud platform and on-premises resources. Public cloud platforms, such as Amazon Web Services, Microsoft Azure or Google Cloud platform which offers infrastructure as a service (IaaS). A hybrid cloud enables an organization to extend their datacenter capacity, utilize new cloud-native capabilities, move applications closer to customers, and create a backup and disaster recovery solution with cost-effective high availability. Hybrid cloud has benefits but comes with technical, business and management challenges and requires the expertise of cloud architects.
Background
I was asked to automate and orchestrate on-demand Hybrid Cloud Infrastructure which will help us to connect with our client’s private environment to identify loopholes and perform necessary actions requires in their environment.
Problem
How to create a Hybrid Environment?
Solution
AWS and OpenVPN to the rescue. In this document I am using AWS environment to build my public infrastructure but we can also Azure, GCP or any other cloud infrastructure provider.
Create Certificate Authority
We are not going to cover building a certificate authority in this post. We have to build CA and Diffie Hellman Key and then signed our server and client certificates using the CA to be use by OpenVPN. However, we can easily achieve this by using easy-rsa, please follow Setting up your own Certificate Authority.
 port 443
 proto tcp
 dev tun
 ca ca.crt
 cert server.crt
 key server.key
 dh dh.pem
 topology subnet
 server 162.200.100.0 255.255.255.0
 route [Your Client Subnet] [Subnet Mask]
 push "route [Your Server Private Subnet] [Subnet Mask]"
 client-config-dir ccd
 ifconfig-pool-persist /var/log/openvpn/ipp.txt
 keepalive 10 120
 cipher AES-256-CBC
 persist-key
 persist-tun
 status /var/log/openvpn/openvpn-status.log
 verb 3
ccd/client
iroute [Your Client Subnet] [Subnet Mask]
Client Configurations – client.conf
client.conf
 client
 dev tun
 proto tcp
 remote [Your Server Public IP Address]
 port 443
 topology subnet
 resolv-retry infinite
 nobind
 persist-key
 persist-tun
 ca ca.crt
 cert client.crt
 key client.key
 remote-cert-tls server
 cipher AES-256-CBC
 verb 3
Firewalls – Server
iptables (IPV4)
  iptables -A FORWARD -i eth+ -o tun+ -j ACCEPT
  iptables -A FORWARD -i tun+ -o eth+ -m state --state RELATED,ESTABLISHED -j ACCEPT
Enable IPv4 Forwarding – changes to /etc/sysctl.conf
net.ipv4.ip_forward = 1
What about IPV6? [Optional but Interesting]
You can create a IPv6 tunnel over IPv4 with OpenVPN. Add the following to your server.conf file and there will no changes require to your client.conf file.
The GoDaddy Email Marketing Signup Forms plugin makes it easy to start building an email list to drive repeat traffic to your WordPress site! Use this plugin to add a signup form to your site in no time flat.
With a GoDaddy Email Marketing starter account, you can collect as many email addresses as you like for free. And you can send up to 50 total emails to try it out. To learn more about GoDaddy Email Marketing, check out an overview here.
Once the plugin is activated, you can easily add a default signup form to your site using a widget. Or you can build your own custom signup form in GoDaddy Email Marketing and add it to your site by using a widget, shortcode, or template tag.
Setup is easy; in the plugin Settings, simply enter your GoDaddy username and GoDaddy Email Marketing API key. Don’t have one? The plugin makes it easy to sign up.
Official GoDaddy Email Marketing Signup Forms plugin features:
Automatically add new forms for users to subscribe to an email list of your choice.
Insert unlimited signup forms using the widget, shortcode, or template tag.
Try GoDaddy Email Marketing for free — no credit card required.
Once the plugin has been installed, click Activate.
Nagivate to Settings > GoDaddy Email Marketing where you will find a Settings tab.
Follow the instructions to access your username and API key. If you don’t have a GoDaddy Email Marketing account, you’ll be able to create one.
Click Save Settings.
After your account is verified, you can insert a form into your site by using a widget, shortcode, or template tag directly in your theme. See the FAQ section for more details.
That’s it. You’re ready to go!
Frequently Asked Questions
What is GoDaddy Email Marketing?
GoDaddy Email Marketing is the easiest way to create, send, share, and track email newsletters online. It’s for people who want email marketing to be simple.
Do I need a GoDaddy Email Marketing account to use this plugin?
Absolutely. Use it by finding the GoDaddy Email Marketing widget under Appearance > Widgets in the WordPress Dashboard and dragging it into the widget area of your choice. You can then add a title and select a form!
Is there a shortcode?
Yes! You can add a form to any post or page by adding the shortcode with the form ID (e.g., [gem id=123456 ]) in the page/post editor.
Is there a template tag?
Yup! Add the following template tag into any WordPress theme template file: <?php gem_form( $form_id ); ?>. For example: <?php gem_form( 123456 ); ?> where 123456 is your form ID.
Where can I find my form IDs?
To find your form IDs, navigate to Settings > GoDaddy Email Marketing and select the Forms tab. If you’ve recently created new forms click the Refresh Forms button to pull them into your WordPress site.
Where can I find the API Key?
You can find your Secret API Key in the Settings section of your GoDaddy Email Marketing account on the right hand side.
Screenshots
Settings screen.
A full list of your GoDaddy Email Marketing Webforms, with ready shortcodes.
The widget, on the widgets page.
The widget, on the front-end.
GoDaddy Email Marketing widget block.
GoDaddy Email Marketing widget preview, in the block editor.
GoDaddy Email Marketing widget, on the block front-end.
Changelog
1.4.3
Fix: Remove reference to $ and use jQuery
Fix: Fix block icon SVG element so it renders properly in Firefox as well as Chrome.
Tweak: Test with and bump support for WordPress 5.4.
EMC ECS is a stateful, containerized, object storage system for cloud storage protocols. ECS is compatible with AWS S3 and OpenStack Swift. On file-enabled buckets, ECS can provide NFS exports for file-level access to objects.
ECS can be set up on one or more hosts or virtual machines in a single-site or a multi-site geo replicated configuration. We want the wider community to use ECS and provide feedback. Usage of this software is under the End User License Agreement at the bottom of this README.
ECS Community Edition is a free, reduced footprint, version of Dell EMC’s ECS software. Of course, this means there are some limitations to the use of the software, so the question arises; how is the Community Edition of ECS different from the production version?
License difference
As noted with the included license, ECS Community cannot be used in production environments and is intended to be used for trial and proof of concept purposes only. This software is still owned and protected by Dell EMC.
Feature differences
It it important to note that ECS-Community Edition is not the same as ECS software and as such lacks some features that are integral to the actual ECS software.
ECS Community Edition does NOT support encryption
ECS Community Edition does NOT include ECS’ system management, or “fabric”, layer
Notice
Because of these differences, ECS Community Edition is absolutely not qualified for testing failure scenarios. Failure scenarios can only be adequately mimicked on the full version of ECS Software.
Quick Start Guide
If you have the following:
A CentOS Minimal install of the latest CentOS release with:
16GB RAM
16GB block device for system
104GB block device for ECS
Internet access
No proxies, local mirrors, or special Docker registries
Then you should be able to get up and going with a Single-Node All-in-One install using these commands on your VM:
# git clone https://github.com/EMCECS/ECS-CommunityEdition
# cd ECS-CommunityEdition
# cp docs/design/reference.deploy.yml deploy.yml
# echo "Edit this deploy.yml to match your VM's environment"
# vi deploy.yml
# ./bootstrap.sh -y -g -c deploy.yml
And then after the node reboots (you did use a clean minimal install from ISO or netinstall right?):
# step1
# step2
And if all went well, you now have a working stand-alone ECS, mostly configured, and ready for use.
Hardware Requirements
Minimum
Note: A minimum configuration is only suitable for short-term sandbox testing
Hardware or virtual machine with:
4 CPU Cores
16GB RAM
16GB root block storage
104GB additional block storage
CentOS Minimal installation of the latest CentOS release
Recommended
Note: A recommended configuration is more suitable for longer-term functional testing
Hardware or virtual machine with:
8 CPU Cores
64GB RAM
16GB root block storage
1TB additional block storage
CentOS Minimal installation of the latest CentOS release
Deploy a multi-node ECS instance to two or more hardware or virtual machines. Three nodes are required to enable erasure-coding replication.
Deployments into Soft-Isolated and Air-Gapped Island Environments
Important information regarding Island deployments
Please be aware that install node bootstrapping requires Internet access to the hardware or virtual machine that will become the install node, but once this step is complete, the machine can be removed from the Internet and migrated into the Island environment.
Deploying from OVA
In situations where Internet access is completely disallowed, or for the sake of convenience, an OVA of a prefabricated, bootstrapped, install node is provided. Please download the OVA from one of the links below.
The OVA is shipped as a bootstrapped install node. It must be cloned multiple times to create as many Data Store Nodes as desired.
OVA Special Requirements
All nodes MUST be clones of the OVA.
All nodes MUST have their virtual hardware configurations updated to match the node type requirements.
Default Credentials
The default password for the admin accounts is ChangeMe. The default password for root is unknowable.
For security reasons, it is strongly advised to change the password for admin immediately after installation.
Network Configuration
The OVA is configured to acquire network settings via DHCP. Static configurations must be manually configured with sudo nmtui
OVA Download Links
Please see the release page for OVA download links.
Please validate the package integrity against the provided sha512 hash mentioned for a release, before commencing deployment.
Using an install node for isolated environments, deploy a multi-node ECS instance to two or more hardware or virtual machines. Three nodes are required to enable erasure-coding replication.
Please file bugs and issues at the ECS’s site in the EMC Community Network (ECS’s support site) and you can also use this GitHub’s repository issues page. For more general discussions you can contact the EMC Code team at Google Groups or tagged with EMC on Stack Overflow. The code and documentation are released with no warranties or SLAs and are intended to be supported through a community driven process.
License Agreement
EMC ECS Software Limited-Use License Agreement
This EMC Software License Agreement (the “Agreement”) is a legal agreement between EMC Corporation, with a principal office at 176 South Street, Hopkinton, MA 01748 USA (“EMC”) and you and the organization on whose behalf you are accessing this Agreement (the “Customer”) and governs Customer’s access to, downloading of, and use of any and all components, associated media, printed materials, documentation, and programming accessed via the EMC software (the “Software”).
By clicking on the “Agree” or check box or similar button set forth below, or by downloading, installing, or using the Software, you are representing to EMC that (i) you are authorized to legally bind the Customer, and (ii) you are agreeing on behalf of the Customer that the terms of this Agreement shall govern the relationship of the parties with regard to the Software.
If you do not have authority to agree to the terms of this Agreement, or do not accept the terms of this Agreement, click on the “Cancel” or similar button or discontinue your efforts to download the Software, and the registration, download and/or installation process will not continue. In such event, no access to, or authorization to download or use the Software, is granted by EMC.
EMC and Customer enter into this Agreement and this Agreement shall become effective on the date on which Customer clicks on the “Agree” button described above or downloads, installs or uses the Software, whichever occurs first (the “Effective Date”). NOW, THEREFORE, in consideration of the premises and obligations contained herein, it is agreed as follows:
1.0 – DEFINITIONS
1.1 – “Equipment” means the Customer owned storage devices, systems, or central processing units that the Software was designed to run on or with.
1.2 – “Software” means the free EMC Software made available for download by Customer from a designated EMC web site.
2.0 – PURPOSE AND SCOPE
2.1 – The Software shall be used for Customer’s internal business purposes and in accordance with EMC’s instructions and documentation. The Software is available from EMC to Customer at no charge, but only after Customer agrees to the license terms as contained in this Agreement.
2.2 – Under this Agreement, Customer may use the Software on the related Equipment it owns.
3.0 LICENSE TERMS
3.1 – EMC grants Customer a license to use the Software on the Equipment commencing on download for as long as Customer complies with this Agreement. The foregoing licenses shall be non-exclusive, non-transferable, and non-sublicensable and subject to the restriction that the Software be used solely on or in connection with the Equipment for which it was licensed. EMC may terminate licenses, without liability, if Customer breaches this Agreement and fails to cure within thirty (30) days after receipt of EMC’s written notice thereof. Upon termination, Customer shall cease all use and return or certify destruction of Software (including copies) to EMC. Customer shall not, without EMC’s prior written consent, use the Software in a production environment, service bureau capacity, or copy, provide, disclose or otherwise make available Software in any form to anyone other than Customer’s agents, employees, consultants or independent contractors (“Personnel”), who shall use Software solely for Customer’s internal business purposes in a manner consistent with this Agreement. Customer shall be fully responsible to EMC for the compliance of Customer’s personnel herewith.
3.2 – Software is licensed only. No title to, or ownership of, the Software is transferred to Customer. Customer shall reproduce and include copyright and other proprietary notices on and in any copies, including but not limited to partial, physical or electronic copies, of the Software. Neither Customer nor its personnel shall modify, enhance, supplement, create derivative works from, reverse assemble, reverse engineer, reverse compile or otherwise reduce to human readable form the Software without EMC’s prior written consent. Any third party software that may be provided by EMC shall be governed by the third party’s separate license terms, if any.
4.0 – DELIVERY AND INSTALLATION
4.1 – Delivery of the Software is by download only.
4.2 – EMC shall, as necessary, provide Customer with information to download, install and use the Software.
5.0 – TERM AND TERMINATION
5.1 – If Customer fails to perform any of its material covenants, obligations or responsibilities under this Agreement, Customer shall be in default and breach of this Agreement, and EMC shall, in addition to any other remedies, which may be available to EMC under this Agreement, in law or equity, in its sole discretion, have the right to terminate this Agreement and any or all related license(s) granted to Customer by written notice thereto, with such termination to be effective immediately.
5.2 – EMC may terminate this Agreement for its convenience at any time by providing Customer with a minimum of thirty (30) days prior notice.
6.0 – NO WARRANTY OR SUPPORT
6.1 – EMC PROVIDES ALL SOFTWARE HEREUNDER ON AN “AS-IS,” “WHERE IS” BASIS, AND MAKES NO OTHER EXPRESS WARRANTIES, WRITTEN OR ORAL, AND ALL OTHER WARRANTIES ARE SPECIFICALLY EXCLUDED, INCLUDING, BUT NOT LIMITED TO, THE IMPLIED WARRANTY OF MERCHANTABILITY, FITNESS FOR A PARTICULAR PURPOSE OR NON-INFRINGEMENT, AND ANY WARRANTY ARISING BY STATUTE, OPERATION OF LAW, COURSE OF DEALING OR PERFORMANCE, OR USAGE OF TRADE.
6.2 – EMC shall not provide any technical support, SLA’s, telephone support, on-line support, or support of any kind under this Agreement. Customer is not entitled to receive any updates, upgrades or enhancements of any kind under this Agreement. This includes, but is not limited to, security vulnerabilities that may be applicable to the Software.
6.3 – No representation or other affirmation of fact, including but not limited to statement regarding capacity, suitability for use or performance of Software, whether made by EMC employees or otherwise, shall be deemed to be a warranty for any purpose or give rise to any liability of EMC whatsoever unless contained in this Agreement.
7.0 NO INDEMNIFICATION
7.1 – EMC shall have no liability to Customer for any action (and all prior related claims) brought by or against Customer alleging that Customer’s use or other disposition of any Software infringes any patent, copyright, trade secret or other intellectual property right. In event of such an action, EMC retains the right to terminate this Agreement and take possession of the Software.
7.2 – THIS SECTION 7.0 STATES EMC’S ENTIRE LIABILITY WITH RESPECT TO ALLEGED INFRINGEMENTS OF INTELLECTUAL PROPERTY RIGHTS BY THE SOFTWARE OR ANY PART OF THEM OR BY ITS OPERATION.
8.0 LIMITATION OF LIABILITY
8.1 – EMC’S AND ITS SUPPLIER’S TOTAL LIABILITY AND CUSTOMER’S SOLE AND EXCLUSIVE REMEDY FOR A CLAIM OF DAMAGE TO REAL OR TANGIBLE PERSONAL PROPERTY OR ANY OTHER CLAIM WHATSOEVER, INCLUDING BUT NOT LIMITED TO CLAIMS BASED ON CONTRACT, WARRANTY, NEGLIGENCE OR STRICT LIABILITY IN TORT, THAT ARISES OUT OF OR IN CONNECTION WITH SOFTWARE OR SERVICES PROVIDED HEREUNDER, SHALL BE LIMITED TO PROVEN DIRECT DAMAGES CAUSED BY EMC’S SOLE NEGLIGENCE IN AN AMOUNT NOT TO EXCEED US$5,000. IN NO EVENT SHALL EMC OR ITS SUPPLIERS BE LIABLE FOR CONSEQUENTIAL, INCIDENTAL, INDIRECT, OR SPECIAL DAMAGES (INCLUDING, BUT NOT LIMITED TO, LOSS OF PROFITS, REVENUES, DATA AND/OR USE) EVEN IF ADVISED OF THE POSSIBILITY THEREOF. NEITHER PARTY SHALL BRING ANY CLAIM ARISING OUT OF THE SOFTWARE OR SERVICES PROVIDED HEREUNDER MORE THAN EIGHTEEN (18) MONTHS AFTER SUCH CLAIM HAS ACCRUED.
8.2 – IF CUSTOMER USES SOFTWARE FOR ANY PURPOSE EXCEPT AS STATED HEREIN OR OTHERWISE AGREED IN WRITING, EMC SHALL HAVE NO LIABILITY WHATSOEVER FOR ANY DAMAGE TO EQUIPMENT OR DATA, OR FINANCIAL LOSSES, RESULTING FROM SUCH USE.
9.0 GENERAL
9.1 – Assignment – Customer shall not assign any right or interest hereunder nor delegate any work or other obligation to be performed hereunder to any entity other than its corporate parent, or a division or wholly or majority owned subsidiary of the party or its corporate parent. Any such action in violation of the foregoing shall be void.
9.2 – Entire Agreement – The terms contained herein constitute the entire agreement between the parties with respect to the subject matter hereof and shall supersede all prior communications and agreements, either oral, written or otherwise recorded.
9.3 – Compliance with Export Control Laws – Customer shall comply with all applicable export laws, orders and regulations and obtain all necessary governmental permits, licenses and clearances.
9.4 – Governing Law – This Agreement shall be governed by the laws of the Commonwealth of Massachusetts, excluding its conflict of law rules. The U. N. Convention on Contracts for the International Sale of Goods shall not apply.
9.5 – Notices – Except for routine communications, all other notices required or permitted hereunder, including but not limited to notices of default or breach, shall be signed by an authorized representative of the sender. Such notices shall be deemed to have been received (i) when hand delivered to such individuals by a representative of the sender; (ii) three (3) days after having been sent postage prepaid, by registered or certified first class mail, return receipt requested; (iii) when sent by electronic transmission, with written confirmation by the method of transmission; or (iv) one (1) day after deposit with an overnight carrier, with written verification of delivery.
9.6 – No Waiver – No omission or delay by either party in requiring the other party to fulfill its obligations hereunder shall be deemed to constitute a waiver of (i) the right to require the fulfillment of any other obligation hereunder; or (ii) any remedy that may be available hereunder.
9.7 – Independent Contractors – The parties shall act as independent contractors for all purposes under this Agreement. Nothing contained herein shall be deemed to constitute either party as an agent or representative of the other party, or both parties as joint venturers or partners for any purpose. Neither party shall be responsible for the acts or omissions of the other party, and neither party will have authority to speak for, represent or obligate the other party in any way without an authenticated record indicating the prior approval of the other party.
9.8 – Separability – If any provision of this Agreement shall be held illegal or unenforceable, such provision shall be deemed separable from, and shall in no way affect or impair the validity or enforceability of, the remaining provisions.
This is the repository for the projects of Performance Evaluation and Application course held at Polimi.
Performance Evaluation is the quantitative and qualitative study of systems, to evaluate, measure, predict and ensure target
behaviors and performances. The main topics of the course are:
Introduction to performance indices and measures
Workload and Service characterization
Analytical models
Simulation and resource contention
The coverage of this topics was done through the development of 20 assignment and a final project to put in practice all the knowledge acquired.
🛠️ All the projects were developed in MatLab and Java Modeling Tool (JMT).
⏰ Assignment
In the relative folder all the 20 assignments are present. For each assignment a Matlab\JMT application is present with the source code and the relative pdf file with the task specification. Sometimes a dataset is provided.
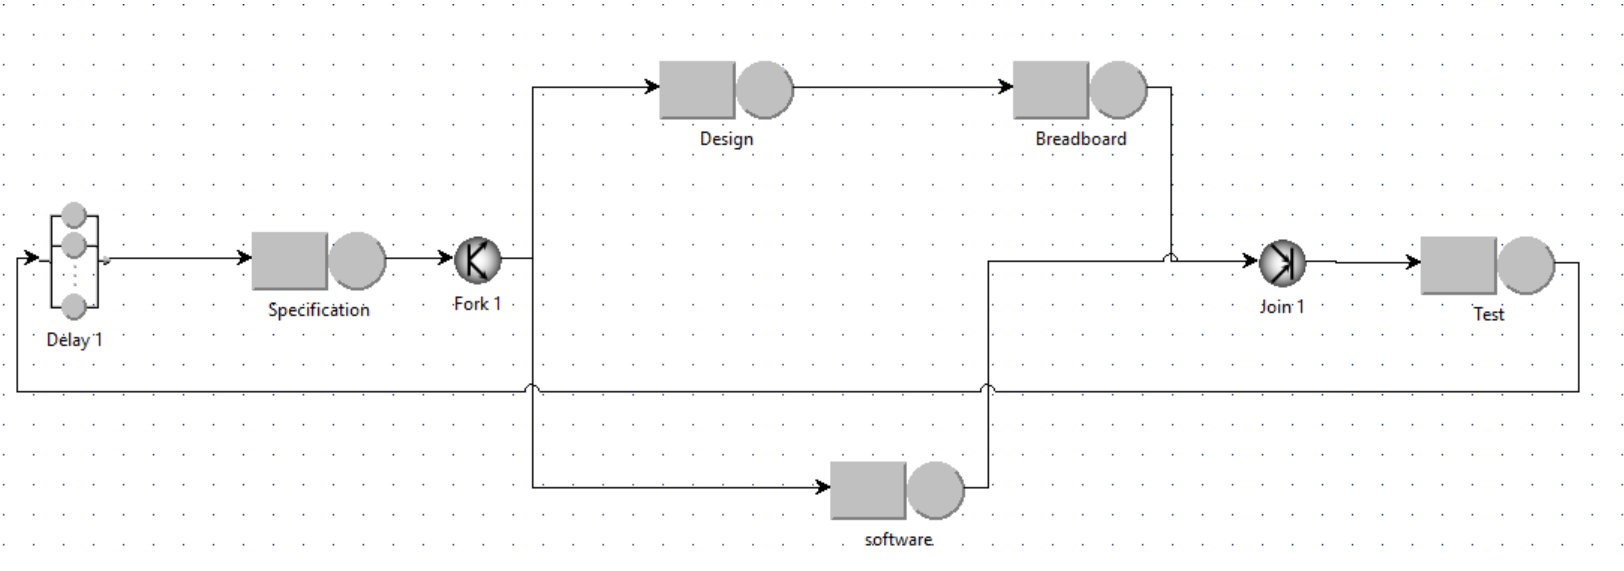
⌨️ Final Project
The final project is a analysis of a embedded system development cycle, where the company need to know best number of projects N that they should work on at the same time, to produce the best tradeoff between throughput and project completion time mixing all the knowledge acquired during the course.
The project is divided using both Matlab and JMT. In the relative folder is present: