Category: Blog

  • torch2coreml

    Convert Torch7 models into Apple CoreML format.

    Short tutorial

    This tool helps convert Torch7 models into Apple CoreML format which can then be run on Apple devices.

    fast-neural-style example app screenshot

    Installation

    pip install -U torch2coreml

    In order to use this tool you need to have these installed:

    • Xcode 9
    • python 2.7

    If you want to run tests, you need MacOS High Sierra 10.13 installed.

    Dependencies

    • coremltools (0.6.2+)
    • PyTorch

    How to use

    Using this library you can implement converter for your own model types. An example of such a converter is located at “example/fast-neural-style/convert-fast-neural-style.py”. To implement converters you should use single function “convert” from torch2coreml:

    from torch2coreml import convert

    This function is simple enough to be self-describing:

    def convert(model,
                input_shapes,
                input_names=['input'],
                output_names=['output'],
                mode=None,
                image_input_names=[],
                preprocessing_args={},
                image_output_names=[],
                deprocessing_args={},
                class_labels=None,
                predicted_feature_name='classLabel',
                unknown_layer_converter_fn=None)

    Parameters

    model: Torch7 model (loaded with PyTorch) | str
    A trained Torch7 model loaded in python using PyTorch or path to file with model (*.t7).

    input_shapes: list of tuples Shapes of the input tensors.

    mode: str (‘classifier’, ‘regressor’ or None)
    Mode of the converted coreml model:
    ‘classifier’, a NeuralNetworkClassifier spec will be constructed.
    ‘regressor’, a NeuralNetworkRegressor spec will be constructed.

    preprocessing_args: dict
    ‘is_bgr’, ‘red_bias’, ‘green_bias’, ‘blue_bias’, ‘gray_bias’, ‘image_scale’ keys with the same meaning as https://apple.github.io/coremltools/generated/coremltools.models.neural_network.html#coremltools.models.neural_network.NeuralNetworkBuilder.set_pre_processing_parameters

    deprocessing_args: dict
    Same as ‘preprocessing_args’ but for deprocessing.

    class_labels: A string or list of strings.
    As a string it represents the name of the file which contains the classification labels (one per line). As a list of strings it represents a list of categories that map the index of the output of a neural network to labels in a classifier.

    predicted_feature_name: str
    Name of the output feature for the class labels exposed in the Core ML model (applies to classifiers only). Defaults to ‘classLabel’

    unknown_layer_converter_fn: function with signature:
    (builder, name, layer, input_names, output_names)
    builder: object – instance of NeuralNetworkBuilder class
    name: str – generated layer name
    layer: object – PyTorch (python) object for corresponding layer
    input_names: list of strings
    output_names: list of strings
    Returns: list of strings for layer output names
    Callback function to handle unknown for torch2coreml layers

    Returns

    model: A coreml model.

    Currently supported

    Models

    Only Torch7 “nn” module is supported now.

    Layers

    List of Torch7 layers that can be converted into their CoreML equivalent:

    1. Sequential
    2. ConcatTable
    3. SpatialConvolution
    4. ELU
    5. ReLU
    6. SpatialBatchNormalization
    7. Identity
    8. CAddTable
    9. SpatialFullConvolution
    10. SpatialSoftMax
    11. SpatialMaxPooling
    12. SpatialAveragePooling
    13. View
    14. Linear
    15. Tanh
    16. MulConstant
    17. SpatialZeroPadding
    18. SpatialReflectionPadding
    19. Narrow
    20. SpatialUpSamplingNearest
    21. SplitTable

    License

    Copyright (c) 2017 Prisma Labs, Inc. All rights reserved.

    Use of this source code is governed by the MIT License that can be found in the LICENSE.txt file.

    Visit original content creator repository https://github.com/prisma-ai/torch2coreml
  • torch2coreml

    Convert Torch7 models into Apple CoreML format.

    Short tutorial

    This tool helps convert Torch7 models into Apple CoreML format which can then be run on Apple devices.

    fast-neural-style example app screenshot

    Installation

    pip install -U torch2coreml

    In order to use this tool you need to have these installed:

    • Xcode 9
    • python 2.7

    If you want to run tests, you need MacOS High Sierra 10.13 installed.

    Dependencies

    • coremltools (0.6.2+)
    • PyTorch

    How to use

    Using this library you can implement converter for your own model types. An example of such a converter is located at “example/fast-neural-style/convert-fast-neural-style.py”.
    To implement converters you should use single function “convert” from torch2coreml:

    from torch2coreml import convert

    This function is simple enough to be self-describing:

    def convert(model,
                input_shapes,
                input_names=['input'],
                output_names=['output'],
                mode=None,
                image_input_names=[],
                preprocessing_args={},
                image_output_names=[],
                deprocessing_args={},
                class_labels=None,
                predicted_feature_name='classLabel',
                unknown_layer_converter_fn=None)

    Parameters

    model: Torch7 model (loaded with PyTorch) | str
    A trained Torch7 model loaded in python using PyTorch or path to file
    with model (*.t7).

    input_shapes: list of tuples
    Shapes of the input tensors.

    mode: str (‘classifier’, ‘regressor’ or None)
    Mode of the converted coreml model:
    ‘classifier’, a NeuralNetworkClassifier spec will be constructed.
    ‘regressor’, a NeuralNetworkRegressor spec will be constructed.

    preprocessing_args: dict
    ‘is_bgr’, ‘red_bias’, ‘green_bias’, ‘blue_bias’, ‘gray_bias’,
    ‘image_scale’ keys with the same meaning as
    https://apple.github.io/coremltools/generated/coremltools.models.neural_network.html#coremltools.models.neural_network.NeuralNetworkBuilder.set_pre_processing_parameters

    deprocessing_args: dict
    Same as ‘preprocessing_args’ but for deprocessing.

    class_labels: A string or list of strings.
    As a string it represents the name of the file which contains
    the classification labels (one per line).
    As a list of strings it represents a list of categories that map
    the index of the output of a neural network to labels in a classifier.

    predicted_feature_name: str
    Name of the output feature for the class labels exposed in the Core ML
    model (applies to classifiers only). Defaults to ‘classLabel’

    unknown_layer_converter_fn: function with signature:
    (builder, name, layer, input_names, output_names)
    builder: object – instance of NeuralNetworkBuilder class
    name: str – generated layer name
    layer: object – PyTorch (python) object for corresponding layer
    input_names: list of strings
    output_names: list of strings
    Returns: list of strings for layer output names
    Callback function to handle unknown for torch2coreml layers

    Returns

    model: A coreml model.

    Currently supported

    Models

    Only Torch7 “nn” module is supported now.

    Layers

    List of Torch7 layers that can be converted into their CoreML equivalent:

    1. Sequential
    2. ConcatTable
    3. SpatialConvolution
    4. ELU
    5. ReLU
    6. SpatialBatchNormalization
    7. Identity
    8. CAddTable
    9. SpatialFullConvolution
    10. SpatialSoftMax
    11. SpatialMaxPooling
    12. SpatialAveragePooling
    13. View
    14. Linear
    15. Tanh
    16. MulConstant
    17. SpatialZeroPadding
    18. SpatialReflectionPadding
    19. Narrow
    20. SpatialUpSamplingNearest
    21. SplitTable

    License

    Copyright (c) 2017 Prisma Labs, Inc. All rights reserved.

    Use of this source code is governed by the MIT License that can be found in the LICENSE.txt file.

    Visit original content creator repository
    https://github.com/prisma-ai/torch2coreml
  • monty

    Project: 0x19. C – Stacks, Queues – LIFO, FIFO

    This project is an interpreter for Monty ByteCodes files. It implements a stack (Last In, First Out) and a queue (First In, First Out) in C.

    Learning Objectives

    • What do LIFO and FIFO mean
    • What is a stack, and when to use it
    • What is a queue, and when to use it
    • What are the common implementations of stacks and queues
    • What are the most common use cases of stacks and queues
    • What is the proper way to use global variables

    Tasks

    Each task corresponds to a specific opcode implementation:

    Task File
    0. push, pall push.c, pall.c
    1. pint pint.c
    2. pop pop.c
    3. swap swap.c
    4. add add.c
    5. nop nop.c
    6. sub sub.c
    7. div div.c
    8. mul mul.c

    Getting Started

    To get a local copy up and running, follow these steps:

    1. Clone the repository:

      git clone https://github.com/hackerSa3edy/monty.git
    2. Navigate to the project directory:

      cd monty
    3. Compile the project:

      gcc -Wall -Werror -Wextra -pedantic -std=gnu89 *.c -o monty

    Usage

    To run the Monty interpreter, compile all .c files in the repository and run the output file with a .m file as an argument:

    gcc -Wall -Werror -Wextra -pedantic -std=gnu89 *.c -o monty
    ./monty bytecodes/00.m

    The .m files in the bytecodes/ directory are test files in the Monty bytecodes format.
    To run the interpreter, use the following command:

    ./monty <file.m>

    Where <file.m> is the path to a Monty bytecodes file.

    Monty ByteCodes Files

    Monty bytecodes files contain a list of commands to be executed by the interpreter. Each command must be on its own line. Lines can be empty or contain a comment (lines starting with # are treated as comments).

    Commands

    The interpreter supports the following commands:

    • push <n>: Pushes an integer <n> onto the top of the stack.
    • pall: Prints all values on the stack.
    • pint: Prints the value at the top of the stack.
    • pop: Removes the top element of the stack.
    • swap: Swaps the top two elements of the stack.
    • add: Adds the top two elements of the stack.
    • nop: Does nothing.
    • sub: Subtracts the top element of the stack from the second top element.
    • div: Divides the second top element of the stack by the top element.
    • mul: Multiplies the top two elements of the stack.
    • mod: Computes the remainder of the division of the second top element by the top element.
    • pchar: Prints the char at the top of the stack.
    • pstr: Prints the string starting at the top of the stack.

    Author

    Visit original content creator repository
    https://github.com/hackerSa3edy/monty

  • qx-iconfont-material

    Qooxdoo Integration of the Material Icons font

    These instructions assume that you are using the new qooxdoo-compiler
    for building your application.

    Using the iconfont in your Application

    $ qx contrib update
    $ qx contrib list
    $ qx contrib install ITISFoundation/qx-iconfont-material

    To induce the compiler to copy the font file you can either add a ‘dummy’ call to:

    iconfont.material.Load;

    to your appliaction or you can explicitly include the class in the compile.json file.

    Your app now knows about all the material icons. To access the icons
    use names like:

    @MaterialIcons/sms_failed/40

    The demo app shows a list of all the icons available.

    To find the names of the icons, either look at the demo app, or go to https://material.io/icons

    Running the Demo App

    This contrib also comes with a demo application. To make it really simple to test
    it comes with ‘docker-batteries’ included.

    The setup is prepared for runnig with docker. You don’t
    need a local qooxdoo install or anyting to get started. Just install docker
    and give this a whirl.

    • build the docker image

      $ docker-compose build
    • run the demo server

      $ docker-compose up

      Now you can open http://localhost:31753 to see the icon browser.

    If you want to run a different qx command, you can do this too

    $ docker-compose run qx lint

    Inspect the image interactively

    $ docker run --entrypoint /bin/bash -i -t itisfoundation/qx-iconfont-material

    Visit original content creator repository
    https://github.com/ITISFoundation/qx-iconfont-material

  • Lib-A9G

    A9G Arduino Library

    Library to use A9G with AT commands in Arduino framework-based systems.

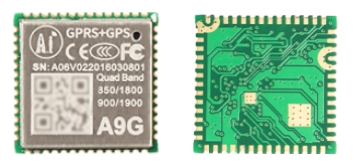
    A9G is a quad-band module from Ai-Thinker based on RDA8955 SoC – [GSM/GPRS] + [GPS/BDS] (850/900/1800/1900MHz).

    Official A9G repository: Ai-Thinker GPRS C SDK.

    This library configures the A9G’s GPS data output using the NMEA data specification. So to decode this NMEA packet this library incorporated Mikal Hart‘s amazing TinyGPSPlus library.

    Big difference compared to other libraries: this one supports JSON as payload in MQTT mode! 💁

    Minimal example code snippet:

    #include "A9G.h"
    
    A9G_Controller A9G(A9G_RESET_PIN, A9G_INIT_PIN);
    GPS_Controller GPS(Serial1);
    GPRS_Controller GPRS(Serial2);
    
    void mqtt_callback(char* topic, char* payload, int length) {
    	Serial.printf("\r\nFrom MQTT subscription: topic: %s, payload: %s, length: %d\r\n\r\n", topic, payload, length);
    	// GPRS.mqtt_unsubscribe(MQTT_SUB_TOPIC, MQTT_SUB_QOS);
    }
    
    void setup() {
    
    	Serial.begin(115200);
    
    	while (!A9G.turn_on(MODEM_INIT_TIMEOUT_SECS)) {
    		Serial.println("\r\nA9G init fail. Retrying...\r\n");
    		A9G.turn_off();
    	}
    
    	A9G.echo(true);
    
    	GPRS.cellular_network_connect(NETWORK_APN);
    
    	GPS.enable(GPS_REFRESH_INTERVAL_SECS);
    
    	GPRS.mqtt_connect_broker(MQTT_BROKER_ADDR,
    				 MQTT_BROKER_PORT,
    				 MQTT_BROKER_AUTH_USER,
    				 MQTT_BROKER_AUTH_PASSWORD,
    				 MQTT_CLIENT_ID,
    				 MQTT_CLIENT_KEEPALIVE_SECS);
    
    	GPRS.mqtt_subscribe(MQTT_SUB_TOPIC, MQTT_SUB_QOS, mqtt_callback);
    
    	GPRS.mqtt_publish(MQTT_PUB_TOPIC, MQTT_PUB_PAYLOAD, MQTT_PUB_QOS);
    }
    
    void loop() {
    
    	A9G.loop();
    	GPRS.mqtt_loop();
    
    	static uint32_t t0 = millis();
    
    	if (millis() - t0 > 1000) {
    		t0 = millis();
    
    		static char JSON_payload[100];
    
    		sprintf(JSON_payload, "{\"variable\":\"location\",\"value\":\"A9G\",\"location\":{\"lat\":%.8f,\"lng\":%.8f}}", GPS.location(LAT), GPS.location(LNG));
    
    		GPRS.mqtt_publish((char*)"GPS", JSON_payload, MQTT_PUB_QOS);
    	}
    }

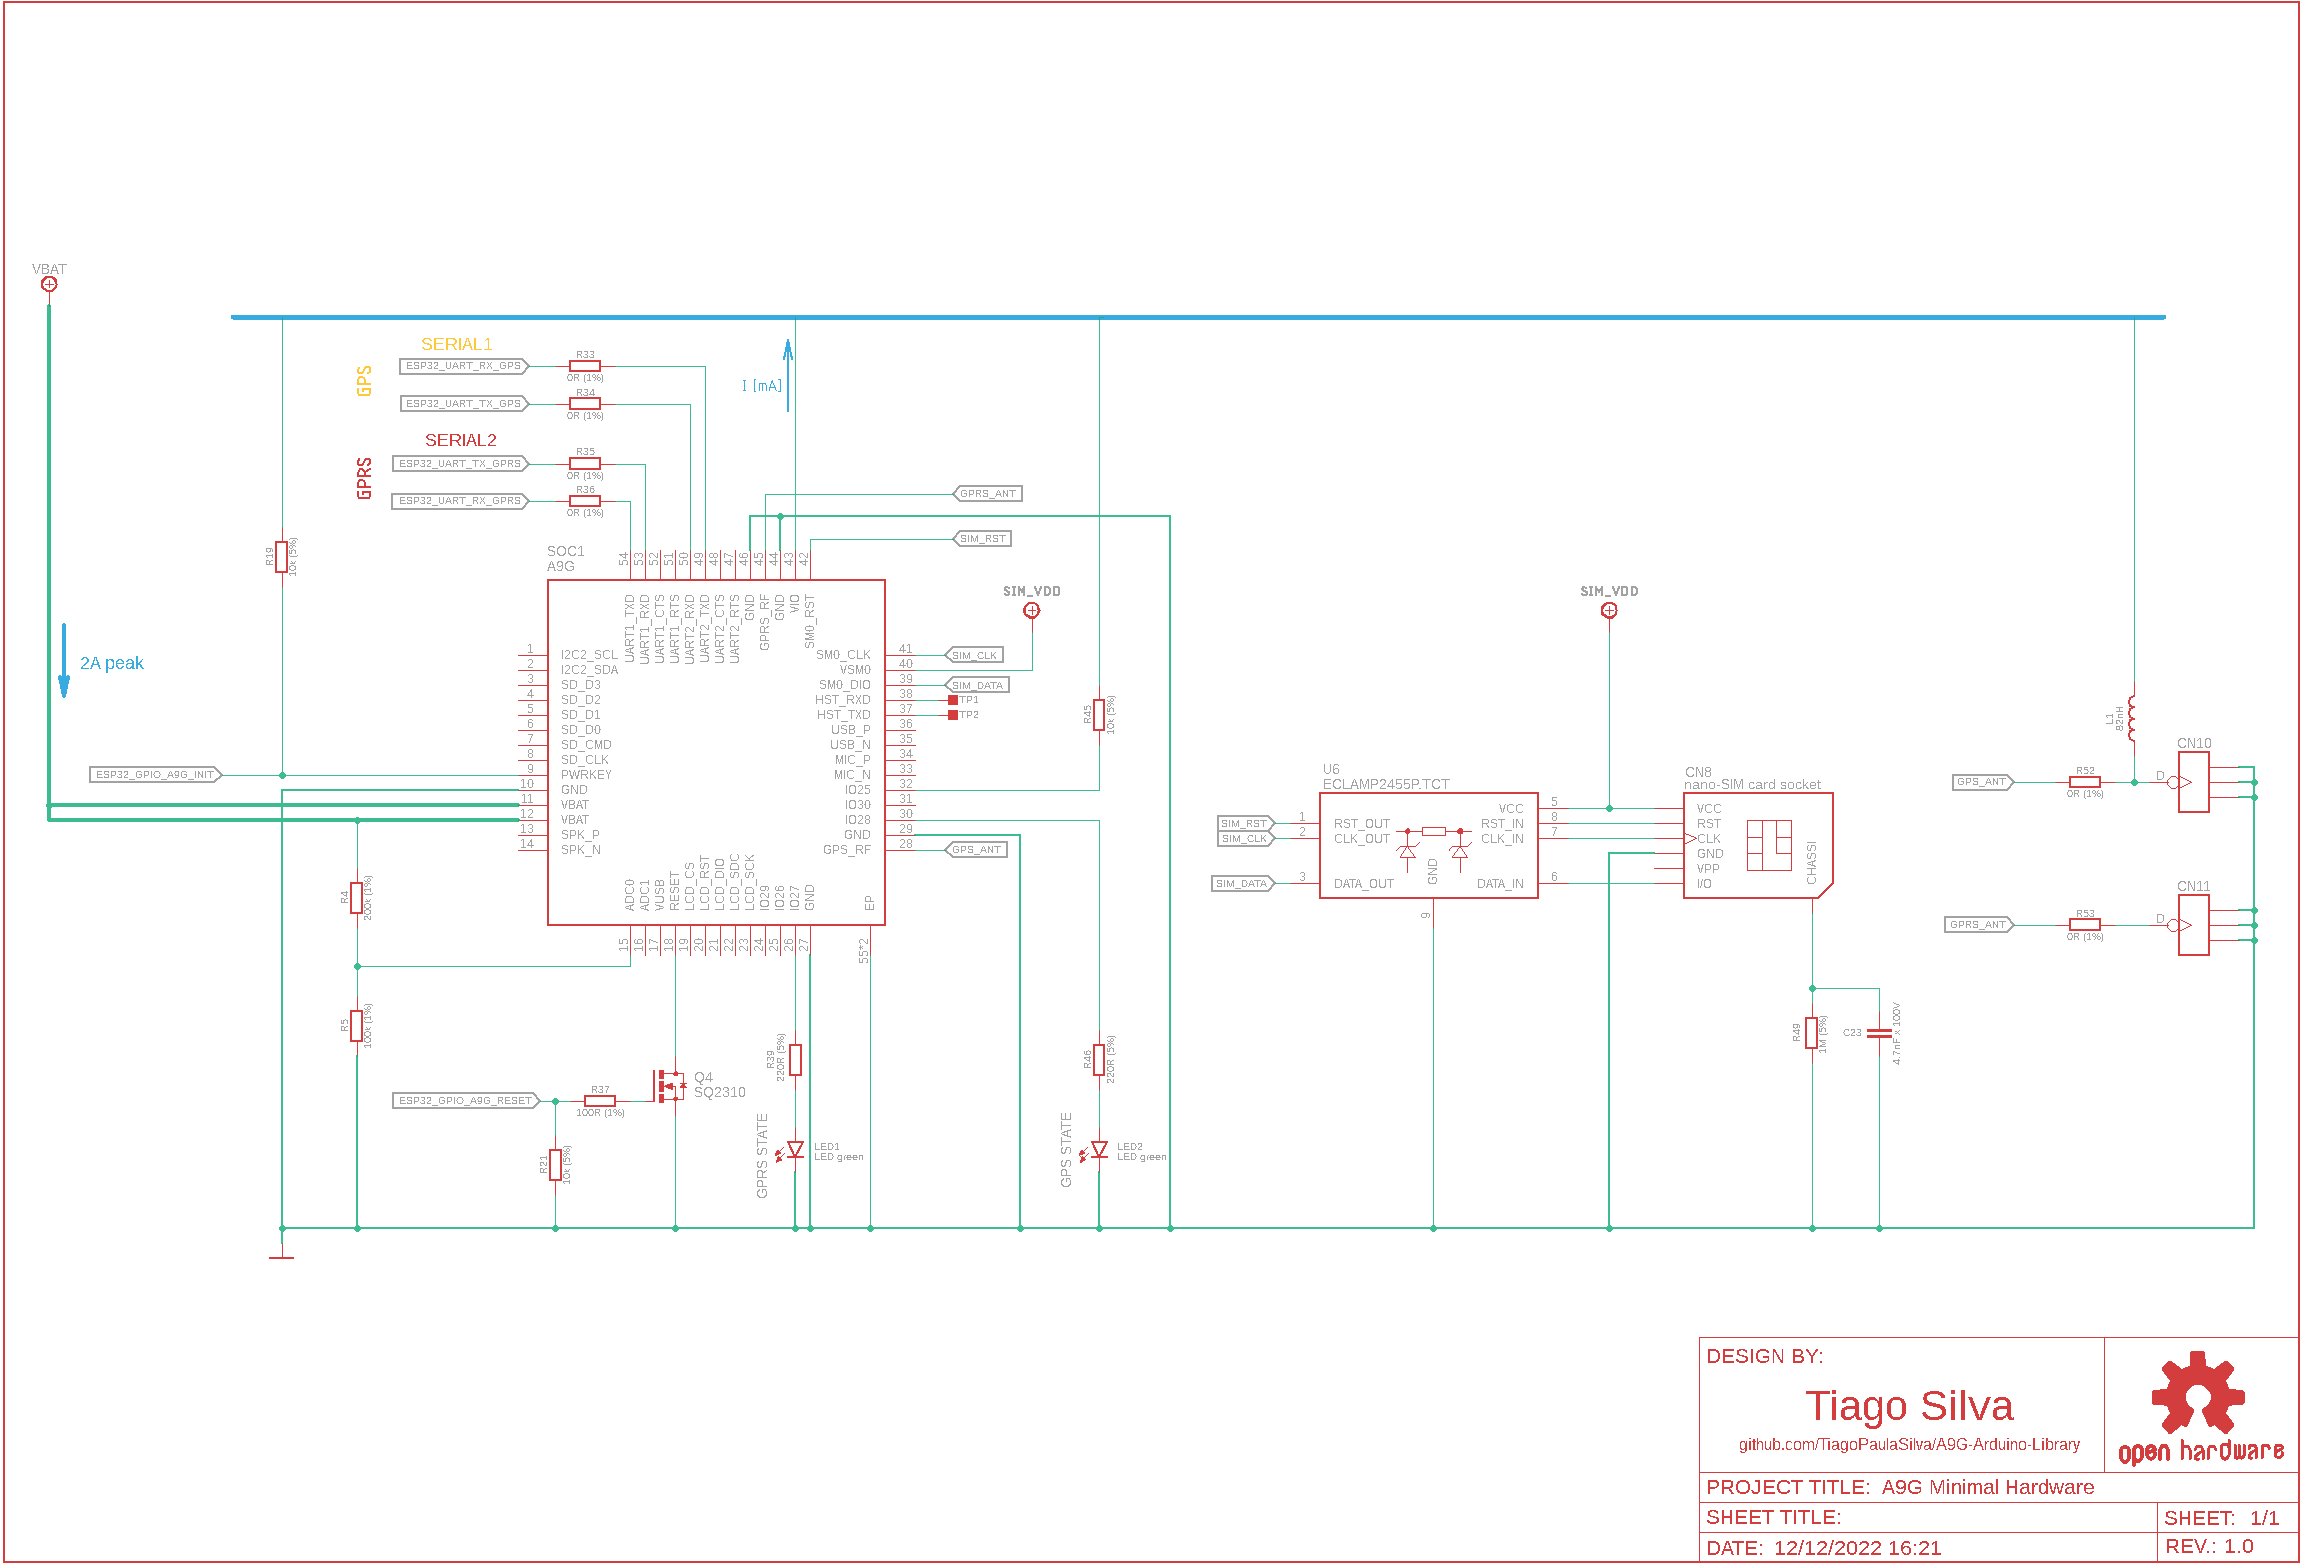
    Minimal Hardware

    PDF Download

    Visit original content creator repository https://github.com/import-tiago/A9G-Arduino-Library
  • offline-globe

    Offline Globe

    Offline country data for PHP Laravel framework. Over 200 countries, capitals, flags, languages, currencies. No internet needed.
    This packages uses the 7 model continent, and this is a Reference for all the countries included.

    Installation

      cd my-laravel-project
      composer require ayoub-amzil/offline-globe

    Usage/Examples

    Import class

    use offline\Globe; 

    Create an instance

    $globe = new Globe();

    Functions available

    Return an array type value of all countries available

    $globe->Countries()

    Return an array type value of African countries

    $globe->African()

    Return an array type value of Asian countries

    $globe->Asian()

    Return an array type value of Australian countries

    $globe->Australia()

    Return an array type value of European countries

    $globe->Europe()

    Return an array type value of North America countries

    $globe->NorthAmerica()

    Return an array type value of South America countries

    $globe->SouthAmerica()

    Return the country code of the given country. The function accept one argument of type string.

    $globe->Code('Morocco') // MA (return type: string)

    Return the capital of the given country. The function accept one argument of type string.

    $globe->Capital('japan') // Tokyo (return type: string)

    Return the Languages spoken in the given country. The function accept one argument of type string.

    $globe->Language('jamaica') // ['english', 'jamaican_patois'] (return type: array)

    Return the currency used in the given country. The function accept one or two arguments

    // It can take only the country (mandatory)
    $globe->Currency('Canada') // ['name' => 'Canadian Dollar', 'code' => 'CAD'] (return type: array)
    
    // Or the country plus one type of information
    // name (option)
    $globe->Currency('canada','name') // Canadian Dollar (return type: string)
    // code (option)
    $globe->Currency('canada','code') // CAD (return type: string)

    Return the flag of the given country. The function accept three arguments. Country, type of the flag, and a directory name where the flags are saved.

    // country (mandatory)
    return view('welcome',
                ['flag'=>$globe->flag('united states')]
            ); //  (return type: string)
    
    // In your template
    <img src="https://github.com/ayoub-amzil/{{$flag}}" alt="image">

    // type (option) [default=svg]
    return view('welcome',
                ['flag'=>$globe->flag('united states','png')]
            ); //  (return type: string)
    
    // In your template
    <img src="https://github.com/ayoub-amzil/{{$flag}}" alt="image">

    // directory name (option) [default=flags]
    // PS:  if you want to change your directory name, you have to set the type before
    return view('welcome',
                ['flag'=>$globe->flag('united states','png','images')]
            ); //  (return type: string)
    
    // In your template
    <img src="https://github.com/ayoub-amzil/{{$flag}}" alt="image">

    Authors

    @ayoub-amzil

    License

    MIT

    Contributing

    Contributions are always welcome!

    Acknowledgements

    Visit original content creator repository
    https://github.com/ayoub-amzil/offline-globe

  • volumetrics_example_ofelia

    pure_data_volumetrics_example_ofelia

    This Pure Data patch made with the Ofelia library uses the ofxVolumetrics addon.

    https://github.com/pure-data/pure-data

    https://github.com/cuinjune/Ofelia

    https://github.com/timscaffidi/ofxVolumetrics

    First the ofxVolumetrics addon needs to be added to Ofelia:

    1. replace ofxOfeliaPdBindings.h in ofxOfelia/scr
    2. replace addons.make in ofxOfelia/(Linux/Windows/Mac)External
    3. add the ofxVolumetrics folder to ofxOfelia/libs
    4. run ofxOfelia/scripts/common/updatePdBindings.sh
    5. compile ofxOfelia/(Linux/Windows/Mac)External
    6. replace the compiled files in the Pure Data externals folder

    Then add the volumes folder from here https://github.com/wasawi/ofxVolumetrics/tree/addon_ofxVolume/ofxVolumetricsExample/bin/data to the place where the pure data patch volumetrics_example_ofelia.pd is, and run the patch.

    Edit: Actually you need to convert the images from .tif to .png with something like https://www.xnview.com/de/xnconvert/ because with .tif images there are a lot of warnings… And I ran the shell script and compiled the external with Linux, no luck with Windows so far (had no possibility to try to compile with a Mac)…

    Visit original content creator repository
    https://github.com/Jonathhhan/volumetrics_example_ofelia

  • blender-animation-retargeting

    Blender Animation Retargeting

    This addon enables the transfer of animations and poses from one armature to another.

    Installation

    1. Download this repo as .zip

    2. In Blender go to Edit > Preferences > Add-ons > Install…

    3. Select the downloaded .zip

    4. Enable the Add-on, which will appear in the list

    How to use

    Assuming you have both your target and source armature in the scene, and have them aligned and scaled to match each other.

    Both armatures in rest pose next to each other, scaled to be same height

    1. Select your target armature and open the add-on panel on the right side of the 3D View (Retarget tab)

    2. Now choose the source armature as ‘Source’ on the panel

    3. It should say that there are no bone mappings, yet. Go ahead and click ‘Create’.

    4. Now map each relevant source bone to the corresponding target. Make sure to not map any bone multiple times, otherwise you’ll get undefined behaviour.

    5. Next you have to set up the rest pose alignment. Click on “Set up”, then change the pose of your target armature in a way, that it optimally fits your source armatures rest pose. When done click ‘Apply’.

    pose adjusted to fit source's rest pose

    1. The add-on will then automatically create drivers for each bone, and you should be good to go.

    Correction Features

    Foot / Hand Positions Correction

    If there’s significant ‘foot-sliding’ or odd arm movements, due to anatomical differences between your armatures, you can turn on:

    • Correct Feet Position

    • Correct Hands Position

    You will be asked to specify the leg/foot, arm/hand bones respectively.

    This will create and IK bone setup for the specified limbs whereas the target positions for the feet/hands are copied over from the source.

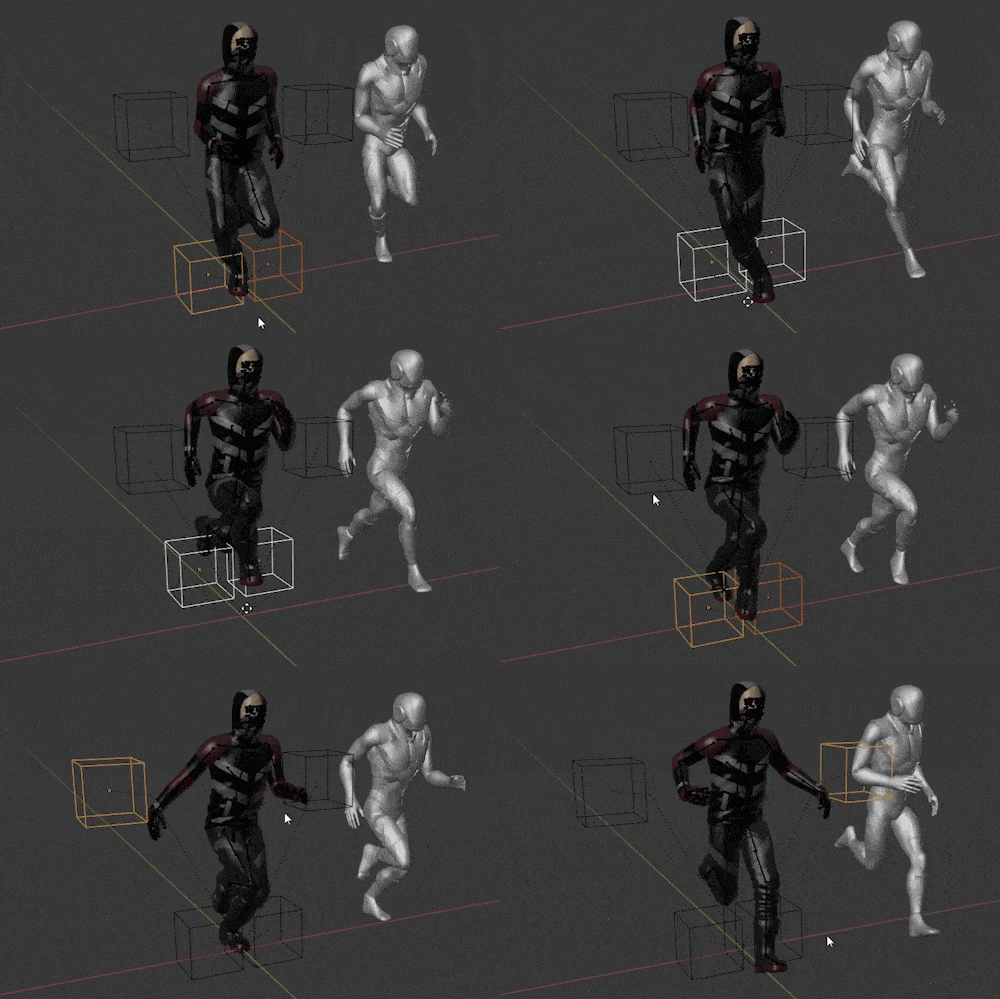
    Additionally it will spawn a control empty cube, that allows you to transform the target positions as shown in this gif:

    demonstration of the ik correction transform cube

    Baking

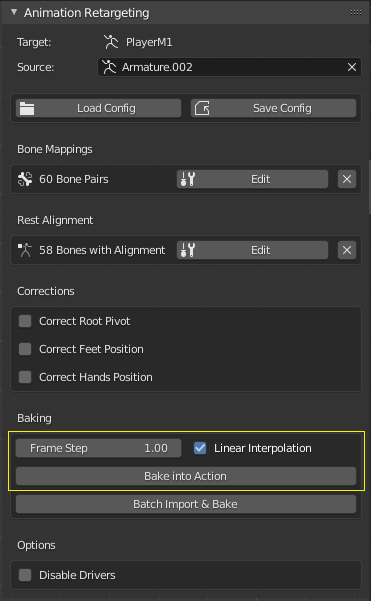
    For convenience you can bake the source’s animation into an action for your target via the add-on.

    • The option “Linear Interpolation” causes the F-Curves between the keyframes to be linearized instead of the default Blender Bezier interpolation.
    • The option “Bake Mapped Bones Only” ensures that target bones that have no retarget mapping will remain unaffected.

    section for baking in the add-on panel

    Since the target bones are driven by drivers, you can bake everything youself, if you want. Make sure to check ‘Visual Keying’ if you do so.

    Visit original content creator repository https://github.com/Mwni/blender-animation-retargeting
  • SplinesNextJS

    SplinesNextJS Application

    This is a Next.js application designed to fetch and display financial quote data for options in an interactive chart format. Users can enter a stock ticker, select an option’s expiration date, and choose between calls or puts. The app then fetches real-time financial data and displays implied volatilities for bid, ask, and mid prices in a dynamic chart.

    Features

    • Real-time data fetching for stock prices and options.
    • Implied volatility calculations using the Barone-Adesi Whaley method.
    • Interactive plotting of bid, ask, and mid implied volatilities.
    • Interpolation options using models like RFV, SLV, SABR, and SVI.
    • Responsive UI built with Material-UI and Plotly.js for charts.
    • Full support for Next.js features such as client-side rendering and dynamic imports.

    Getting Started

    Prerequisites

    Make sure you have Node.js installed on your system. This project uses npm, but it can also be run with yarn, pnpm, or bun.

    Install Dependencies

    Run the following command to install the required packages:

    npm install
    # or
    yarn install
    # or
    pnpm install
    # or
    bun install

    The app will be available at http://localhost:3000 after running the development server. To start the development server, use the following command:

    npm run dev

    Usage

    1. Enter a stock ticker symbol.
    2. Select an expiration date for the options.
    3. Choose between calls or puts.
    4. Click on “Enter” to see the implied volatility chart for the selected option.

    The chart displays:

    • Bid IV (Implied Volatility for Bid Prices)
    • Mid IV (Implied Volatility for Mid Prices)
    • Ask IV (Implied Volatility for Ask Prices)

    You can also apply filtering for penny options and strike filtering.

    Environment Variables

    Make sure to set up the following environment variables in a .env file at the root of the project:

    FRED_API_KEY=your_fred_api_key

    This key is used to fetch financial data, such as the risk-free rate, for implied volatility calculations.

    Technologies Used

    • Next.js: For server-side rendering and static generation.
    • React: For building the user interface.
    • Material-UI: For the modern and responsive design.
    • Plotly.js: For interactive charting and plotting.
    • Luxon: For date and time manipulation.
    • Yahoo Finance API: For fetching real-time financial data.

    Learn More

    To learn more about Next.js, check out the following resources:

    Deploying the Application

    You can easily deploy this application using Vercel, the creators of Next.js.

    Check out the Next.js deployment documentation for more details.

    License

    This project is licensed under the MIT License.

    Visit original content creator repository
    https://github.com/hedge0/SplinesNextJS

  • DSCI-532_2025_26_SMBFinder

    SMBFinder: Your Guide to Smarter Business Location Choices

    Summary

    SMBFinder (Smart Microbusiness Finder) is a data-driven dashboard designed to help entrepreneurs and microbusiness owners identify optimal locations to start their business across the United States. Users can visualize microbusiness density through a heatmap, filter data by state and county, and analyze historical trends in microbusiness growth. The dashboard provides insights into competition levels, median income trends, and other key business indicators – Sellability index, Growth index and Hireability index. Users can leverage these insights to make informed decisions, reduce risks, and strategically expand their business in the most promising locations.

    This document introduces the project, its purpose, and how you can get involved—whether as a user, contributor, or developer. Jump to one of the sections below to learn more:


    What are we doing?

    The Problem

    Starting a microbusiness can be challenging due to the lack of accessible, data-driven insights about location suitability. Entrepreneurs often struggle to find the best places to start or expand their business based on competition levels, economic conditions, and workforce availability.

    The Solution

    SMBFinder provides an interactive dashboard that allows users to:

    • Explore microbusiness density over time.
    • Identify high-potential locations through heatmaps.
    • Analyze trends across different economic and demographic indicators.

    By providing a structured data-driven approach, SMBFinder helps business owners, policymakers, and investors understand key trends and make informed choices about where to establish or grow their businesses.


    Who are we?

    The SMBFinder project is developed by a team of Master of Data Science Students at University of British Columbia. Contributors include Anna Nandar, Dongchun Chen, Jiayi Li, and Marek Boulerice, as part of the UBC DSCI 532 Data Visualization II project.


    What do we need?

    We welcome contributions in various areas, including:

    • Data Science & Engineering: Improving data collection, aggregation, and analysis.
    • Web Development: Enhancing dashboard functionality and scalability.
    • Economic Research: Providing context for better interpretation of business indicators.
    • Community Outreach: Engaging with business owners and policymakers.

    If you have experience in any of these areas (or others we haven’t considered yet!), we’d love your input!


    Get Involved

    Target Audience:

    Entrepreneurs, Small Business Owners, Investors, and Economic Policymakers.

    Live Demo:

    SMBFinder Dashboard

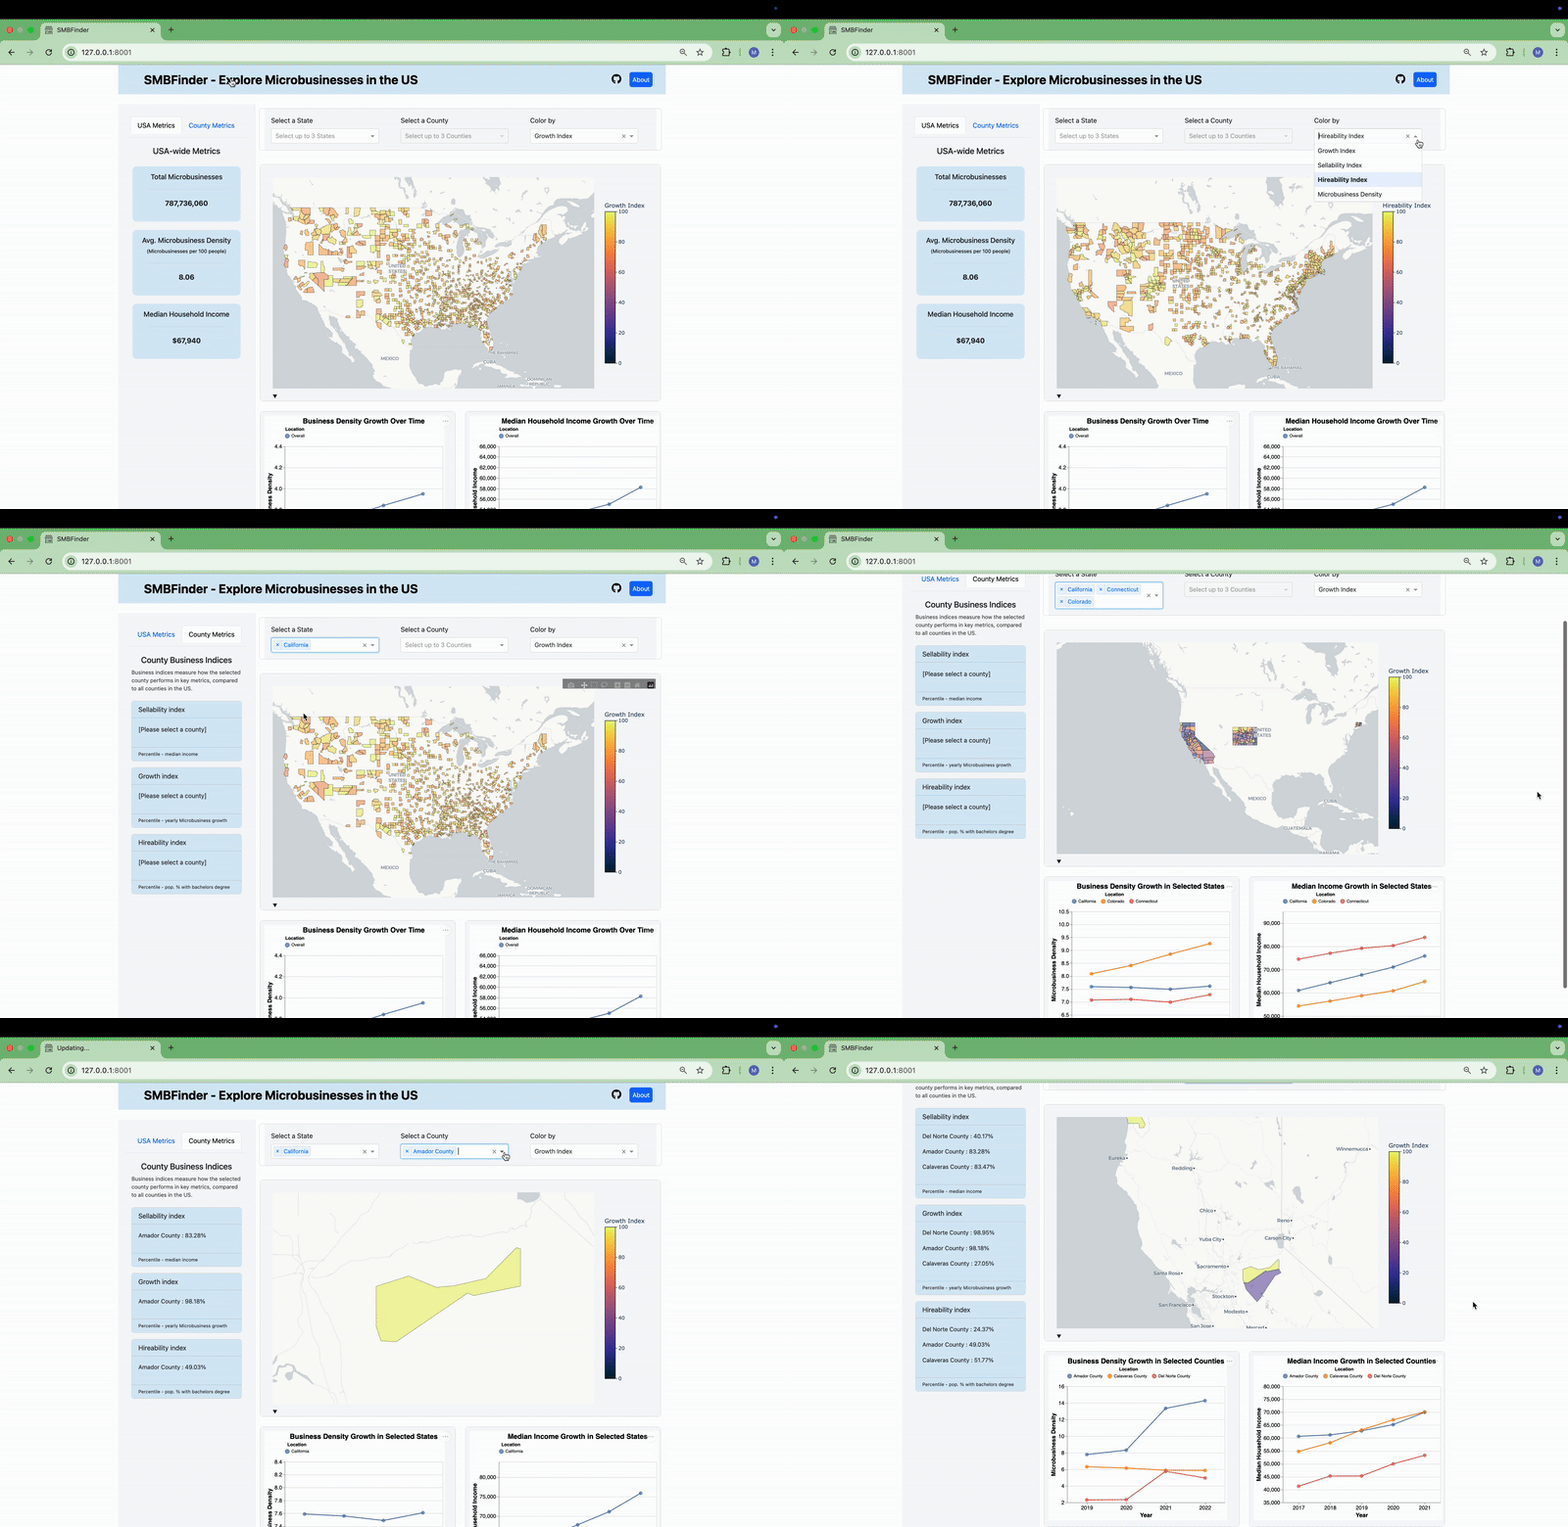
    Demo GIF:

    Demo of Dashboard Usage

    Use this dashboard to explore microbusiness trends, analyze location data, and support informed decision-making.

    For Developers & Contributors

    Read our Contributing Guide to get started!

    Step 1: Clone the repository

    git clone https://github.com/UBC-MDS/DSCI-532_2025_26_SMBFinder.git
    cd your-repo-folder

    Step 2: Install dependencies

    pip install -r requirements.txt

    Step 3: Run the app locally in the repository’s root directory

    python -m src.app

    Step 4: Start contributing!

    • Report issues or suggest enhancements in GitHub Issues: SMBFinder Issues
    • Share feedback on documentation and dataset usage.

    Find out more

    Dataset Attribution:

    This project utilizes data from GoDaddy – Microbusiness Density Forecasting (Kaggle).

    License

    SMBFinder was created by Anna Nandar, Dongchun Chen, Jiayi Li and Marek Boulerice. It is licensed under the terms of the MIT license.

    Thank You

    Thank you for your interest and support! Let’s use data to empower small businesses and drive economic growth.

    Visit original content creator repository https://github.com/UBC-MDS/DSCI-532_2025_26_SMBFinder