Category: Blog

  • IndexedDB-Manager

    DatabaseManager

    A simple class to manage IndexedDB operations.

    Features

    • Initialize the IndexedDB.
    • Set, get, delete, and list key-value pairs.
    • Bulk operations for setting multiple entries.
    • Retrieve all entries or clear the store.

    Example Usage

    1. Basic Initialization

    NOTE: If using in an HTML file, just simply include the <script src=””> tag with the appropriate location of the file

    const DatabaseManager = require('./DatabaseManager'); //
    
    const dbManager = new DatabaseManager('myDatabase', 1, 'myStore', 'id');
    
    dbManager.init().then(() => {
        console.log('Database initialized and ready to use');
    }).catch(err => {
        console.error('Error initializing the database:', err);
    });

    2. Set a value in the store

    dbManager.set('username', 'johnDoe').then(() => {
        console.log('Value set successfully');
    
        // Get the value from the store
        return dbManager.get('username');
    }).then(value => {
        console.log('Retrieved value:', value);
    }).catch(err => {
        console.error('Error setting or getting the value:', err);
    });

    3. Delete a value in the store

    dbManager.delete('username').then(() => {
        console.log('Value deleted successfully');
    }).catch(err => {
        console.error('Error deleting the value:', err);
    });

    4. List all keys in the store

    dbManager.list().then(keys => {
        console.log('Keys in the store:', keys);
    }).catch(err => {
        console.error('Error listing keys:', err);
    });

    5. Retrieve all entries from the store

    dbManager.getAll().then(entries => {
        console.log('All entries:', entries);
    }).catch(err => {
        console.error('Error retrieving all entries:', err);
    });

    6. Clear all entries from the store

    dbManager.clear().then(() => {
        console.log('Store cleared successfully');
    }).catch(err => {
        console.error('Error clearing the store:', err);
    });

    7. Bulk Setting values in the store

    dbManager.setAll([
        { key: 'name', value: 'Alice' },
        { key: 'age', value: 30 },
        { key: 'job', value: 'Developer' }
    ]).then(() => {
        console.log('All values set successfully');
    }).catch(err => {
        console.error('Error setting multiple values:', err);
    });

    Visit original content creator repository
    https://github.com/EZFoxOne/IndexedDB-Manager

  • cs224n-gpu-that-talks

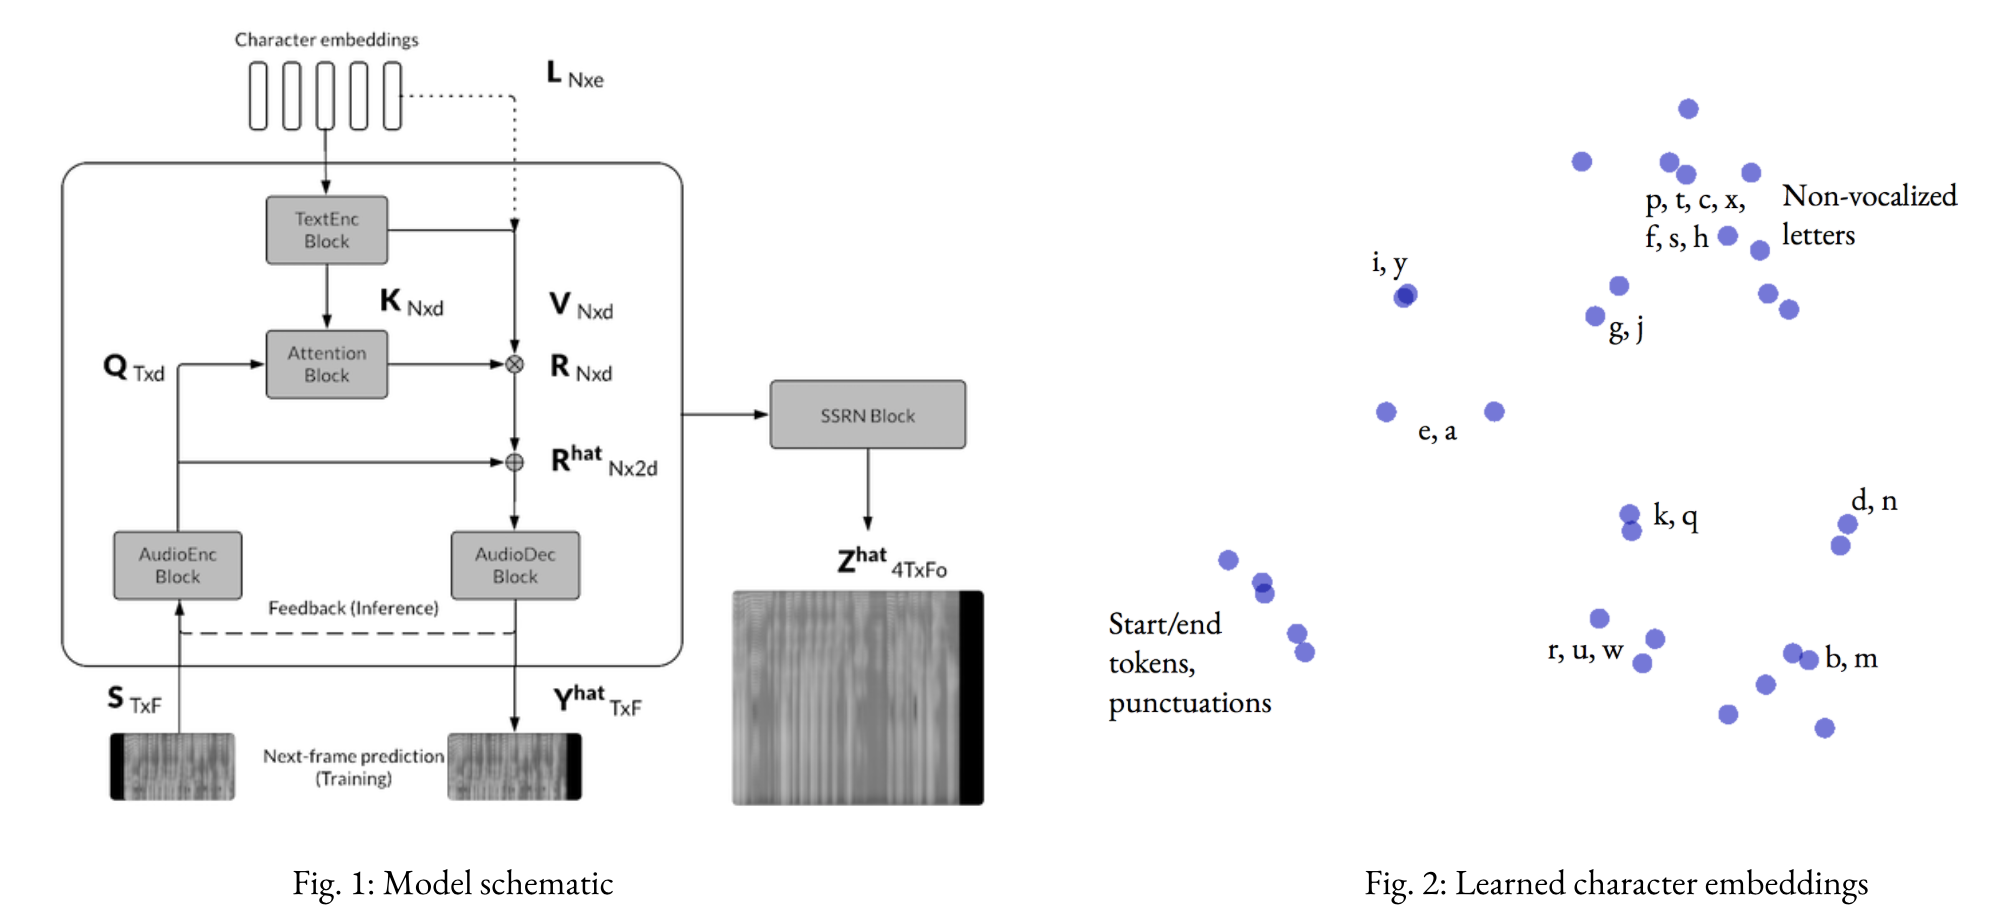
    Attention, I’m Trying to Speak: End-to-end speech synthesis (CS224n ’18)

    Implementation of a convolutional seq2seq-based text-to-speech model based on Tachibana et. al. (2017). Given a sequence of characters, the model predicts a sequence of spectrogram frames in two stages (Text2Mel and SSRN).

    As discussed in the report, we can get fairly decent audio quality with Text2Mel trained for 60k steps, SSRN for 100k steps. This corresponds to about (6+12) hours of training on a single Tesla K80 GPU on the LJ Speech Dataset.

    Pretrained Model: [download] Samples: [base-model-M4] [unsupervised-decoder-M1]

    For more details see: Poster Paper

    Model Schematic (left), Character Embeddings (right)

    Usage:

    Directory Structure

     - runs (contains checkpoints and params.json file for each different run. params.json specifies various hyperameters: see params-examples folder)
        - run1/params.json ...
     - src (implementation code package)
     - sentences (contains test sentences in .txt files)
     
    train.py
    evaluate.py
    synthesize.py
    
    ../data (directory containing data in format below)
     - FOLDER
        - train.csv, val.csv (files containing [wav_file_name|transcript|normalized_trascript] as in LJ-Speech dataset)
        - wavs (folder containing corresponding .wav audio files)
    

    Script files

    Run each file with python <script_file>.py -h to see usage details.

    python train.py <PATH_PARAMS.JSON> <MODE>
    python evaluate.py <PATH_PARAMS.JSON> <MODE> 
    python synthesize.py <TEXT2MEL_PARAMS> <SSRN_PARAMS> <SENTENCES.txt> (<N_ITER> <SAMPLE_DIR>)
    

    Notebooks:

    • Evaluation: Runs model predictions across the entire training and validation sets for different saved model checkpoints and saves the final results.
    • Demo: Interactively type input sentences and listen to the generated output audio.

    Further:

    • Training on different languages with smaller amount of data available Dataset of Indian languages
    • Exploring use of semi-supervised methods to accelerate training, using a pre-trained ‘audio-language model’ as initialization

    Referenced External Code:

    (From src/init.py) Utility Code has been referenced from the following sources, all other code is the author’s own:

    Visit original content creator repository https://github.com/akashmjn/cs224n-gpu-that-talks
  • taro-plugin-vue

    taro-plugin-vue

    A customized @vitejs/plugin-vue for building component libs for Taro.

    构建及打包 Taro 第三方 Vue 3.0 组件的定制版 @vitejs/plugin-vue

    背景

    taro-ui-vue3 时,其实已经踩过了 Taro Vue 第三方组件一些出现率比较频繁的坑,其中一个就是在 Taro 项目(h5 或小程序)中使用第三方组件时,发现无法解析某个组件,例如:[Vue-warn]: Failed to resolve component: swiper

    导致这一问题的原因,通常是编译配置的问题。Taro Vue 第三方组件库(基于 SFC template)的编译,应采用与 @tarojs/mini-runner@tarojs/webpack-runnervue-loader 编译配置相同的配置。

    为了避免 Taro Vue 第三方组件生态圈重复踩坑,现将 taro-ui-vue3 feat/sfc 分支 采用的编译配置提炼出来,方便 Taro Vue 第三方组件库开发者使用。

    taro-plugin-vue 其实是基于 @vitejs/plugin-vue 的一个 vite 插件,针对 Taro Vue 第三方组件的 SFC 模板编译进行配置,仅适用于采用 vite 构建和打包的场景。

    如果你熟悉 Taro 的 vue-loader 编译配置,亦可直接将相关配置作为参数传递给 @vitejs/plugin-vue 插件即可,无需使用 taro-plugin-vue 插件。

    安装

    yarn add -D taro-plugin-vue @vitejs/plugin-vue

    使用

    taro-plugin-vue@vitejs/plugin-vue 的参数 Option 的基础上新增了一个 h5?: boolean 项,用于控制编译的平台。用法和其他参数与 @vitejs/plugin-vue 相同。

    // vite.config.js
    const { vuePlugin } = require('taro-plugin-vue')
    
    export default {
      plugins: [
        // 编译至小程序平台
        vuePlugin() 
    
        // 编译至 h5 平台
        vuePlugin({ h5: true }) 
    
        // 自行配置编译参数,覆盖默认的编译配置
        vue({
          template: {
            transformAssetUrls: {
              video: ['src', 'poster'],
              'live-player': ['src'],
              // ...
            },
            compilerOptions: {
              isNativeTag: ...,
              nodeTransforms: [...]
            }
          }
        })
      ],
      //...
    }

    默认编译配置

    • h5

      const options: Options = {
        template: {
          ssr: false,
          transformAssetUrls: transformH5AssetUrls,
          compilerOptions: {
            mode: "module",
            optimizeImports: true,
            nodeTransforms: [transformH5Tags()] // 详见 src/transforms.ts
          }
        }
      }
    • 小程序

      // mini-apps
      const options: Options = {
        template: {
          ssr: false,
          transformAssetUrls: transformMiniappAssetUrls,
          compilerOptions: {
            mode: "module",
            optimizeImports: true,
            isNativeTag: isMiniappNativeTag // 详见 src/transforms.ts
          }
        }
      }

    其他用法

    本 repo 还导出了专门针对 Taro Vue 3.0 SFC 模板编译的一些 transform 函数,详情如下。

    这些函数可用于 @vitejs/plugin-vue 插件配置, 亦可用于 vue-loader 配置。

    /**
     * Transform mini-app asset urls.
     * @see https://github.com/NervJS/taro/blob/next/packages/taro-mini-runner/src/webpack/vue3.ts#L43-L50
     */
    export declare const transformMiniappAssetUrls
    
    /**
     * Transform H5 asset urls.
     * @see https://github.com/NervJS/taro/blob/next/packages/taro-webpack-runner/src/config/vue3.ts#L49-L62
     */
    export declare const transformH5AssetUrls
    
    /**
     * Declare native mini-app tags, so that miniapp native components
     * such as `picker`, `swiper`, `scroll-view` and etc.
     * will be treated as native tags, thus not to be resolved as components.
     */
    export declare function isMiniappNativeTag(tag: string): boolean;
    
    /**
     * Transform tags for h5 components.
     * For example, tag `view` will be transformed to `taro-view`,
     * so that it will be compiled to `resolveComponent('taro-view')`.
     */
    export declare function transformH5Tags(): NodeTransform;
    
    /**
     * Transform `taro-env` or `taroEnv` prop,
     * and remove node that is not for the specified platform
     * @param platform `'mini' | 'h5'`
     */
    export declare function transformEnv(platform?: 'mini' | 'h5'): NodeTransform;
    
    /**
     * Transform `onClick` to `onTap` on native tags.
     */
    export declare const transformClick: NodeTransform;

    Visit original content creator repository
    https://github.com/b2nil/taro-plugin-vue

  • juno

    logo
    Jupyter Notebook stays on macOS menubar.
    demo gif

    GitHub release GitHub license GitHub issues Join the chat at https://gitter.im/uetchy/juno Build Status

    Download

    See releases.

    Supported platforms

    • macOS

    Requirements

    • Jupyter Notebook

    How to install Jupyter Notebook

    brew install python3
    pip3 install jupyter
    jupyter notebook
    

    Config

    Juno config is located on ~/.junorc.json.

    default parameters are:

    {
      "jupyterCommand": "/usr/local/bin/jupyter-notebook", // executable path for Jupyter Notebook
      "jupyterPort": 8888, // server port
      "jupyterHome": "~", // root folder
      "openBrowserOnStartup": true, // set true if let Juno open browser after launch
      "preferLab": false // open Jupyter Lab instead of Jupyter Notebook
    }

    JupyterLab

    You can also specify /usr/local/bin/jupyter-lab to jupyterCommand to utilize Jupyter Lab (you may also want to install jupyterlab via pip3 install jupyterlab.)

    pyenv

    Put ~/.pyenv/shims/jupyter into jupyterCommand if you are on pyenv-enabled environment.

    Launch Juno from Terminal

    Add juno command to open Jupyter notebooks from Terminal. Put following code to your shell config file.

    juno() {
      open -a Juno $1
    }

    to open a notebook:

    juno "Untitled.ipynb"
    

    Bugs

    Feel free to report issues.

    Roadmap

    • Launch Juno in specified directory
    • Terminal integration
    • Test suite
    • Auto update

    Screenshots

    Development Installation

    npm install
    npm start
    

    Test & Build

    npm test
    npm run build
    

    License

    MIT © Yasuaki Uechi

    Visit original content creator repository https://github.com/uetchy/juno
  • england-school-admissions


    School Admissions Dashboard Logo

    England School Admissions

    An interactive dashboard to help parents in England understand the primary and secondary school admissions process.
    Explore the docs »
    View Dashboard · Project Wiki · Report Bug · Request Feature

    Table of Contents
    1. About The Project
    2. Roadmap
    3. Contributing
    4. License
    5. Contact
    6. Acknowledgments

    About The Project

    Applying for a place for your child at primary or secondary school in England can be a daunting task. In some regions, parents have a plethora of schools to choose from. Having options is no bad thing, but in order to make an informed choice parents need answers to questions such as:

    • How many preferences can I list on my application form?
    • What is the likelihood of getting an offer at my preferred school based on my circumstances?
    • Which schools are oversubscribed?
    • Which schools are the top performers in my area?

    This dashboard sets out to help parents answer those questions and more in order to better understand the landscape before submitting their application. The dashboard uses data published by UK Government on school admissions and performance at both primary and secondary level, and covers all local authorities in England.

    (back to top)

    Built With

    (back to top)

    Steps Taken

    1. Downloaded required data.
    2. Cleaned and modelled the data using R Tidyverse.
    3. Built the dashboard using Tableau Public.

    The project wiki contains more information about how this repo is structured and how the data was collected.

    (back to top)

    Roadmap

    • Show breakdown of admissions by criteria at a school level
    • Improve the aesthetics of the dashboard by using more sophisticated design elements such as custom backgrounds
    • Get feedback from parents who have used the dashboard

    See the open issues for a full list of proposed features (and known issues).

    (back to top)

    Contributing

    Contributions are what make the open source community such an amazing place to learn, inspire, and create. Any contributions you make are greatly appreciated.

    If you have a suggestion that would make this better, please fork the repo and create a pull request. You can also simply open an issue with the tag “enhancement”. Don’t forget to give the project a star! Thanks again!

    1. Fork the Project
    2. Create your Feature Branch (git checkout -b feature/AmazingFeature)
    3. Commit your Changes (git commit -m 'Add some AmazingFeature')
    4. Push to the Branch (git push origin feature/AmazingFeature)
    5. Open a Pull Request

    (back to top)

    License

    Distributed under the CC0 License. See LICENSE.txt for more information. All source data is licensed under the Open Government License 3.0.

    (back to top)

    Contact

    Clare Gibson – @surreydatagirlclarelgibson@gmail.com

    Project Link: https://github.com/clarelgibson/england-school-admissions

    (back to top)

    Acknowledgments

    (back to top)

    Visit original content creator repository https://github.com/clarelgibson/england-school-admissions
  • stage_4_gm

    Table of content

    Introduction

    Natural Language Inference (NLI) task

    The data (SNLI dataset)

    Command lines (How to use this git)

    First of all make sure to use the environnement.

    Virtualenv – pip environment (recommended)

    Path to $VENV should be saved in ~/.bashrc

    # Specify path to venv
    export VENV=path/to/venv
    echo $VENV
    
    # Create venv
    python -m venv $VENV/bert
    
    # Activate venv
    source $VENV/bert/bin/activate
    
    # Replicate on cpu
    pip install -r python_env/requirements.cpu.txt --no-cache-dir
    
    # Replicate on gpu
    pip install -r python_env/requirements.gpu.txt --no-cache-dir
    
    # Exit venv
    deactivate
    

    Virtualenv – conda environment

    • if you are using conda you can use the two following command :

    conda env create -f python_env/environment.yml
    conda activate nlp
    

    conda create --name nlp --file requirements.txt
    conda activate nlp
    

    WARNING: All the environments were exported on windows 11 -64 bits.

    Download the data

    To download the snli and e-snli data the command line is the following :

    python data_download.py
    

    All the data downloaded in this part will be stored in the folder : .cache\raw_data

    Pytorch lightning training script

    To run the training_bert.py for some tests we used the following command line :

    python training_bert.py --epoch 3 --batch_size 4 --nb_data 16 --experiment bert --version 0
    
    # Or by shorthand
    python training_bert.py -e 3 -b 4 -n 16 --experiment bert --version 0
    

    The objective was only to see the behaviour of the training with a small amount of data. (Spot some mistakes and see the
    behaviour of the loss)

    To visualize our training performance we used the tool tensorboard. The default logdir in
    in .cache/logs/$EXPERIMENT
    where $EXPERIMENT is specified in --experiment. The log could be changed using flag --logdir or shorthand -s

    tensorboard --logdir .cache/logs/$EXPERIMENT
    

    Visit original content creator repository
    https://github.com/lolofo/stage_4_gm

  • pybrainlife

    Abcdspec-compliant

    pybrainlife

    This repository contains the python package for collecting, collating, manipulating, analyzing, and visualizing MRI data generated on brainlife.io. Designed to used within the brainlife.io Analysis tab Jupyter notebooks, can be installed as a pypi package to your local machine.

    Authors

    Contributors

    Funding

    NSF-BCS-1734853 NSF-BCS-1636893

    Citations

    Please cite the following articles when publishing papers that used data, code or other resources created by the brainlife.io community.

    1. Hayashi, S., Caron, B., et al. In review

    Directory structure

    pybrainlife
    ├── dist
    │   ├── pybrainlife-1.0.0-py3-none-any.whl
    │   └── pybrainlife-1.0.0.tar.gz
    ├── poetry.lock
    ├── pybrainlife
    │   ├── data
    │   │   ├── collect.py
    │   │   └── manipulate.py
    │   ├── __init__.py
    │   └── vis
    │       ├── plots.py
    │       └── __pycache__
    │           ├── data.cpython-38.pyc
    │           └── plots.cpython-38.pyc
    ├── pyproject.toml
    ├── README.md
    └── tests
        ├── __init__.py
        └── test_pybrainlife.py
    

    Installing locally

    This package can be installed locally via PyPi using the following command:

    pip install pybrainlife
    

    Dependencies

    This package requires the following libraries.

    • python = “3.8”
    • numpy = “^1.9.3”
    • bctpy = “^0.5.2”
    • seaborn = “^0.11.2”
    • jgf = “^0.2.2”
    • scikit-learn = “^1.0.2”
    • pandas = “^1.4.2”
    • scipy = “^1.8.0”
    • requests = “^2.27.1”

    Library of Modules for Loading Data and Analyzing Data from brainlife.io

    2023 The University of Texas at Austin

    Visit original content creator repository https://github.com/brainlife/pybrainlife
  • ever-node-tools

    Visit original content creator repository
    https://github.com/Everscale-Network/ever-node-tools

  • indelope

    indelope: find indels and SVs too small for structural variant callers and too large for GATK

    indelope was started with the goal of increasing the diagnostic rate in exomes. To do this it must be:

    • fast : ~2.5 CPU-minutes per exome (25% slower than samtools view -c)
    • easy-to-use : goes from BAM to VCF in a single command.
    • novel : it does local assembly and then aligns assembled contigs to the genome to determine the event, and then does k-mer counting (not alignment) to genotype without k-mer tables.
    • accurate : because of the genotyping method, we know that called variants are not present in the reference.

    These features will help ensure that it is actually used (fast, easy-to-use) and that it finds new and valid variation.

    As of November 2017, indelope is working — it finds large indels that are clearly valid by visual inspection that are missed by GATK/freebayes/lumpy.

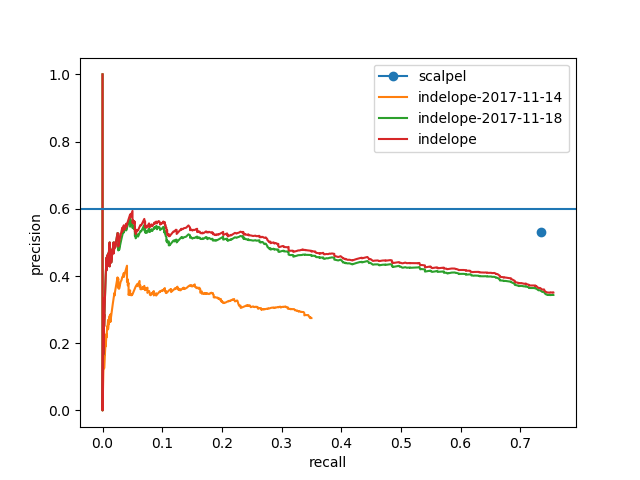
    As of November 2017, I am still tuning. Here is a look at the progress:

    image

    Note that while indelope is steadily improving, it still is not as good as scalpel. More improvements are coming soon.

    indelope also works on whole genomes, but, for now, that is not the target use-case.

    how it works

    indelope sweeps over a single bam and finds regions that are likely to harbor indels–reads that have more than 1 cigar event and split-reads (work on split reads is in progress). As it finds these it increments a counter for the genomic position of the event. Upon finding a gap in coverage, it goes back, finds any previous position with sufficient evidence (this is a parameter) of an event, gathers reads that have been aligned across that genomic position (and unaligned reads from that region) and does assembly on those reads. It then aligns the assembled contigs to the genome using ksw2 and uses the CIGAR to determine the event as it’s represented in the VCF. Any event will result in a novel k-mer not present in the reference genome; indelope gets the k-mer of the reference genome at the event and the novel k-mer of the alternate event. It again iterates through the reads that were originally aligned to the event and counts reference and alternate k-mers. Those counts are used for genotyping. Note that this reduces reference bias because we are aligning a contig (often >400 bases) to the genome and never re-aligning the actual reads.

    As indelope sweeps across the genome, it keeps the reads for each chunk in memory. A chunk bound is defined by a gap in coverage; this occurs frequently enough that the memory use is negligible. Once a new chunk is reached, all events from the previous chunk are called and then those reads are discarded. This method, along with the assembly method make indelope extremely fast–given 2 BAM decompression threads, it can call variants in an exome in ~ 1 minute (2.5 CPU-minutes).

    assembly

    A read (contig) slides along another read (contig) to find the offset with the most matches. At each offset, if more than $n mismatches are found, the next offset is attempted. This is efficient enough that a random read to a random (non-matching) contig of length $N will incur ~ 1.25 * $N equality (char vs. char) tests.

    Within each contig indelope tracks the number of reads supporting each base. Given a sufficient number of reads supporting a contig, it can account for sequencing errors with a simple voting scheme. That is: if contig a, position x has more than 7 supporting reads and contig b has fewer than 3 supporting reads (and we know that otherwise, a and b have no mismatches), we can vote to set the mismatch in b to the apparent match in a. This allows us to first create contigs allowing no mismatches within the reads and then to combine and extend contigs using this voting method.

    installation and usage

    get a binary from here and make sure that libhts.so is in your LD_LIBRARY_PATH

    then run ./indelope -h for usage. recommended is:

    indelope --min-event-len 5 --min-reads 5 $fasta $bam > $vcf
    

    to do

    • somatic mode / filter mode. allow filtering on a set of k-mers from a parental genome (parent for mendelian context or normal for somatic variation).

    • use SA tag. (and possibly discordant reads)

    see also

    • svaba does local assembly, but then genotypes by alignment to those assemblies. It is slower than indelope but it is an extremely useful tool and has a series of careful and insightful analyses in its paper. (highly recommend!!)

    • rufus does k-mer based variant detection; Andrew described to me the RUFUS assembly method that inspired the one now used in indelope.

    • lancet, scalpel, mate-clever, and prosic2 are all great tools that are similar in spirit that are worth checking out (of those, AFAICT, only scalpel has a focus on germ-line variation).

    notes and TODO

    need a better way to combine contigs

    sometimes, can have 2 contigs, each of length ~ 80 and they overlap for 60 bases but cutoff is e.g. 65. Need a way to recover this as it happens a lot in low-coverage scenarios. maybe it can first combine, then trim (currently, it’s trim, combine). This should also allow more permissive overlaps if the correction list is empty.

    track a read/contig matches multiple contigs with the same match, mismatch count

    CHM1/13 truth-set

    https://www.ncbi.nlm.nih.gov/biosample?Db=biosample&DbFrom=bioproject&Cmd=Link&LinkName=bioproject_biosample&LinkReadableName=BioSample&ordinalpos=1&IdsFromResult=316945

    ~/.aspera/connect/bin/ascp -P33001 -QT -L- -l 1000M -i ~/.aspera/connect/etc/asperaweb_id_dsa.openssh era-fasp@fasp.sra.ebi.ac.uk:/vol1/ERA596/ERA596286/bam/CHM1_1.bam . ~/.aspera/connect/bin/ascp -P33001 -QT -L- -l 1000M -i ~/.aspera/connect/etc/asperaweb_id_dsa.openssh era-fasp@fasp.sra.ebi.ac.uk:/vol1/ERA596/ERA596286/bam/CHM13_1.bam .

    ftp://ftp.ncbi.nlm.nih.gov/pub/dbVar/data/Homo_sapiens/by_study/nstd137_Huddleston_et_al_2016/genotype/CHM1_final_genotypes.annotated.vcf.gz ftp://ftp.ncbi.nlm.nih.gov/pub/dbVar/data/Homo_sapiens/by_study/nstd137_Huddleston_et_al_2016/genotype/CHM13_final_genotypes.annotated.vcf.gz ftp://ftp.ncbi.nlm.nih.gov/pub/dbVar/data/Homo_sapiens/by_study/nstd137_Huddleston_et_al_2016/genotype/

    contigs

    min_overlap in contig::best_match should be a float between 0 and 1 that will make sure that at least that portion of the shortest contig overlaps the other.

    Visit original content creator repository https://github.com/brentp/indelope
  • RosettaStone

    Visit original content creator repository
    https://github.com/JinhaJjing/RosettaStone